# app
# About LM Studio
> Learn how to run Llama, DeepSeek, Qwen, Phi, and other LLMs locally with LM Studio.
LM Studio is a desktop app for developing and experimenting with LLMs locally on your computer.
**Key functionality**
1. A desktop application for running local LLMs
2. A familiar chat interface
3. Search & download functionality (via Hugging Face 🤗)
4. A local server that can listen on OpenAI-like endpoints
5. Systems for managing local models and configurations
### How do I install LM Studio?
Head over to the [Downloads page](/download) and download an installer for your operating system.
LM Studio is available for macOS, Windows, and Linux.
### System requirements
LM Studio generally supports Apple Silicon Macs, x64/ARM64 Windows PCs, and x64 Linux PCs.
Consult the [System Requirements](app/system-requirements) page for more detailed information.
### Run llama.cpp (GGUF) or MLX models
LM Studio supports running LLMs on Mac, Windows, and Linux using [`llama.cpp`](https://github.com/ggerganov/llama.cpp).
On Apple Silicon Macs, LM Studio also supports running LLMs using Apple's [`MLX`](https://github.com/ml-explore/mlx).
To install or manage LM Runtimes, press `⌘` `Shift` `R` on Mac or `Ctrl` `Shift` `R` on Windows/Linux.
### Run an LLM like `Llama`, `Phi`, or `DeepSeek R1` on your computer
To run an LLM on your computer you first need to download the model weights.
You can do this right within LM Studio! See [Download an LLM](app/basics/download-model) for guidance.
### Chat with documents entirely offline on your computer
You can attach documents to your chat messages and interact with them entirely offline, also known as "RAG".
Read more about how to use this feature in the [Chat with Documents](app/basics/rag) guide.
### Use LM Studio's API from your own apps and scripts
LM Studio provides a REST API that you can use to interact with your local models from your own apps and scripts.
- [OpenAI Compatibility API](api/openai-api)
- [LM Studio REST API (beta)](api/rest-api)
### Community
Join the LM Studio community on [Discord](https://discord.gg/aPQfnNkxGC) to ask questions, share knowledge, and get help from other users and the LM Studio team.
## API Changelog
> LM Studio API Changelog - new features and updates
###### [👾 LM Studio 0.3.15](/blog/lmstudio-v0.3.15) • 2025-04-24
### Improved Tool Use API Support
OpenAI-like REST API now supports the `tool_choice` parameter:
```json
{
"tool_choice": "auto" // or "none", "required"
}
```
- `"tool_choice": "none"` — Model will not call tools
- `"tool_choice": "auto"` — Model decides
- `"tool_choice": "required"` — Model must call tools (llama.cpp only)
Chunked responses now set `"finish_reason": "tool_calls"` when appropriate.
---
###### [👾 LM Studio 0.3.14](/blog/lmstudio-v0.3.14) • 2025-03-27
### [API/SDK] Preset Support
RESTful API and SDKs support specifying presets in requests.
_(example needed)_
###### [👾 LM Studio 0.3.10](/blog/lmstudio-v0.3.10) • 2025-02-18
### Speculative Decoding API
Enable speculative decoding in API requests with `"draft_model"`:
```json
{
"model": "deepseek-r1-distill-qwen-7b",
"draft_model": "deepseek-r1-distill-qwen-0.5b",
"messages": [ ... ]
}
```
Responses now include a `stats` object for speculative decoding:
```json
"stats": {
"tokens_per_second": ...,
"draft_model": "...",
"total_draft_tokens_count": ...,
"accepted_draft_tokens_count": ...,
"rejected_draft_tokens_count": ...,
"ignored_draft_tokens_count": ...
}
```
---
###### [👾 LM Studio 0.3.9](blog/lmstudio-v0.3.9) • 2025-01-30
### Idle TTL and Auto Evict
Set a TTL (in seconds) for models loaded via API requests (docs article: [Idle TTL and Auto-Evict](/docs/api/ttl-and-auto-evict))
```diff
curl http://localhost:1234/api/v0/chat/completions \
-H "Content-Type: application/json" \
-d '{
"model": "deepseek-r1-distill-qwen-7b",
"messages": [ ... ]
+ "ttl": 300,
}'
```
With `lms`:
```
lms load --ttl
```
### Separate `reasoning_content` in Chat Completion responses
For DeepSeek R1 models, get reasoning content in a separate field. See more [here](/blog/lmstudio-v0.3.9#separate-reasoningcontent-in-chat-completion-responses).
Turn this on in App Settings > Developer.
---
###### [👾 LM Studio 0.3.6](blog/lmstudio-v0.3.6) • 2025-01-06
### Tool and Function Calling API
Use any LLM that supports Tool Use and Function Calling through the OpenAI-like API.
Docs: [Tool Use and Function Calling](/docs/api/tools).
---
###### [👾 LM Studio 0.3.5](blog/lmstudio-v0.3.5) • 2024-10-22
### Introducing `lms get`: download models from the terminal
You can now download models directly from the terminal using a keyword
```bash
lms get deepseek-r1
```
or a full Hugging Face URL
```bash
lms get
```
To filter for MLX models only, add `--mlx` to the command.
```bash
lms get deepseek-r1 --mlx
```
## System Requirements
> Supported CPU, GPU types for LM Studio on Mac (M1/M2/M3/M4), Windows (x64/ARM), and Linux (x64)
Minimum system requirements for running LM Studio.
###### We are actively working to add support for more platforms and configurations. If you noticed an error in this page, please let us know by opening an issue on [github](https://github.com/lmstudio-ai/lmstudio-bug-tracker).
### macOS
- Chip: Apple Silicon (M1/M2/M3/M4).
- macOS 13.4 or newer is required.
- For MLX models, macOS 14.0 or newer is required.
- 16GB+ RAM recommended.
- You may still be able to use LM Studio on 8GB Macs, but stick to smaller models and modest context sizes.
- Intel-based Macs are currently not supported. Chime in [here](https://github.com/lmstudio-ai/lmstudio-bug-tracker/issues/9) if you are interested in this.
### Windows
LM Studio is supported on both x64 and ARM (Snapdragon X Elite) based systems.
- CPU: AVX2 instruction set support is required (for x64)
- RAM: LLMs can consume a lot of RAM. At least 16GB of RAM is recommended.
- GPU: at least 4GB of dedicated VRAM is recommended.
### Linux
- LM Studio for Linux is distributed as an AppImage.
- Ubuntu 20.04 or newer is required
- x64 only, aarch64 not yet supported
- Ubuntu versions newer than 22 are not well tested. Let us know if you're running into issues by opening a bug [here](https://github.com/lmstudio-ai/lmstudio-bug-tracker).
- CPU:
- LM Studio ships with AVX2 support by default
## Offline Operation
> LM Studio can operate entirely offline, just make sure to get some model files first.
```lms_notice
In general, LM Studio does not require the internet in order to work. This includes core functions like chatting with models, chatting with documents, or running a local server, none of which require the internet.
```
### Operations that do NOT require connectivity
#### Using downloaded LLMs
Once you have an LLM onto your machine, the model will run locally and you should be good to go entirely offline. Nothing you enter into LM Studio when chatting with LLMs leaves your device.
#### Chatting with documents (RAG)
When you drag and drop a document into LM Studio to chat with it or perform RAG, that document stays on your machine. All document processing is done locally, and nothing you upload into LM Studio leaves the application.
#### Running a local server
LM Studio can be used as a server to provide LLM inferencing on localhost or the local network. Requests to LM Studio use OpenAI endpoints and return OpenAI-like response objects, but stay local.
### Operations that require connectivity
Several operations, described below, rely on internet connectivity. Once you get an LLM onto your machine, you should be good to go entirely offline.
#### Searching for models
When you search for models in the Discover tab, LM Studio makes network requests (e.g. to huggingface.co). Search will not work without internet connection.
#### Downloading new models
In order to download models you need a stable (and decently fast) internet connection. You can also 'sideload' models (use models that were procured outside the app). See instructions for [sideloading models](advanced/sideload).
#### Discover tab's model catalog
Any given version of LM Studio ships with an initial model catalog built-in. The entries in the catalog are typically the state of the online catalog near the moment we cut the release. However, in order to show stats and download options for each model, we need to make network requests (e.g. to huggingface.co).
#### Downloading runtimes
[LM Runtimes](advanced/lm-runtimes) are individually packaged software libraries, or LLM engines, that allow running certain formats of models (e.g. `llama.cpp`). As of LM Studio 0.3.0 (read the [announcement](https://lmstudio.ai/blog/lmstudio-v0.3.0)) it's easy to download and even hot-swap runtimes without a full LM Studio update. To check for available runtimes, and to download them, we need to make network requests.
#### Checking for app updates
On macOS and Windows, LM Studio has a built-in app updater that's capable. The linux in-app updater [is in the works](https://github.com/lmstudio-ai/lmstudio-bug-tracker/issues/89). When you open LM Studio, the app updater will make a network request to check if there are any new updates available. If there's a new version, the app will show you a notification to update now or later.
Without internet connectivity you will not be able to update the app via the in-app updater.
## basics
## Get started with LM Studio
> Download and run Large Language Models (LLMs) like Llama 3.1, Phi-3, and Gemma 2 locally in LM Studio
You can use openly available Large Language Models (LLMs) like Llama 3.1, Phi-3, and Gemma 2 locally in LM Studio, leveraging your computer's CPU and optionally the GPU.
Double check computer meets the minimum [system requirements](/docs/system-requirements).
```lms_info
You might sometimes see terms such as `open-source models` or `open-weights models`. Different models might be released under different licenses and varying degrees of 'openness'. In order to run a model locally, you need to be able to get access to its "weights", often distributed as one or more files that end with `.gguf`, `.safetensors` etc.
```
## Getting up and running
First, **install the latest version of LM Studio**. You can get it from [here](/download).
Once you're all set up, you need to **download your first LLM**.
### 1. Download an LLM to your computer
Head over to the Discover tab to download models. Pick one of the curated options or search for models by search query (e.g. `"Llama"`). See more in-depth information about downloading models [here](/docs/basics/download-models).
### 2. Load a model to memory
Head over to the **Chat** tab, and
1. Open the model loader
2. Select one of the models you downloaded (or [sideloaded](/docs/advanced/sideload)).
3. Optionally, choose load configuration parameters.
##### What does loading a model mean?
Loading a model typically means allocating memory to be able to accomodate the model's weights and other parameters in your computer's RAM.
### 3. Chat!
Once the model is loaded, you can start a back-and-forth conversation with the model in the Chat tab.
### Community
Chat with other LM Studio users, discuss LLMs, hardware, and more on the [LM Studio Discord server](https://discord.gg/aPQfnNkxGC).
### Manage chats
> Manage conversation threads with LLMs
LM Studio has a ChatGPT-like interface for chatting with local LLMs. You can create many different conversation threads and manage them in folders.
### Create a new chat
You can create a new chat by clicking the "+" button or by using a keyboard shortcut: `⌘` + `N` on Mac, or `ctrl` + `N` on Windows / Linux.
### Create a folder
Create a new folder by clicking the new folder button or by pressing: `⌘` + `shift` + `N` on Mac, or `ctrl` + `shift` + `N` on Windows / Linux.
### Drag and drop
You can drag and drop chats in and out of folders, and even drag folders into folders!
### Duplicate chats
You can duplicate a whole chat conversation by clicking the `•••` menu and selecting "Duplicate". If the chat has any files in it, they will be duplicated too.
## FAQ
#### Where are chats stored in the file system?
Right-click on a chat and choose "Reveal in Finder" / "Show in File Explorer".
Conversations are stored in JSON format. It is NOT recommended to edit them manually, nor to rely on their structure.
#### Does the model learn from chats?
The model doesn't 'learn' from chats. The model only 'knows' the content that is present in the chat or is provided to it via configuration options such as the "system prompt".
## Conversations folder filesystem path
Mac / Linux:
```shell
~/.lmstudio/conversations/
```
Windows:
```ps
%USERPROFILE%\.lmstudio\conversations
```
### Community
Chat with other LM Studio users, discuss LLMs, hardware, and more on the [LM Studio Discord server](https://discord.gg/aPQfnNkxGC).
### Download an LLM
> Discover and download supported LLMs in LM Studio
LM Studio comes with a built-in model downloader that let's you download any supported model from [Hugging Face](https://huggingface.co).
### Searching for models
You can search for models by keyword (e.g. `llama`, `gemma`, `lmstudio`), or by providing a specific `user/model` string. You can even insert full Hugging Face URLs into the search bar!
###### Pro tip: you can jump to the Discover tab from anywhere by pressing `⌘` + `2` on Mac, or `ctrl` + `2` on Windows / Linux.
### Which download option to choose?
You will often see several options for any given model named things like `Q3_K_S`, `Q_8` etc. These are all copies of the same model, provided in varying degrees of fidelity. The `Q` represents a technique called "Quantization", which roughly means compressing model files in size, while giving up some degree of quality.
Choose a 4-bit option or higher if your machine is capable enough for running it.
`Advanced`
### Changing the models directory
You can change the models directory by heading to My Models
### Community
Chat with other LM Studio users, discuss LLMs, hardware, and more on the [LM Studio Discord server](https://discord.gg/aPQfnNkxGC).
### Chat with Documents
> How to provide local documents to an LLM as additional context
You can attach document files (`.docx`, `.pdf`, `.txt`) to chat sessions in LM Studio.
This will provide additional context to LLMs you chat with through the app.
### Terminology
- **Retrieval**: Identifying relevant portion of a long source document
- **Query**: The input to the retrieval operation
- **RAG**: Retrieval-Augmented Generation\*
- **Context**: the 'working memory' of an LLM. Often limited at a few thousand words\*\*
###### \* In this context, 'Generation' means the output of the LLM.
###### \*\* A recent trend in newer LLMs is support for larger context sizes.
###### Context sizes are measured in "tokens". One token is often about 3/4 of a word.
### RAG vs. Full document 'in context'
If the document is short enough (i.e., if it fits in the model's context), LM Studio will add the file contents to the conversation in full. This is particularly useful for models that support longer context sizes such as Meta's Llama 3.1 and Mistral Nemo.
If the document is very long, LM Studio will opt into using "Retrieval Augmented Generation", frequently referred to as "RAG". RAG means attempting to fish out relevant bits of a very long document (or several documents) and providing them to the model for reference. This technique sometimes works really well, but sometimes it requires some tuning and experimentation.
### Tip for successful RAG
provide as much context in your query as possible. Mention terms, ideas, and words you expect to be in the relevant source material. This will often increase the chance the system will provide useful context to the LLM. As always, experimentation is the best way to find what works best.
### Import Models
> Use model files you've downloaded outside of LM Studio
You can use compatible models you've downloaded outside of LM Studio by placing them in the expected directory structure.
### Use `lms import` (experimental)
To import a `GGUF` model you've downloaded outside of LM Studio, run the following command in your terminal:
```bash
lms import
```
###### Follow the interactive prompt to complete the import process.
### LM Studio's expected models directory structure
LM Studio aims to preserves the directory structure of models downloaded from Hugging Face. The expected directory structure is as follows:
```xml
~/.lmstudio/models/
└── publisher/
└── model/
└── model-file.gguf
```
For example, if you have a model named `ocelot-v1` published by `infra-ai`, the structure would look like this:
```xml
~/.lmstudio/models/
└── infra-ai/
└── ocelot-v1/
└── ocelot-v1-instruct-q4_0.gguf
```
### Community
Chat with other LM Studio users, discuss LLMs, hardware, and more on the [LM Studio Discord server](https://discord.gg/aPQfnNkxGC).
## presets
## Config Presets
> Save your system prompts and other parameters as Presets for easy reuse across chats.
Presets are a way to bundle together a system prompt and other parameters into a single configuration that can be easily reused across different chats.
New in 0.3.15: You can [import](/docs/app/presets/import) Presets from file or URL, and even [publish](/docs/app/presets/publish) your own Presets to share with others on to the LM Studio Hub.
## Saving, resetting, and deselecting Presets
Below is the anatomy of the Preset manager:
## Importing, Publishing, and Updating Downloaded Presets
Presets are JSON files. You can share them by sending around the JSON, or you can share them by publishing them to the LM Studio Hub.
You can also import Presets from other users by URL. See the [Import](/docs/app/presets/import) and [Publish](/docs/app/presets/publish) sections for more details.
## Example: Build your own Prompt Library
You can create your own prompt library by using Presets.
In addition to system prompts, every parameter under the Advanced Configuration sidebar can be recorded in a named Preset.
For example, you might want to always use a certain Temperature, Top P, or Max Tokens for a particular use case. You can save these settings as a Preset (with or without a system prompt) and easily switch between them.
#### The Use Case for Presets
- Save your system prompts, inference parameters as a named `Preset`.
- Easily switch between different use cases, such as reasoning, creative writing, multi-turn conversations, or brainstorming.
## Where Presets are stored
Presets are stored in the following directory:
#### macOS or Linux
```xml
~/.lmstudio/config-presets
```
#### Windows
```xml
%USERPROFILE%\.lmstudio\config-presets
```
### Migration from LM Studio 0.2.\* Presets
- Presets you've saved in LM Studio 0.2.\* are automatically readable in 0.3.3 with no migration step needed.
- If you save **new changes** in a **legacy preset**, it'll be **copied** to a new format upon save.
- The old files are NOT deleted.
- Notable difference: Load parameters are not included in the new preset format.
- Favor editing the model's default config in My Models. See [how to do it here](/docs/configuration/per-model).
### Community
Chat with other LM Studio users, discuss LLMs, hardware, and more on the [LM Studio Discord server](https://discord.gg/aPQfnNkxGC).
### Importing and Sharing
> You can import preset files directly from disk, or pull presets made by others via URL.
You can import preset by file or URL. This is useful for sharing presets with others, or for importing presets from other users.
# Import Presets
First, click the presets dropdown in the sidebar. You will see a list of your presets along with 2 buttons: `+ New Preset` and `Import`.
Click the `Import` button to import a preset.
## Import Presets from File
Once you click the Import button, you can select the source of the preset you want to import. You can either import from a file or from a URL.
## Import Presets from URL
Presets that are [published](/docs/app/presets/publish) to the LM Studio Hub can be imported by providing their URL.
Importing public presets does not require logging in within LM Studio.
### Using `lms` CLI
You can also use the CLI to import presets from URL. This is useful for sharing presets with others.
```
lms get {author}/{preset-name}
```
Example:
```bash
lms get neil/qwen3-thinking
```
### Find your config-presets directory
LM Studio manages config presets on disk. Presets are local and private by default. You or others can choose to share them by sharing the file.
Click on the `•••` button in the Preset dropdown and select "Reveal in Finder" (or "Show in Explorer" on Windows).
This will download the preset file and automatically surface it in the preset dropdown in the app.
### Where Hub shared presets are stored
Presets you share, and ones you download from the LM Studio Hub are saved in `~/.lmstudio/hub` on macOS and Linux, or `%USERPROFILE%\.lmstudio\hub` on Windows.
### Publish Your Presets
> Publish your Presets to the LM Studio Hub. Share your Presets with the community or with your colleagues.
`Feature In Preview`
Starting LM Studio 0.3.15, you can publish your Presets to the LM Studio community. This allows you to share your Presets with others and import Presets from other users.
This feature is early and we would love to hear your feedback. Please report bugs and feedback to bugs@lmstudio.ai.
---
## Step 1: Click the Publish Button
Identify the Preset you want to publish in the Preset dropdown. Click the `•••` button and select "Publish" from the menu.
## Step 2: Set the Preset Details
You will be prompted to set the details of your Preset. This includes the name (slug) and optional description.
Community presets are public and can be used by anyone on the internet!
#### Privacy and Terms
For good measure, visit the [Privacy Policy](https://lmstudio.ai/hub-privacy) and [Terms of Service](https://lmstudio.ai/hub-terms) to understand what's suitable to share on the Hub, and how data is handled. Community presets are public and visible to everyone. Make sure you agree to what these documents say before publishing your Preset.
### Pull Updates
> How to pull the latest revisions of your Presets, or presets you have imported from others.
`Feature In Preview`
You can pull the latest revisions of your Presets, or presets you have imported from others. This is useful for keeping your Presets up to date with the latest changes.
## How to Pull Updates
Click the `•••` button in the Preset dropdown and select "Pull" from the menu.
## Your Presets vs Others'
Both your published Presets and other downloaded Presets can be pulled and updated the same way.
### Push New Revisions
> Publish new revisions of your Presets to the LM Studio Hub.
`Feature In Preview`
Starting LM Studio 0.3.15, you can publish your Presets to the LM Studio community. This allows you to share your Presets with others and import Presets from other users.
This feature is early and we would love to hear your feedback. Please report bugs and feedback to bugs@lmstudio.ai.
---
## Published Presets
Presets you share on the LM Studio Hub can be updated.
## Step 1: Make Changes and Commit
Make any changes to your Preset, both in parameters that are already included in the Preset, or by adding new parameters.
## Step 2: Click the Push Button
Once changes are committed, you will see a `Push` button. Click it to push your changes to the Hub.
Pushing changes will result in a new revision of your Preset on the Hub.
## api
## LM Studio as a Local LLM API Server
> Run an LLM API server on localhost with LM Studio
You can serve local LLMs from LM Studio's Developer tab, either on localhost or on the network.
LM Studio's APIs can be used through an [OpenAI compatibility mode](/docs/app/api/endpoints/openai), enhanced [REST API](/docs/api/rest-api/endpoints/endpoints), or through a client library like [lmstudio-js](/docs/api/sdk).
#### API options
- [TypeScript SDK](/docs/typescript) - `lmstudio-js`
- [Python SDK](/docs/python) - `lmstudio-python`
- [LM Studio REST API](/docs/app/api/endpoints/rest) (new, in beta)
- [OpenAI Compatibility endpoints](/docs/app/api/endpoints/openai)
### Run LM Studio as a service (headless)
> GUI-less operation of LM Studio: run in the background, start on machine login, and load models on demand
`Advanced`
Starting in v[0.3.5](/blog/lmstudio-v0.3.5), LM Studio can be run as a service without the GUI. This is useful for running LM Studio on a server or in the background on your local machine.
### Run LM Studio as a service
Running LM Studio as a service consists of several new features intended to make it more efficient to use LM Studio as a developer tool.
1. The ability to run LM Studio without the GUI
2. The ability to start the LM Studio LLM server on machine login, headlessly
3. On-demand model loading
### Run the LLM service on machine login
To enable this, head to app settings (`Cmd` / `Ctrl` + `,`) and check the box to run the LLM server on login.
When this setting is enabled, exiting the app will minimize it to the system tray, and the LLM server will continue to run in the background.
### Just-In-Time (JIT) model loading for OpenAI endpoints
Useful when utilizing LM Studio as an LLM service with other frontends or applications.
#### When JIT loading is ON:
- Call to `/v1/models` will return all downloaded models, not only the ones loaded into memory
- Calls to inference endpoints will load the model into memory if it's not already loaded
#### When JIT loading is OFF:
- Call to `/v1/models` will return only the models loaded into memory
- You have to first load the model into memory before being able to use it
##### What about auto unloading?
As of LM Studio 0.3.5, auto unloading is not yet in place. Models that are loaded via JIT loading will remain in memory until you unload them.
We expect to implement more sophisticated memory management in the near future. Let us know if you have any feedback or suggestions.
### Auto Server Start
Your last server state will be saved and restored on app or service launch.
To achieve this programmatically, you can use the following command:
```bash
lms server start
```
```lms_protip
If you haven't already, bootstrap `lms` on your machine by following the instructions [here](/docs/cli).
```
### Community
Chat with other LM Studio developers, discuss LLMs, hardware, and more on the [LM Studio Discord server](https://discord.gg/aPQfnNkxGC).
Please report bugs and issues in the [lmstudio-bug-tracker](https://github.com/lmstudio-ai/lmstudio-bug-tracker/issues) GitHub repository.
### Idle TTL and Auto-Evict
> Optionally auto-unload idle models after a certain amount of time (TTL)
```lms_noticechill
ℹ️ Requires LM Studio 0.3.9 (b1), currently in beta. Download from [here](https://lmstudio.ai/beta-releases)
```
LM Studio 0.3.9 (b1) introduces the ability to set a _time-to-live_ (TTL) for API models, and optionally auto-evict previously loaded models before loading new ones.
These features complement LM Studio's [on-demand model loading (JIT)](https://lmstudio.ai/blog/lmstudio-v0.3.5#on-demand-model-loading) to automate efficient memory management and reduce the need for manual intervention.
## Background
- `JIT loading` makes it easy to use your LM Studio models in other apps: you don't need to manually load the model first before being able to use it. However, this also means that models can stay loaded in memory even when they're not being used. `[Default: enabled]`
- (New) `Idle TTL` (technically: Time-To-Live) defines how long a model can stay loaded in memory without receiving any requests. When the TTL expires, the model is automatically unloaded from memory. You can set a TTL using the `ttl` field in your request payload. `[Default: 60 minutes]`
- (New) `Auto-Evict` is a feature that unloads previously JIT loaded models before loading new ones. This enables easy switching between models from client apps without having to manually unload them first. You can enable or disable this feature in Developer tab > Server Settings. `[Default: enabled]`
## Idle TTL
**Use case**: imagine you're using an app like [Zed](https://github.com/zed-industries/zed/blob/main/crates/lmstudio/src/lmstudio.rs#L340), [Cline](https://github.com/cline/cline/blob/main/src/api/providers/lmstudio.ts), or [Continue.dev](https://docs.continue.dev/customize/model-providers/more/lmstudio) to interact with LLMs served by LM Studio. These apps leverage JIT to load models on-demand the first time you use them.
**Problem**: When you're not actively using a model, you might don't want it to remain loaded in memory.
**Solution**: Set a TTL for models loaded via API requests. The idle timer resets every time the model receives a request, so it won't disappear while you use it. A model is considered idle if it's not doing any work. When the idle TTL expires, the model is automatically unloaded from memory.
### Set App-default Idle TTL
By default, JIT-loaded models have a TTL of 60 minutes. You can configure a default TTL value for any model loaded via JIT like so:
### Set per-model TTL-model in API requests
When JIT loading is enabled, the **first request** to a model will load it into memory. You can specify a TTL for that model in the request payload.
This works for requests targeting both the [OpenAI compatibility API](openai-api) and the [LM Studio's REST API](rest-api):
```diff
curl http://localhost:1234/api/v0/chat/completions \
-H "Content-Type: application/json" \
-d '{
"model": "deepseek-r1-distill-qwen-7b",
+ "ttl": 300,
"messages": [ ... ]
}'
```
###### This will set a TTL of 5 minutes (300 seconds) for this model if it is JIT loaded.
### Set TTL for models loaded with `lms`
By default, models loaded with `lms load` do not have a TTL, and will remain loaded in memory until you manually unload them.
You can set a TTL for a model loaded with `lms` like so:
```bash
lms load --ttl 3600
```
###### Load a `` with a TTL of 1 hour (3600 seconds)
### Specify TTL when loading models in the server tab
You can also set a TTL when loading a model in the server tab like so
## Configure Auto-Evict for JIT loaded models
With this setting, you can ensure new models loaded via JIT automatically unload previously loaded models first.
This is useful when you want to switch between models from another app without worrying about memory building up with unused models.
**When Auto-Evict is ON** (default):
- At most `1` model is kept loaded in memory at a time (when loaded via JIT)
- Non-JIT loaded models are not affected
**When Auto-Evict is OFF**:
- Switching models from an external app will keep previous models loaded in memory
- Models will remain loaded until either:
- Their TTL expires
- You manually unload them
This feature works in tandem with TTL to provide better memory management for your workflow.
### Nomenclature
`TTL`: Time-To-Live, is a term borrowed from networking protocols and cache systems. It defines how long a resource can remain allocated before it's considered stale and evicted.
### Structured Output
> Enforce LLM response formats using JSON schemas.
You can enforce a particular response format from an LLM by providing a JSON schema to the `/v1/chat/completions` endpoint, via LM Studio's REST API (or via any OpenAI client).
### Start LM Studio as a server
To use LM Studio programatically from your own code, run LM Studio as a local server.
You can turn on the server from the "Developer" tab in LM Studio, or via the `lms` CLI:
```
lms server start
```
###### Install `lms` by running `npx lmstudio install-cli`
This will allow you to interact with LM Studio via an OpenAI-like REST API. For an intro to LM Studio's OpenAI-like API, see [Running LM Studio as a server](/docs/basics/server).
### Structured Output
The API supports structured JSON outputs through the `/v1/chat/completions` endpoint when given a [JSON schema](https://json-schema.org/overview/what-is-jsonschema). Doing this will cause the LLM to respond in valid JSON conforming to the schema provided.
It follows the same format as OpenAI's recently announced [Structured Output](https://platform.openai.com/docs/guides/structured-outputs) API and is expected to work via the OpenAI client SDKs.
**Example using `curl`**
This example demonstrates a structured output request using the `curl` utility.
To run this example on Mac or Linux, use any terminal. On Windows, use [Git Bash](https://git-scm.com/download/win).
```bash
curl http://{{hostname}}:{{port}}/v1/chat/completions \
-H "Content-Type: application/json" \
-d '{
"model": "{{model}}",
"messages": [
{
"role": "system",
"content": "You are a helpful jokester."
},
{
"role": "user",
"content": "Tell me a joke."
}
],
"response_format": {
"type": "json_schema",
"json_schema": {
"name": "joke_response",
"strict": "true",
"schema": {
"type": "object",
"properties": {
"joke": {
"type": "string"
}
},
"required": ["joke"]
}
}
},
"temperature": 0.7,
"max_tokens": 50,
"stream": false
}'
```
All parameters recognized by `/v1/chat/completions` will be honored, and the JSON schema should be provided in the `json_schema` field of `response_format`.
The JSON object will be provided in `string` form in the typical response field, `choices[0].message.content`, and will need to be parsed into a JSON object.
**Example using `python`**
```python
from openai import OpenAI
import json
# Initialize OpenAI client that points to the local LM Studio server
client = OpenAI(
base_url="http://localhost:1234/v1",
api_key="lm-studio"
)
# Define the conversation with the AI
messages = [
{"role": "system", "content": "You are a helpful AI assistant."},
{"role": "user", "content": "Create 1-3 fictional characters"}
]
# Define the expected response structure
character_schema = {
"type": "json_schema",
"json_schema": {
"name": "characters",
"schema": {
"type": "object",
"properties": {
"characters": {
"type": "array",
"items": {
"type": "object",
"properties": {
"name": {"type": "string"},
"occupation": {"type": "string"},
"personality": {"type": "string"},
"background": {"type": "string"}
},
"required": ["name", "occupation", "personality", "background"]
},
"minItems": 1,
}
},
"required": ["characters"]
},
}
}
# Get response from AI
response = client.chat.completions.create(
model="your-model",
messages=messages,
response_format=character_schema,
)
# Parse and display the results
results = json.loads(response.choices[0].message.content)
print(json.dumps(results, indent=2))
```
**Important**: Not all models are capable of structured output, particularly LLMs below 7B parameters.
Check the model card README if you are unsure if the model supports structured output.
### Structured output engine
- For `GGUF` models: utilize `llama.cpp`'s grammar-based sampling APIs.
- For `MLX` models: using [Outlines](https://github.com/dottxt-ai/outlines).
The MLX implementation is available on Github: [lmstudio-ai/mlx-engine](https://github.com/lmstudio-ai/mlx-engine).
### Community
Chat with other LM Studio users, discuss LLMs, hardware, and more on the [LM Studio Discord server](https://discord.gg/aPQfnNkxGC).
### Tool Use
> Enable LLMs to interact with external functions and APIs.
Tool use enables LLMs to request calls to external functions and APIs through the `/v1/chat/completions` endpoint, via LM Studio's REST API (or via any OpenAI client). This expands their functionality far beyond text output.
> 🔔 Tool use requires LM Studio 0.3.6 or newer, [get it here](https://lmstudio.ai/download)
## Quick Start
### 1. Start LM Studio as a server
To use LM Studio programmatically from your own code, run LM Studio as a local server.
You can turn on the server from the "Developer" tab in LM Studio, or via the `lms` CLI:
```bash
lms server start
```
###### Install `lms` by running `npx lmstudio install-cli`
This will allow you to interact with LM Studio via an OpenAI-like REST API. For an intro to LM Studio's OpenAI-like API, see [Running LM Studio as a server](/docs/basics/server).
### 2. Load a Model
You can load a model from the "Chat" or "Developer" tabs in LM Studio, or via the `lms` CLI:
```bash
lms load
```
### 3. Copy, Paste, and Run an Example!
- `Curl`
- [Single Turn Tool Call Request](#example-using-curl)
- `Python`
- [Single Turn Tool Call + Tool Use](#single-turn-example)
- [Multi-Turn Example](#multi-turn-example)
- [Advanced Agent Example](#advanced-agent-example)
## Tool Use
### What really is "Tool Use"?
Tool use describes:
- LLMs output text requesting functions to be called (LLMs cannot directly execute code)
- Your code executes those functions
- Your code feeds the results back to the LLM.
### High-level flow
```xml
┌──────────────────────────┐
│ SETUP: LLM + Tool list │
└──────────┬───────────────┘
▼
┌──────────────────────────┐
│ Get user input │◄────┐
└──────────┬───────────────┘ │
▼ │
┌──────────────────────────┐ │
│ LLM prompted w/messages │ │
└──────────┬───────────────┘ │
▼ │
Needs tools? │
│ │ │
Yes No │
│ │ │
▼ └────────────┐ │
┌─────────────┐ │ │
│Tool Response│ │ │
└──────┬──────┘ │ │
▼ │ │
┌─────────────┐ │ │
│Execute tools│ │ │
└──────┬──────┘ │ │
▼ ▼ │
┌─────────────┐ ┌───────────┐
│Add results │ │ Normal │
│to messages │ │ response │
└──────┬──────┘ └─────┬─────┘
│ ▲
└───────────────────────┘
```
### In-depth flow
LM Studio supports tool use through the `/v1/chat/completions` endpoint when given function definitions in the `tools` parameter of the request body. Tools are specified as an array of function definitions that describe their parameters and usage, like:
It follows the same format as OpenAI's [Function Calling](https://platform.openai.com/docs/guides/function-calling) API and is expected to work via the OpenAI client SDKs.
We will use [lmstudio-community/Qwen2.5-7B-Instruct-GGUF](https://model.lmstudio.ai/download/lmstudio-community/Qwen2.5-7B-Instruct-GGUF) as the model in this example flow.
1. You provide a list of tools to an LLM. These are the tools that the model can _request_ calls to.
For example:
```json
// the list of tools is model-agnostic
[
{
"type": "function",
"function": {
"name": "get_delivery_date",
"description": "Get the delivery date for a customer's order",
"parameters": {
"type": "object",
"properties": {
"order_id": {
"type": "string"
}
},
"required": ["order_id"]
}
}
}
]
```
This list will be injected into the `system` prompt of the model depending on the model's chat template. For `Qwen2.5-Instruct`, this looks like:
```json
<|im_start|>system
You are Qwen, created by Alibaba Cloud. You are a helpful assistant.
# Tools
You may call one or more functions to assist with the user query.
You are provided with function signatures within XML tags:
{"type": "function", "function": {"name": "get_delivery_date", "description": "Get the delivery date for a customer's order", "parameters": {"type": "object", "properties": {"order_id": {"type": "string"}}, "required": ["order_id"]}}}
For each function call, return a json object with function name and arguments within XML tags:
{"name": , "arguments": }
<|im_end|>
```
**Important**: The model can only _request_ calls to these tools because LLMs _cannot_ directly call functions, APIs, or any other tools. They can only output text, which can then be parsed to programmatically call the functions.
2. When prompted, the LLM can then decide to either:
- (a) Call one or more tools
```xml
User: Get me the delivery date for order 123
Model:
{"name": "get_delivery_date", "arguments": {"order_id": "123"}}
```
- (b) Respond normally
```xml
User: Hi
Model: Hello! How can I assist you today?
```
3. LM Studio parses the text output from the model into an OpenAI-compliant `chat.completion` response object.
- If the model was given access to `tools`, LM Studio will attempt to parse the tool calls into the `response.choices[0].message.tool_calls` field of the `chat.completion` response object.
- If LM Studio cannot parse any **correctly formatted** tool calls, it will simply return the response to the standard `response.choices[0].message.content` field.
- **Note**: Smaller models and models that were not trained for tool use may output improperly formatted tool calls, resulting in LM Studio being unable to parse them into the `tool_calls` field. This is useful for troubleshooting when you do not receive `tool_calls` as expected. Example of an improperly formatting `Qwen2.5-Instruct` tool call:
```xml
["name": "get_delivery_date", function: "date"]
```
> Note that the brackets are incorrect, and the call does not follow the `name, argument` format.
4. Your code parses the `chat.completion` response to check for tool calls from the model, then calls the appropriate tools with the parameters specified by the model. Your code then adds both:
1. The model's tool call message
2. The result of the tool call
To the `messages` array to send back to the model
```python
# pseudocode, see examples for copy-paste snippets
if response.has_tool_calls:
for each tool_call:
# Extract function name & args
function_to_call = tool_call.name # e.g. "get_delivery_date"
args = tool_call.arguments # e.g. {"order_id": "123"}
# Execute the function
result = execute_function(function_to_call, args)
# Add result to conversation
add_to_messages([
ASSISTANT_TOOL_CALL_MESSAGE, # The request to use the tool
TOOL_RESULT_MESSAGE # The tool's response
])
else:
# Normal response without tools
add_to_messages(response.content)
```
5. The LLM is then prompted again with the updated messages array, but without access to tools. This is because:
- The LLM already has the tool results in the conversation history
- We want the LLM to provide a final response to the user, not call more tools
```python
# Example messages
messages = [
{"role": "user", "content": "When will order 123 be delivered?"},
{"role": "assistant", "function_call": {
"name": "get_delivery_date",
"arguments": {"order_id": "123"}
}},
{"role": "tool", "content": "2024-03-15"},
]
response = client.chat.completions.create(
model="lmstudio-community/qwen2.5-7b-instruct",
messages=messages
)
```
The `response.choices[0].message.content` field after this call may be something like:
```xml
Your order #123 will be delivered on March 15th, 2024
```
6. The loop continues back at step 2 of the flow
Note: This is the `pedantic` flow for tool use. However, you can certainly experiment with this flow to best fit your use case.
## Supported Models
Through LM Studio, **all** models support at least some degree of tool use.
However, there are currently two levels of support that may impact the quality of the experience: Native and Default.
Models with Native tool use support will have a hammer badge in the app, and generally perform better in tool use scenarios.
### Native tool use support
"Native" tool use support means that both:
1. The model has a chat template that supports tool use (usually means the model has been trained for tool use)
- This is what will be used to format the `tools` array into the system prompt and tell them model how to format tool calls
- Example: [Qwen2.5-Instruct chat template](https://huggingface.co/mlx-community/Qwen2.5-7B-Instruct-4bit/blob/c26a38f6a37d0a51b4e9a1eb3026530fa35d9fed/tokenizer_config.json#L197)
2. LM Studio supports that model's tool use format
- Required for LM Studio to properly input the chat history into the chat template, and parse the tool calls the model outputs into the `chat.completion` object
Models that currently have native tool use support in LM Studio (subject to change):
- Qwen
- `GGUF` [lmstudio-community/Qwen2.5-7B-Instruct-GGUF](https://model.lmstudio.ai/download/lmstudio-community/Qwen2.5-7B-Instruct-GGUF) (4.68 GB)
- `MLX` [mlx-community/Qwen2.5-7B-Instruct-4bit](https://model.lmstudio.ai/download/mlx-community/Qwen2.5-7B-Instruct-4bit) (4.30 GB)
- Llama-3.1, Llama-3.2
- `GGUF` [lmstudio-community/Meta-Llama-3.1-8B-Instruct-GGUF](https://model.lmstudio.ai/download/lmstudio-community/Meta-Llama-3.1-8B-Instruct-GGUF) (4.92 GB)
- `MLX` [mlx-community/Meta-Llama-3.1-8B-Instruct-8bit](https://model.lmstudio.ai/download/mlx-community/Meta-Llama-3.1-8B-Instruct-8bit) (8.54 GB)
- Mistral
- `GGUF` [bartowski/Ministral-8B-Instruct-2410-GGUF](https://model.lmstudio.ai/download/bartowski/Ministral-8B-Instruct-2410-GGUF) (4.67 GB)
- `MLX` [mlx-community/Ministral-8B-Instruct-2410-4bit](https://model.lmstudio.ai/download/mlx-community/Ministral-8B-Instruct-2410-4bit) (4.67 GB GB)
### Default tool use support
"Default" tool use support means that **either**:
1. The model does not have chat template that supports tool use (usually means the model has not been trained for tool use)
2. LM Studio does not currently support that model's tool use format
Under the hood, default tool use works by:
- Giving models a custom system prompt and a default tool call format to use
- Converting `tool` role messages to the `user` role so that chat templates without the `tool` role are compatible
- Converting `assistant` role `tool_calls` into the default tool call format
Results will vary by model.
You can see the default format by running `lms log stream` in your terminal, then sending a chat completion request with `tools` to a model that doesn't have Native tool use support. The default format is subject to change.
Expand to see example of default tool use format
```bash
-> % lms log stream
Streaming logs from LM Studio
timestamp: 11/13/2024, 9:35:15 AM
type: llm.prediction.input
modelIdentifier: gemma-2-2b-it
modelPath: lmstudio-community/gemma-2-2b-it-GGUF/gemma-2-2b-it-Q4_K_M.gguf
input: "system
You are a tool-calling AI. You can request calls to available tools with this EXACT format:
[TOOL_REQUEST]{"name": "tool_name", "arguments": {"param1": "value1"}}[END_TOOL_REQUEST]
AVAILABLE TOOLS:
{
"type": "toolArray",
"tools": [
{
"type": "function",
"function": {
"name": "get_delivery_date",
"description": "Get the delivery date for a customer's order",
"parameters": {
"type": "object",
"properties": {
"order_id": {
"type": "string"
}
},
"required": [
"order_id"
]
}
}
}
]
}
RULES:
- Only use tools from AVAILABLE TOOLS
- Include all required arguments
- Use one [TOOL_REQUEST] block per tool
- Never use [TOOL_RESULT]
- If you decide to call one or more tools, there should be no other text in your message
Examples:
"Check Paris weather"
[TOOL_REQUEST]{"name": "get_weather", "arguments": {"location": "Paris"}}[END_TOOL_REQUEST]
"Send email to John about meeting and open browser"
[TOOL_REQUEST]{"name": "send_email", "arguments": {"to": "John", "subject": "meeting"}}[END_TOOL_REQUEST]
[TOOL_REQUEST]{"name": "open_browser", "arguments": {}}[END_TOOL_REQUEST]
Respond conversationally if no matching tools exist.user
Get me delivery date for order 123model
"
```
If the model follows this format exactly to call tools, i.e:
```
[TOOL_REQUEST]{"name": "get_delivery_date", "arguments": {"order_id": "123"}}[END_TOOL_REQUEST]
```
Then LM Studio will be able to parse those tool calls into the `chat.completions` object, just like for natively supported models.
All models that don't have native tool use support will have default tool use support.
## Example using `curl`
This example demonstrates a model requesting a tool call using the `curl` utility.
To run this example on Mac or Linux, use any terminal. On Windows, use [Git Bash](https://git-scm.com/download/win).
```bash
curl http://localhost:1234/v1/chat/completions \
-H "Content-Type: application/json" \
-d '{
"model": "lmstudio-community/qwen2.5-7b-instruct",
"messages": [{"role": "user", "content": "What dell products do you have under $50 in electronics?"}],
"tools": [
{
"type": "function",
"function": {
"name": "search_products",
"description": "Search the product catalog by various criteria. Use this whenever a customer asks about product availability, pricing, or specifications.",
"parameters": {
"type": "object",
"properties": {
"query": {
"type": "string",
"description": "Search terms or product name"
},
"category": {
"type": "string",
"description": "Product category to filter by",
"enum": ["electronics", "clothing", "home", "outdoor"]
},
"max_price": {
"type": "number",
"description": "Maximum price in dollars"
}
},
"required": ["query"],
"additionalProperties": false
}
}
}
]
}'
```
All parameters recognized by `/v1/chat/completions` will be honored, and the array of available tools should be provided in the `tools` field.
If the model decides that the user message would be best fulfilled with a tool call, an array of tool call request objects will be provided in the response field, `choices[0].message.tool_calls`.
The `finish_reason` field of the top-level response object will also be populated with `"tool_calls"`.
An example response to the above `curl` request will look like:
```bash
{
"id": "chatcmpl-gb1t1uqzefudice8ntxd9i",
"object": "chat.completion",
"created": 1730913210,
"model": "lmstudio-community/qwen2.5-7b-instruct",
"choices": [
{
"index": 0,
"logprobs": null,
"finish_reason": "tool_calls",
"message": {
"role": "assistant",
"tool_calls": [
{
"id": "365174485",
"type": "function",
"function": {
"name": "search_products",
"arguments": "{\"query\":\"dell\",\"category\":\"electronics\",\"max_price\":50}"
}
}
]
}
}
],
"usage": {
"prompt_tokens": 263,
"completion_tokens": 34,
"total_tokens": 297
},
"system_fingerprint": "lmstudio-community/qwen2.5-7b-instruct"
}
```
In plain english, the above response can be thought of as the model saying:
> "Please call the `search_products` function, with arguments:
>
> - 'dell' for the `query` parameter,
> - 'electronics' for the `category` parameter
> - '50' for the `max_price` parameter
>
> and give me back the results"
The `tool_calls` field will need to be parsed to call actual functions/APIs. The below examples demonstrate how.
## Examples using `python`
Tool use shines when paired with program languages like python, where you can implement the functions specified in the `tools` field to programmatically call them when the model requests.
### Single-turn example
Below is a simple single-turn (model is only called once) example of enabling a model to call a function called `say_hello` that prints a hello greeting to the console:
`single-turn-example.py`
```python
from openai import OpenAI
# Connect to LM Studio
client = OpenAI(base_url="http://localhost:1234/v1", api_key="lm-studio")
# Define a simple function
def say_hello(name: str) -> str:
print(f"Hello, {name}!")
# Tell the AI about our function
tools = [
{
"type": "function",
"function": {
"name": "say_hello",
"description": "Says hello to someone",
"parameters": {
"type": "object",
"properties": {
"name": {
"type": "string",
"description": "The person's name"
}
},
"required": ["name"]
}
}
}
]
# Ask the AI to use our function
response = client.chat.completions.create(
model="lmstudio-community/qwen2.5-7b-instruct",
messages=[{"role": "user", "content": "Can you say hello to Bob the Builder?"}],
tools=tools
)
# Get the name the AI wants to use a tool to say hello to
# (Assumes the AI has requested a tool call and that tool call is say_hello)
tool_call = response.choices[0].message.tool_calls[0]
name = eval(tool_call.function.arguments)["name"]
# Actually call the say_hello function
say_hello(name) # Prints: Hello, Bob the Builder!
```
Running this script from the console should yield results like:
```xml
-> % python single-turn-example.py
Hello, Bob the Builder!
```
Play around with the name in
```python
messages=[{"role": "user", "content": "Can you say hello to Bob the Builder?"}]
```
to see the model call the `say_hello` function with different names.
### Multi-turn example
Now for a slightly more complex example.
In this example, we'll:
1. Enable the model to call a `get_delivery_date` function
2. Hand the result of calling that function back to the model, so that it can fulfill the user's request in plain text
multi-turn-example.py (click to expand)
```python
from datetime import datetime, timedelta
import json
import random
from openai import OpenAI
# Point to the local server
client = OpenAI(base_url="http://localhost:1234/v1", api_key="lm-studio")
model = "lmstudio-community/qwen2.5-7b-instruct"
def get_delivery_date(order_id: str) -> datetime:
# Generate a random delivery date between today and 14 days from now
# in a real-world scenario, this function would query a database or API
today = datetime.now()
random_days = random.randint(1, 14)
delivery_date = today + timedelta(days=random_days)
print(
f"\nget_delivery_date function returns delivery date:\n\n{delivery_date}",
flush=True,
)
return delivery_date
tools = [
{
"type": "function",
"function": {
"name": "get_delivery_date",
"description": "Get the delivery date for a customer's order. Call this whenever you need to know the delivery date, for example when a customer asks 'Where is my package'",
"parameters": {
"type": "object",
"properties": {
"order_id": {
"type": "string",
"description": "The customer's order ID.",
},
},
"required": ["order_id"],
"additionalProperties": False,
},
},
}
]
messages = [
{
"role": "system",
"content": "You are a helpful customer support assistant. Use the supplied tools to assist the user.",
},
{
"role": "user",
"content": "Give me the delivery date and time for order number 1017",
},
]
# LM Studio
response = client.chat.completions.create(
model=model,
messages=messages,
tools=tools,
)
print("\nModel response requesting tool call:\n", flush=True)
print(response, flush=True)
# Extract the arguments for get_delivery_date
# Note this code assumes we have already determined that the model generated a function call.
tool_call = response.choices[0].message.tool_calls[0]
arguments = json.loads(tool_call.function.arguments)
order_id = arguments.get("order_id")
# Call the get_delivery_date function with the extracted order_id
delivery_date = get_delivery_date(order_id)
assistant_tool_call_request_message = {
"role": "assistant",
"tool_calls": [
{
"id": response.choices[0].message.tool_calls[0].id,
"type": response.choices[0].message.tool_calls[0].type,
"function": response.choices[0].message.tool_calls[0].function,
}
],
}
# Create a message containing the result of the function call
function_call_result_message = {
"role": "tool",
"content": json.dumps(
{
"order_id": order_id,
"delivery_date": delivery_date.strftime("%Y-%m-%d %H:%M:%S"),
}
),
"tool_call_id": response.choices[0].message.tool_calls[0].id,
}
# Prepare the chat completion call payload
completion_messages_payload = [
messages[0],
messages[1],
assistant_tool_call_request_message,
function_call_result_message,
]
# Call the OpenAI API's chat completions endpoint to send the tool call result back to the model
# LM Studio
response = client.chat.completions.create(
model=model,
messages=completion_messages_payload,
)
print("\nFinal model response with knowledge of the tool call result:\n", flush=True)
print(response.choices[0].message.content, flush=True)
```
Running this script from the console should yield results like:
```xml
-> % python multi-turn-example.py
Model response requesting tool call:
ChatCompletion(id='chatcmpl-wwpstqqu94go4hvclqnpwn', choices=[Choice(finish_reason='tool_calls', index=0, logprobs=None, message=ChatCompletionMessage(content=None, refusal=None, role='assistant', function_call=None, tool_calls=[ChatCompletionMessageToolCall(id='377278620', function=Function(arguments='{"order_id":"1017"}', name='get_delivery_date'), type='function')]))], created=1730916196, model='lmstudio-community/qwen2.5-7b-instruct', object='chat.completion', service_tier=None, system_fingerprint='lmstudio-community/qwen2.5-7b-instruct', usage=CompletionUsage(completion_tokens=24, prompt_tokens=223, total_tokens=247, completion_tokens_details=None, prompt_tokens_details=None))
get_delivery_date function returns delivery date:
2024-11-19 13:03:17.773298
Final model response with knowledge of the tool call result:
Your order number 1017 is scheduled for delivery on November 19, 2024, at 13:03 PM.
```
### Advanced agent example
Building upon the principles above, we can combine LM Studio models with locally defined functions to create an "agent" - a system that pairs a language model with custom functions to understand requests and perform actions beyond basic text generation.
The agent in the below example can:
1. Open safe urls in your default browser
2. Check the current time
3. Analyze directories in your file system
agent-chat-example.py (click to expand)
```python
import json
from urllib.parse import urlparse
import webbrowser
from datetime import datetime
import os
from openai import OpenAI
# Point to the local server
client = OpenAI(base_url="http://localhost:1234/v1", api_key="lm-studio")
model = "lmstudio-community/qwen2.5-7b-instruct"
def is_valid_url(url: str) -> bool:
try:
result = urlparse(url)
return bool(result.netloc) # Returns True if there's a valid network location
except Exception:
return False
def open_safe_url(url: str) -> dict:
# List of allowed domains (expand as needed)
SAFE_DOMAINS = {
"lmstudio.ai",
"github.com",
"google.com",
"wikipedia.org",
"weather.com",
"stackoverflow.com",
"python.org",
"docs.python.org",
}
try:
# Add http:// if no scheme is present
if not url.startswith(('http://', 'https://')):
url = 'http://' + url
# Validate URL format
if not is_valid_url(url):
return {"status": "error", "message": f"Invalid URL format: {url}"}
# Parse the URL and check domain
parsed_url = urlparse(url)
domain = parsed_url.netloc.lower()
base_domain = ".".join(domain.split(".")[-2:])
if base_domain in SAFE_DOMAINS:
webbrowser.open(url)
return {"status": "success", "message": f"Opened {url} in browser"}
else:
return {
"status": "error",
"message": f"Domain {domain} not in allowed list",
}
except Exception as e:
return {"status": "error", "message": str(e)}
def get_current_time() -> dict:
"""Get the current system time with timezone information"""
try:
current_time = datetime.now()
timezone = datetime.now().astimezone().tzinfo
formatted_time = current_time.strftime("%Y-%m-%d %H:%M:%S %Z")
return {
"status": "success",
"time": formatted_time,
"timezone": str(timezone),
"timestamp": current_time.timestamp(),
}
except Exception as e:
return {"status": "error", "message": str(e)}
def analyze_directory(path: str = ".") -> dict:
"""Count and categorize files in a directory"""
try:
stats = {
"total_files": 0,
"total_dirs": 0,
"file_types": {},
"total_size_bytes": 0,
}
for entry in os.scandir(path):
if entry.is_file():
stats["total_files"] += 1
ext = os.path.splitext(entry.name)[1].lower() or "no_extension"
stats["file_types"][ext] = stats["file_types"].get(ext, 0) + 1
stats["total_size_bytes"] += entry.stat().st_size
elif entry.is_dir():
stats["total_dirs"] += 1
# Add size of directory contents
for root, _, files in os.walk(entry.path):
for file in files:
try:
stats["total_size_bytes"] += os.path.getsize(os.path.join(root, file))
except (OSError, FileNotFoundError):
continue
return {"status": "success", "stats": stats, "path": os.path.abspath(path)}
except Exception as e:
return {"status": "error", "message": str(e)}
tools = [
{
"type": "function",
"function": {
"name": "open_safe_url",
"description": "Open a URL in the browser if it's deemed safe",
"parameters": {
"type": "object",
"properties": {
"url": {
"type": "string",
"description": "The URL to open",
},
},
"required": ["url"],
},
},
},
{
"type": "function",
"function": {
"name": "get_current_time",
"description": "Get the current system time with timezone information",
"parameters": {
"type": "object",
"properties": {},
"required": [],
},
},
},
{
"type": "function",
"function": {
"name": "analyze_directory",
"description": "Analyze the contents of a directory, counting files and folders",
"parameters": {
"type": "object",
"properties": {
"path": {
"type": "string",
"description": "The directory path to analyze. Defaults to current directory if not specified.",
},
},
"required": [],
},
},
},
]
def process_tool_calls(response, messages):
"""Process multiple tool calls and return the final response and updated messages"""
# Get all tool calls from the response
tool_calls = response.choices[0].message.tool_calls
# Create the assistant message with tool calls
assistant_tool_call_message = {
"role": "assistant",
"tool_calls": [
{
"id": tool_call.id,
"type": tool_call.type,
"function": tool_call.function,
}
for tool_call in tool_calls
],
}
# Add the assistant's tool call message to the history
messages.append(assistant_tool_call_message)
# Process each tool call and collect results
tool_results = []
for tool_call in tool_calls:
# For functions with no arguments, use empty dict
arguments = (
json.loads(tool_call.function.arguments)
if tool_call.function.arguments.strip()
else {}
)
# Determine which function to call based on the tool call name
if tool_call.function.name == "open_safe_url":
result = open_safe_url(arguments["url"])
elif tool_call.function.name == "get_current_time":
result = get_current_time()
elif tool_call.function.name == "analyze_directory":
path = arguments.get("path", ".")
result = analyze_directory(path)
else:
# llm tried to call a function that doesn't exist, skip
continue
# Add the result message
tool_result_message = {
"role": "tool",
"content": json.dumps(result),
"tool_call_id": tool_call.id,
}
tool_results.append(tool_result_message)
messages.append(tool_result_message)
# Get the final response
final_response = client.chat.completions.create(
model=model,
messages=messages,
)
return final_response
def chat():
messages = [
{
"role": "system",
"content": "You are a helpful assistant that can open safe web links, tell the current time, and analyze directory contents. Use these capabilities whenever they might be helpful.",
}
]
print(
"Assistant: Hello! I can help you open safe web links, tell you the current time, and analyze directory contents. What would you like me to do?"
)
print("(Type 'quit' to exit)")
while True:
# Get user input
user_input = input("\nYou: ").strip()
# Check for quit command
if user_input.lower() == "quit":
print("Assistant: Goodbye!")
break
# Add user message to conversation
messages.append({"role": "user", "content": user_input})
try:
# Get initial response
response = client.chat.completions.create(
model=model,
messages=messages,
tools=tools,
)
# Check if the response includes tool calls
if response.choices[0].message.tool_calls:
# Process all tool calls and get final response
final_response = process_tool_calls(response, messages)
print("\nAssistant:", final_response.choices[0].message.content)
# Add assistant's final response to messages
messages.append(
{
"role": "assistant",
"content": final_response.choices[0].message.content,
}
)
else:
# If no tool call, just print the response
print("\nAssistant:", response.choices[0].message.content)
# Add assistant's response to messages
messages.append(
{
"role": "assistant",
"content": response.choices[0].message.content,
}
)
except Exception as e:
print(f"\nAn error occurred: {str(e)}")
exit(1)
if __name__ == "__main__":
chat()
```
Running this script from the console will allow you to chat with the agent:
```xml
-> % python agent-example.py
Assistant: Hello! I can help you open safe web links, tell you the current time, and analyze directory contents. What would you like me to do?
(Type 'quit' to exit)
You: What time is it?
Assistant: The current time is 14:11:40 (EST) as of November 6, 2024.
You: What time is it now?
Assistant: The current time is 14:13:59 (EST) as of November 6, 2024.
You: Open lmstudio.ai
Assistant: The link to lmstudio.ai has been opened in your default web browser.
You: What's in my current directory?
Assistant: Your current directory at `/Users/matt/project` contains a total of 14 files and 8 directories. Here's the breakdown:
- Files without an extension: 3
- `.mjs` files: 2
- `.ts` (TypeScript) files: 3
- Markdown (`md`) file: 1
- JSON files: 4
- TOML file: 1
The total size of these items is 1,566,990,604 bytes.
You: Thank you!
Assistant: You're welcome! If you have any other questions or need further assistance, feel free to ask.
You:
```
### Streaming
When streaming through `/v1/chat/completions` (`stream=true`), tool calls are sent in chunks. Function names and arguments are sent in pieces via `chunk.choices[0].delta.tool_calls.function.name` and `chunk.choices[0].delta.tool_calls.function.arguments`.
For example, to call `get_current_weather(location="San Francisco")`, the streamed `ChoiceDeltaToolCall` in each `chunk.choices[0].delta.tool_calls[0]` object will look like:
```py
ChoiceDeltaToolCall(index=0, id='814890118', function=ChoiceDeltaToolCallFunction(arguments='', name='get_current_weather'), type='function')
ChoiceDeltaToolCall(index=0, id=None, function=ChoiceDeltaToolCallFunction(arguments='{"', name=None), type=None)
ChoiceDeltaToolCall(index=0, id=None, function=ChoiceDeltaToolCallFunction(arguments='location', name=None), type=None)
ChoiceDeltaToolCall(index=0, id=None, function=ChoiceDeltaToolCallFunction(arguments='":"', name=None), type=None)
ChoiceDeltaToolCall(index=0, id=None, function=ChoiceDeltaToolCallFunction(arguments='San Francisco', name=None), type=None)
ChoiceDeltaToolCall(index=0, id=None, function=ChoiceDeltaToolCallFunction(arguments='"}', name=None), type=None)
```
These chunks must be accumulated throughout the stream to form the complete function signature for execution.
The below example shows how to create a simple tool-enhanced chatbot through the `/v1/chat/completions` streaming endpoint (`stream=true`).
tool-streaming-chatbot.py (click to expand)
```python
from openai import OpenAI
import time
client = OpenAI(base_url="http://127.0.0.1:1234/v1", api_key="lm-studio")
MODEL = "lmstudio-community/qwen2.5-7b-instruct"
TIME_TOOL = {
"type": "function",
"function": {
"name": "get_current_time",
"description": "Get the current time, only if asked",
"parameters": {"type": "object", "properties": {}},
},
}
def get_current_time():
return {"time": time.strftime("%H:%M:%S")}
def process_stream(stream, add_assistant_label=True):
"""Handle streaming responses from the API"""
collected_text = ""
tool_calls = []
first_chunk = True
for chunk in stream:
delta = chunk.choices[0].delta
# Handle regular text output
if delta.content:
if first_chunk:
print()
if add_assistant_label:
print("Assistant:", end=" ", flush=True)
first_chunk = False
print(delta.content, end="", flush=True)
collected_text += delta.content
# Handle tool calls
elif delta.tool_calls:
for tc in delta.tool_calls:
if len(tool_calls) <= tc.index:
tool_calls.append({
"id": "", "type": "function",
"function": {"name": "", "arguments": ""}
})
tool_calls[tc.index] = {
"id": (tool_calls[tc.index]["id"] + (tc.id or "")),
"type": "function",
"function": {
"name": (tool_calls[tc.index]["function"]["name"] + (tc.function.name or "")),
"arguments": (tool_calls[tc.index]["function"]["arguments"] + (tc.function.arguments or ""))
}
}
return collected_text, tool_calls
def chat_loop():
messages = []
print("Assistant: Hi! I am an AI agent empowered with the ability to tell the current time (Type 'quit' to exit)")
while True:
user_input = input("\nYou: ").strip()
if user_input.lower() == "quit":
break
messages.append({"role": "user", "content": user_input})
# Get initial response
response_text, tool_calls = process_stream(
client.chat.completions.create(
model=MODEL,
messages=messages,
tools=[TIME_TOOL],
stream=True,
temperature=0.2
)
)
if not tool_calls:
print()
text_in_first_response = len(response_text) > 0
if text_in_first_response:
messages.append({"role": "assistant", "content": response_text})
# Handle tool calls if any
if tool_calls:
tool_name = tool_calls[0]["function"]["name"]
print()
if not text_in_first_response:
print("Assistant:", end=" ", flush=True)
print(f"**Calling Tool: {tool_name}**")
messages.append({"role": "assistant", "tool_calls": tool_calls})
# Execute tool calls
for tool_call in tool_calls:
if tool_call["function"]["name"] == "get_current_time":
result = get_current_time()
messages.append({
"role": "tool",
"content": str(result),
"tool_call_id": tool_call["id"]
})
# Get final response after tool execution
final_response, _ = process_stream(
client.chat.completions.create(
model=MODEL,
messages=messages,
stream=True
),
add_assistant_label=False
)
if final_response:
print()
messages.append({"role": "assistant", "content": final_response})
if __name__ == "__main__":
chat_loop()
```
You can chat with the bot by running this script from the console:
```xml
-> % python tool-streaming-chatbot.py
Assistant: Hi! I am an AI agent empowered with the ability to tell the current time (Type 'quit' to exit)
You: Tell me a joke, then tell me the current time
Assistant: Sure! Here's a light joke for you: Why don't scientists trust atoms? Because they make up everything.
Now, let me get the current time for you.
**Calling Tool: get_current_time**
The current time is 18:49:31. Enjoy your day!
You:
```
## Community
Chat with other LM Studio users, discuss LLMs, hardware, and more on the [LM Studio Discord server](https://discord.gg/aPQfnNkxGC).
### endpoints
#### OpenAI Compatibility API
> Send requests to Chat Completions (text and images), Completions, and Embeddings endpoints
Send requests to Chat Completions (text and images), Completions, and Embeddings endpoints.
### OpenAI-like API endpoints
LM Studio accepts requests on several OpenAI endpoints and returns OpenAI-like response objects.
#### Supported endpoints
```
GET /v1/models
POST /v1/chat/completions
POST /v1/embeddings
POST /v1/completions
```
###### See below for more info about each endpoint
### Re-using an existing OpenAI client
```lms_protip
You can reuse existing OpenAI clients (in Python, JS, C#, etc) by switching up the "base URL" property to point to your LM Studio instead of OpenAI's servers.
```
#### Switching up the `base url` to point to LM Studio
###### Note: The following examples assume the server port is `1234`
##### Python
```diff
from openai import OpenAI
client = OpenAI(
+ base_url="http://localhost:1234/v1"
)
# ... the rest of your code ...
```
##### Typescript
```diff
import OpenAI from 'openai';
const client = new OpenAI({
+ baseUrl: "http://localhost:1234/v1"
});
// ... the rest of your code ...
```
##### cURL
```diff
- curl https://api.openai.com/v1/chat/completions \
+ curl http://localhost:1234/v1/chat/completions \
-H "Content-Type: application/json" \
-d '{
- "model": "gpt-4o-mini",
+ "model": "use the model identifier from LM Studio here",
"messages": [{"role": "user", "content": "Say this is a test!"}],
"temperature": 0.7
}'
```
### Endpoints overview
#### `/v1/models`
- `GET` request
- Lists the currently **loaded** models.
##### cURL example
```bash
curl http://localhost:1234/v1/models
```
#### `/v1/chat/completions`
- `POST` request
- Send a chat history and receive the assistant's response
- Prompt template is applied automatically
- You can provide inference parameters such as temperature in the payload. See [supported parameters](#supported-payload-parameters)
- See [OpenAI's documentation](https://platform.openai.com/docs/api-reference/chat) for more information
- As always, keep a terminal window open with [`lms log stream`](/docs/cli/log-stream) to see what input the model receives
##### Python example
```python
# Example: reuse your existing OpenAI setup
from openai import OpenAI
# Point to the local server
client = OpenAI(base_url="http://localhost:1234/v1", api_key="lm-studio")
completion = client.chat.completions.create(
model="model-identifier",
messages=[
{"role": "system", "content": "Always answer in rhymes."},
{"role": "user", "content": "Introduce yourself."}
],
temperature=0.7,
)
print(completion.choices[0].message)
```
#### `/v1/embeddings`
- `POST` request
- Send a string or array of strings and get an array of text embeddings (integer token IDs)
- See [OpenAI's documentation](https://platform.openai.com/docs/api-reference/embeddings) for more information
##### Python example
```python
# Make sure to `pip install openai` first
from openai import OpenAI
client = OpenAI(base_url="http://localhost:1234/v1", api_key="lm-studio")
def get_embedding(text, model="model-identifier"):
text = text.replace("\n", " ")
return client.embeddings.create(input = [text], model=model).data[0].embedding
print(get_embedding("Once upon a time, there was a cat."))
```
#### `/v1/completions`
```lms_warning
This OpenAI-like endpoint is no longer supported by OpenAI. LM Studio continues to support it.
Using this endpoint with chat-tuned models might result in unexpected behavior such as extraneous role tokens being emitted by the model.
For best results, utilize a base model.
```
- `POST` request
- Send a string and get the model's continuation of that string
- See [supported payload parameters](#supported-payload-parameters)
- Prompt template will NOT be applied, even if the model has one
- See [OpenAI's documentation](https://platform.openai.com/docs/api-reference/completions) for more information
- As always, keep a terminal window open with [`lms log stream`](/docs/cli/log-stream) to see what input the model receives
### Supported payload parameters
For an explanation for each parameter, see https://platform.openai.com/docs/api-reference/chat/create.
```py
model
top_p
top_k
messages
temperature
max_tokens
stream
stop
presence_penalty
frequency_penalty
logit_bias
repeat_penalty
seed
```
### Community
Chat with other LM Studio developers, discuss LLMs, hardware, and more on the [LM Studio Discord server](https://discord.gg/aPQfnNkxGC).
#### LM Studio REST API (beta)
> The REST API includes enhanced stats such as Token / Second and Time To First Token (TTFT), as well as rich information about models such as loaded vs unloaded, max context, quantization, and more.
`Experimental`
##### Requires [LM Studio 0.3.6](/download) or newer. Still WIP, endpoints may change.
LM Studio now has its own REST API, in addition to OpenAI compatibility mode ([learn more](/docs/app/api/endpoints/openai)).
The REST API includes enhanced stats such as Token / Second and Time To First Token (TTFT), as well as rich information about models such as loaded vs unloaded, max context, quantization, and more.
#### Supported API Endpoints
- [`GET /api/v0/models`](#get-apiv0models) - List available models
- [`GET /api/v0/models/{model}`](#get-apiv0modelsmodel) - Get info about a specific model
- [`POST /api/v0/chat/completions`](#post-apiv0chatcompletions) - Chat Completions (messages -> assistant response)
- [`POST /api/v0/completions`](#post-apiv0completions) - Text Completions (prompt -> completion)
- [`POST /api/v0/embeddings`](#post-apiv0embeddings) - Text Embeddings (text -> embedding)
###### 🚧 We are in the process of developing this interface. Let us know what's important to you on [Github](https://github.com/lmstudio-ai/lmstudio.js/issues) or by [email](mailto:bugs@lmstudio.ai).
---
### Start the REST API server
To start the server, run the following command:
```bash
lms server start
```
```lms_protip
You can run LM Studio as a service and get the server to auto-start on boot without launching the GUI. [Learn about Headless Mode](/docs/advanced/headless).
```
## Endpoints
### `GET /api/v0/models`
List all loaded and downloaded models
**Example request**
```bash
curl http://localhost:1234/api/v0/models
```
**Response format**
```json
{
"object": "list",
"data": [
{
"id": "qwen2-vl-7b-instruct",
"object": "model",
"type": "vlm",
"publisher": "mlx-community",
"arch": "qwen2_vl",
"compatibility_type": "mlx",
"quantization": "4bit",
"state": "not-loaded",
"max_context_length": 32768
},
{
"id": "meta-llama-3.1-8b-instruct",
"object": "model",
"type": "llm",
"publisher": "lmstudio-community",
"arch": "llama",
"compatibility_type": "gguf",
"quantization": "Q4_K_M",
"state": "not-loaded",
"max_context_length": 131072
},
{
"id": "text-embedding-nomic-embed-text-v1.5",
"object": "model",
"type": "embeddings",
"publisher": "nomic-ai",
"arch": "nomic-bert",
"compatibility_type": "gguf",
"quantization": "Q4_0",
"state": "not-loaded",
"max_context_length": 2048
}
]
}
```
---
### `GET /api/v0/models/{model}`
Get info about one specific model
**Example request**
```bash
curl http://localhost:1234/api/v0/models/qwen2-vl-7b-instruct
```
**Response format**
```json
{
"id": "qwen2-vl-7b-instruct",
"object": "model",
"type": "vlm",
"publisher": "mlx-community",
"arch": "qwen2_vl",
"compatibility_type": "mlx",
"quantization": "4bit",
"state": "not-loaded",
"max_context_length": 32768
}
```
---
### `POST /api/v0/chat/completions`
Chat Completions API. You provide a messages array and receive the next assistant response in the chat.
**Example request**
```bash
curl http://localhost:1234/api/v0/chat/completions \
-H "Content-Type: application/json" \
-d '{
"model": "granite-3.0-2b-instruct",
"messages": [
{ "role": "system", "content": "Always answer in rhymes." },
{ "role": "user", "content": "Introduce yourself." }
],
"temperature": 0.7,
"max_tokens": -1,
"stream": false
}'
```
**Response format**
```json
{
"id": "chatcmpl-i3gkjwthhw96whukek9tz",
"object": "chat.completion",
"created": 1731990317,
"model": "granite-3.0-2b-instruct",
"choices": [
{
"index": 0,
"logprobs": null,
"finish_reason": "stop",
"message": {
"role": "assistant",
"content": "Greetings, I'm a helpful AI, here to assist,\nIn providing answers, with no distress.\nI'll keep it short and sweet, in rhyme you'll find,\nA friendly companion, all day long you'll bind."
}
}
],
"usage": {
"prompt_tokens": 24,
"completion_tokens": 53,
"total_tokens": 77
},
"stats": {
"tokens_per_second": 51.43709529007664,
"time_to_first_token": 0.111,
"generation_time": 0.954,
"stop_reason": "eosFound"
},
"model_info": {
"arch": "granite",
"quant": "Q4_K_M",
"format": "gguf",
"context_length": 4096
},
"runtime": {
"name": "llama.cpp-mac-arm64-apple-metal-advsimd",
"version": "1.3.0",
"supported_formats": ["gguf"]
}
}
```
---
### `POST /api/v0/completions`
Text Completions API. You provide a prompt and receive a completion.
**Example request**
```bash
curl http://localhost:1234/api/v0/completions \
-H "Content-Type: application/json" \
-d '{
"model": "granite-3.0-2b-instruct",
"prompt": "the meaning of life is",
"temperature": 0.7,
"max_tokens": 10,
"stream": false,
"stop": "\n"
}'
```
**Response format**
```json
{
"id": "cmpl-p9rtxv6fky2v9k8jrd8cc",
"object": "text_completion",
"created": 1731990488,
"model": "granite-3.0-2b-instruct",
"choices": [
{
"index": 0,
"text": " to find your purpose, and once you have",
"logprobs": null,
"finish_reason": "length"
}
],
"usage": {
"prompt_tokens": 5,
"completion_tokens": 9,
"total_tokens": 14
},
"stats": {
"tokens_per_second": 57.69230769230769,
"time_to_first_token": 0.299,
"generation_time": 0.156,
"stop_reason": "maxPredictedTokensReached"
},
"model_info": {
"arch": "granite",
"quant": "Q4_K_M",
"format": "gguf",
"context_length": 4096
},
"runtime": {
"name": "llama.cpp-mac-arm64-apple-metal-advsimd",
"version": "1.3.0",
"supported_formats": ["gguf"]
}
}
```
---
### `POST /api/v0/embeddings`
Text Embeddings API. You provide a text and a representation of the text as an embedding vector is returned.
**Example request**
```bash
curl http://127.0.0.1:1234/api/v0/embeddings \
-H "Content-Type: application/json" \
-d '{
"model": "text-embedding-nomic-embed-text-v1.5",
"input": "Some text to embed"
}
```
**Example response**
```json
{
"object": "list",
"data": [
{
"object": "embedding",
"embedding": [
-0.016731496900320053,
0.028460891917347908,
-0.1407836228609085,
... (truncated for brevity) ...,
0.02505224384367466,
-0.0037634256295859814,
-0.04341062530875206
],
"index": 0
}
],
"model": "text-embedding-nomic-embed-text-v1.5@q4_k_m",
"usage": {
"prompt_tokens": 0,
"total_tokens": 0
}
}
```
---
Please report bugs by opening an issue on [Github](https://github.com/lmstudio-ai/lmstudio-bug-tracker/issues).
## user-interface
### LM Studio in your language
> LM Studio is available in English, Spanish, French, German, Korean, Russian, and 6+ more languages.
LM Studio is available in `English`, `Spanish`, `Japanese`, `Chinese`, `German`, `Norwegian`, `Turkish`, `Russian`, `Korean`, `Polish`, `Vietnamese`, `Czech`, `Ukranian`, and `Portuguese (BR,PT)` thanks to incredibly awesome efforts from the LM Studio community.
### Selecting a Language
You can choose a language in the Settings tab.
Use the dropdown menu under Preferences > Language.
```lms_protip
You can jump to Settings from anywhere in the app by pressing `cmd` + `,` on macOS or `ctrl` + `,` on Windows/Linux.
```
###### To get to the Settings page, you need to be on [Power User mode](/docs/modes) or higher.
#### Big thank you to community localizers 🙏
- Spanish [@xtianpaiva](https://github.com/xtianpaiva)
- Norwegian [@Exlo84](https://github.com/Exlo84)
- German [@marcelMaier](https://github.com/marcelMaier)
- Turkish [@progesor](https://github.com/progesor)
- Russian [@shelomitsky](https://github.com/shelomitsky), [@mlatysh](https://github.com/mlatysh), [@Adjacentai](https://github.com/Adjacentai)
- Korean [@williamjeong2](https://github.com/williamjeong2)
- Polish [@danieltechdev](https://github.com/danieltechdev)
- Czech [@ladislavsulc](https://github.com/ladislavsulc)
- Vietnamese [@trinhvanminh](https://github.com/trinhvanminh)
- Portuguese (BR) [@Sm1g00l](https://github.com/Sm1g00l)
- Portuguese (PT) [@catarino](https://github.com/catarino)
- Chinese (zh-HK), (zh-TW), (zh-CN) [@neotan](https://github.com/neotan)
- Chinese (zh-Hant) [@kywarai](https://github.com/kywarai)
- Ukrainian (uk) [@hmelenok](https://github.com/hmelenok)
- Japanese (ja) [@digitalsp](https://github.com/digitalsp)
Still under development (due to lack of RTL support in LM Studio)
- Hebrew: [@NHLOCAL](https://github.com/NHLOCAL)
#### Contributing to LM Studio localization
If you want to improve existing translations or contribute new ones, you're more than welcome to jump in.
LM Studio strings are maintained in https://github.com/lmstudio-ai/localization.
See instructions for contributing [here](https://github.com/lmstudio-ai/localization/blob/main/README.md).
### User, Power User, or Developer
> Hide or reveal advanced features
Starting LM Studio 0.3.0, you can switch between the following modes:
- **User**
- **Power User**
- **Developer**
### Selecting a Mode
You can configure LM Studio to run in increasing levels of configurability.
Select between User, Power User, and Developer.
### Which mode should I choose?
#### `User`
Show only the chat interface, and auto-configure everything. This is the best choice for beginners or anyone who's happy with the default settings.
#### `Power User`
Use LM Studio in this mode if you want access to configurable [load](/docs/configuration/load) and [inference](/docs/configuration/inference) parameters as well as advanced chat features such as [insert, edit, & continue](/docs/advanced/context) (for either role, user or assistant).
#### `Developer`
Full access to all aspects in LM Studio. This includes keyboard shortcuts and development features. Check out the Developer section under Settings for more.
### Color Themes
> Customize LM Studio's color theme
LM Studio comes with a few built-in themes for app-wide color palettes.
### Selecting a Theme
You can choose a theme in the Settings tab.
Choosing the "Auto" option will automatically switch between Light and Dark themes based on your system settings.
```lms_protip
You can jump to Settings from anywhere in the app by pressing `cmd` + `,` on macOS or `ctrl` + `,` on Windows/Linux.
```
###### To get to the Settings page, you need to be on [Power User mode](/docs/modes) or higher.
## advanced
### Per-model Defaults
> You can set default settings for each model in LM Studio
`Advanced`
You can set default load settings for each model in LM Studio.
When the model is loaded anywhere in the app (including through [`lms load`](/docs/cli#load-a-model-with-options)) these settings will be used.
### Setting default parameters for a model
Head to the My Models tab and click on the gear ⚙️ icon to edit the model's default parameters.
This will open a dialog where you can set the default parameters for the model.
Next time you load the model, these settings will be used.
```lms_protip
#### Reasons to set default load parameters (not required, totally optional)
- Set a particular GPU offload settings for a given model
- Set a particular context size for a given model
- Whether or not to utilize Flash Attention for a given model
```
## Advanced Topics
### Changing load settings before loading a model
When you load a model, you can optionally change the default load settings.
### Saving your changes as the default settings for a model
If you make changes to load settings when you load a model, you can save them as the default settings for that model.
### Community
Chat with other LM Studio power users, discuss configs, models, hardware, and more on the [LM Studio Discord server](https://discord.gg/aPQfnNkxGC).
### Prompt Template
> Optionally set or modify the model's prompt template
`Advanced`
By default, LM Studio will automatically configure the prompt template based on the model file's metadata.
However, you can customize the prompt template for any model.
### Overriding the Prompt Template for a Specific Model
Head over to the My Models tab and click on the gear ⚙️ icon to edit the model's default parameters.
###### Pro tip: you can jump to the My Models tab from anywhere by pressing `⌘` + `3` on Mac, or `ctrl` + `3` on Windows / Linux.
### Customize the Prompt Template
###### 💡 In most cases you don't need to change the prompt template
When a model doesn't come with a prompt template information, LM Studio will surface the `Prompt Template` config box in the **🧪 Advanced Configuration** sidebar.
You can make this config box always show up by right clicking the sidebar and selecting **Always Show Prompt Template**.
### Prompt template options
#### Jinja Template
You can express the prompt template in Jinja.
###### 💡 [Jinja](https://en.wikipedia.org/wiki/Jinja_(template_engine)) is a templating engine used to encode the prompt template in several popular LLM model file formats.
#### Manual
You can also express the prompt template manually by specifying message role prefixes and suffixes.
#### Reasons you might want to edit the prompt template:
1. The model's metadata is incorrect, incomplete, or LM Studio doesn't recognize it
2. The model does not have a prompt template in its metadata (e.g. custom or older models)
3. You want to customize the prompt template for a specific use case
### Speculative Decoding
> Speed up generation with a draft model
`Advanced`
Speculative decoding is a technique that can substantially increase the generation speed of large language models (LLMs) without reducing response quality.
> 🔔 Speculative Decoding requires LM Studio 0.3.10 or newer, currently in beta. [Get it here](https://lmstudio.ai/beta-releases).
## What is Speculative Decoding
Speculative decoding relies on the collaboration of two models:
- A larger, "main" model
- A smaller, faster "draft" model
During generation, the draft model rapidly proposes potential tokens (subwords), which the main model can verify faster than it would take it to generate them from scratch. To maintain quality, the main model only accepts tokens that match what it would have generated. After the last accepted draft token, the main model always generates one additional token.
For a model to be used as a draft model, it must have the same "vocabulary" as the main model.
## How to enable Speculative Decoding
On `Power User` mode or higher, load a model, then select a `Draft Model` within the `Speculative Decoding` section of the chat sidebar:
### Finding compatible draft models
You might see the following when you open the dropdown:
Try to download a lower parameter variant of the model you have loaded, if it exists. If no smaller versions of your model exist, find a pairing that does.
For example:
Once you have both a main and draft model loaded, simply begin chatting to enable speculative decoding.
## Key factors affecting performance
Speculative decoding speed-up is generally dependent on two things:
1. How small and fast the _draft model_ is compared with the _main model_
2. How often the draft model is able to make "good" suggestions
In simple terms, you want to choose a draft model that's much smaller than the main model. And some prompts will work better than others.
### An important trade-off
Running a draft model alongside a main model to enable speculative decoding requires more **computation and resources** than running the main model on its own.
The key to faster generation of the main model is choosing a draft model that's both small and capable enough.
Here are general guidelines for the **maximum** draft model size you should select based on main model size (in parameters):
| Main Model Size | Max Draft Model Size to Expect Speed-Ups |
| :-------------: | :--------------------------------------: |
| 3B | - |
| 7B | 1B |
| 14B | 3B |
| 32B | 7B |
Generally, the larger the size difference is between the main model and the draft model, the greater the speed-up.
Note: if the draft model is not fast enough or effective enough at making "good" suggestions to the main model, the generation speed will not increase, and could actually decrease.
### Prompt dependent
One thing you will likely notice when using speculative decoding is that the generation speed is not consistent across all prompts.
The reason that the speed-up is not consistent across all prompts is because for some prompts, the draft model is less likely to make "good" suggestions to the main model.
Here are some extreme examples that illustrate this concept:
#### 1. Discrete Example: Mathematical Question
Prompt: "What is the quadratic equation formula?"
In this case, both a 70B model and a 0.5B model are both very likely to give the standard formula `x = (-b ± √(b² - 4ac))/(2a)`. So if the draft model suggested this formula as the next tokens, the target model would likely accept it, making this an ideal case for speculative decoding to work efficiently.
#### 2. Creative Example: Story Generation
Prompt: "Write a story that begins: 'The door creaked open...'"
In this case, the smaller model's draft tokens are likely be rejected more often by the larger model, as each next word could branch into countless valid possibilities.
While "4" is the only reasonable answer to "2+2", this story could continue with "revealing a monster", "as the wind howled", "and Sarah froze", or hundreds of other perfectly valid continuations, making the smaller model's specific word predictions much less likely to match the larger
model's choices.
# python
# `lmstudio-python` (Python SDK)
> Getting started with LM Studio's Python SDK
`lmstudio-python` provides you a set APIs to interact with LLMs, embeddings models, and agentic flows.
## Installing the SDK
`lmstudio-python` is available as a PyPI package. You can install it using pip.
```lms_code_snippet
variants:
pip:
language: bash
code: |
pip install lmstudio
```
For the source code and open source contribution, visit [lmstudio-python](https://github.com/lmstudio-ai/lmstudio-python) on GitHub.
## Features
- Use LLMs to [respond in chats](./python/llm-prediction/chat-completion) or predict [text completions](./python/llm-prediction/completion)
- Define functions as tools, and turn LLMs into [autonomous agents](./python/agent) that run completely locally
- [Load](./python/manage-models/loading), [configure](./python/llm-prediction/parameters), and [unload](./python/manage-models/loading) models from memory
- Generate embeddings for text, and more!
## Quick Example: Chat with a Llama Model
```lms_code_snippet
variants:
"Python (convenience API)":
language: python
code: |
import lmstudio as lms
model = lms.llm("llama-3.2-1b-instruct")
result = model.respond("What is the meaning of life?")
print(result)
"Python (scoped resource API)":
language: python
code: |
import lmstudio as lms
with lms.Client() as client:
model = client.llm.model("llama-3.2-1b-instruct")
result = model.respond("What is the meaning of life?")
print(result)
```
### Getting Local Models
The above code requires the Llama 3.2 1B model.
If you don't have the model, run the following command in the terminal to download it.
```bash
lms get llama-3.2-1b-instruct
```
Read more about `lms get` in LM Studio's CLI [here](./cli/get).
# Interactive Convenience or Deterministic Resource Management?
As shown in the example above, there are two distinct approaches for working
with the LM Studio Python SDK.
The first is the interactive convenience API (listed as "Python (convenience API)"
in examples), which focuses on the use of a default LM Studio client instance for
convenient interactions at a Python prompt, or when using Jupyter notebooks.
The second is a scoped resource API (listed as "Python (scoped resource API)"
in examples), which uses context managers to ensure that allocated resources
(such as network connections) are released deterministically, rather than
potentially remaining open until the entire process is terminated.
## getting-started
### Project Setup
> Set up your `lmstudio-python` app or script.
`lmstudio` is a library published on PyPI that allows you to use `lmstudio-python` in your own projects.
It is open source and developed on GitHub.
You can find the source code [here](https://github.com/lmstudio-ai/lmstudio-python).
## Installing `lmstudio-python`
As it is published to PyPI, `lmstudio-python` may be installed using `pip`
or your preferred project dependency manager (`pdm` and `uv` are shown, but other
Python project management tools offer similar dependency addition commands).
```lms_code_snippet
variants:
pip:
language: bash
code: |
pip install lmstudio
pdm:
language: bash
code: |
pdm add lmstudio
uv:
language: bash
code: |
uv add lmstudio
```
## Customizing the server API host and TCP port
All of the examples in the documentation assume that the server API is running locally
on the default port. The network location of the server API can be overridden by
passing a `"host:port"` string when creating the client instance.
```lms_code_snippet
variants:
"Python (convenience API)":
language: python
code: |
import lmstudio as lms
SERVER_API_HOST = "localhost:1234"
# This must be the *first* convenience API interaction (otherwise the SDK
# implicitly creates a client that accesses the default server API host)
lms.configure_default_client(SERVER_API_HOST)
# Note: the dedicated configuration API was added in lmstudio-python 1.3.0
# For compatibility with earlier SDK versions, it is still possible to use
# lms.get_default_client(SERVER_API_HOST) to configure the default client
"Python (scoped resource API)":
language: python
code: |
import lmstudio as lms
SERVER_API_HOST = "localhost:1234"
# When using the scoped resource API, each client instance
# can be configured to use a specific server API host
with lms.Client(SERVER_API_HOST) as client:
model = client.llm.model()
for fragment in model.respond_stream("What is the meaning of life?"):
print(fragment.content, end="", flush=True)
print() # Advance to a new line at the end of the response
```
### Using `lmstudio-python` in REPL
> You can use `lmstudio-python` in REPL (Read-Eval-Print Loop) to interact with LLMs, manage models, and more.
To enable interactive use, `lmstudio-python` offers a convenience API which manages
its resources via `atexit` hooks, allowing a default synchronous client session
to be used across multiple interactive commands.
This convenience API is shown in the examples throughout the documentation as the
`Python (convenience API)` tab (alongside the `Python (scoped resource API)` examples,
which use `with` statements to ensure deterministic cleanup of network communication
resources).
The convenience API allows the standard Python REPL, or more flexible alternatives like
Juypter Notebooks, to be used to interact with AI models loaded into LM Studio. For
example:
```lms_code_snippet
title: "Python REPL"
variants:
"Interactive chat session":
language: python
code: |
>>> import lmstudio as lms
>>> loaded_models = lms.list_loaded_models()
>>> for idx, model in enumerate(loaded_models):
... print(f"{idx:>3} {model}")
...
0 LLM(identifier='qwen2.5-7b-instruct')
>>> model = loaded_models[0]
>>> chat = lms.Chat("You answer questions concisely")
>>> chat = lms.Chat("You answer questions concisely")
>>> chat.add_user_message("Tell me three fruits")
UserMessage(content=[TextData(text='Tell me three fruits')])
>>> print(model.respond(chat, on_message=chat.append))
Banana, apple, orange.
>>> chat.add_user_message("Tell me three more fruits")
UserMessage(content=[TextData(text='Tell me three more fruits')])
>>> print(model.respond(chat, on_message=chat.append))
Mango, strawberry, avocado.
>>> chat.add_user_message("How many fruits have you told me?")
UserMessage(content=[TextData(text='How many fruits have you told me?')])
>>> print(model.respond(chat, on_message=chat.append))
You asked for three initial fruits and three more, so I've listed a total of six fruits.
```
## llm-prediction
### Chat Completions
> APIs for a multi-turn chat conversations with an LLM
Use `llm.respond(...)` to generate completions for a chat conversation.
## Quick Example: Generate a Chat Response
The following snippet shows how to obtain the AI's response to a quick chat prompt.
```lms_code_snippet
variants:
"Python (convenience API)":
language: python
code: |
import lmstudio as lms
model = lms.llm()
print(model.respond("What is the meaning of life?"))
"Python (scoped resource API)":
language: python
code: |
import lmstudio as lms
with lms.Client() as client:
model = client.llm.model()
print(model.respond("What is the meaning of life?"))
```
## Streaming a Chat Response
The following snippet shows how to stream the AI's response to a chat prompt,
displaying text fragments as they are received (rather than waiting for the
entire response to be generated before displaying anything).
```lms_code_snippet
variants:
"Python (convenience API)":
language: python
code: |
import lmstudio as lms
model = lms.llm()
for fragment in model.respond_stream("What is the meaning of life?"):
print(fragment.content, end="", flush=True)
print() # Advance to a new line at the end of the response
"Python (scoped resource API)":
language: python
code: |
import lmstudio as lms
with lms.Client() as client:
model = client.llm.model()
for fragment in model.respond_stream("What is the meaning of life?"):
print(fragment.content, end="", flush=True)
print() # Advance to a new line at the end of the response
```
## Cancelling a Chat Response
See the [Cancelling a Prediction](./cancelling-predictions) section for how to cancel a prediction in progress.
## Obtain a Model
First, you need to get a model handle.
This can be done using the top-level `llm` convenience API,
or the `model` method in the `llm` namespace when using the scoped resource API.
For example, here is how to use Qwen2.5 7B Instruct.
```lms_code_snippet
variants:
"Python (convenience API)":
language: python
code: |
import lmstudio as lms
model = lms.llm("qwen2.5-7b-instruct")
"Python (scoped resource API)":
language: python
code: |
import lmstudio as lms
with lms.Client() as client:
model = client.llm.model("qwen2.5-7b-instruct")
```
There are other ways to get a model handle. See [Managing Models in Memory](./../manage-models/loading) for more info.
## Manage Chat Context
The input to the model is referred to as the "context".
Conceptually, the model receives a multi-turn conversation as input,
and it is asked to predict the assistant's response in that conversation.
```lms_code_snippet
variants:
"Constructing a Chat object":
language: python
code: |
import lmstudio as lms
# Create a chat with an initial system prompt.
chat = lms.Chat("You are a resident AI philosopher.")
# Build the chat context by adding messages of relevant types.
chat.add_user_message("What is the meaning of life?")
# ... continued in next example
"From chat history data":
language: python
code: |
import lmstudio as lms
# Create a chat object from a chat history dict
chat = lms.Chat.from_history({
"messages": [
{ "role": "system", "content": "You are a resident AI philosopher." },
{ "role": "user", "content": "What is the meaning of life?" },
]
})
# ... continued in next example
```
See [Working with Chats](./working-with-chats) for more information on managing chat context.
## Generate a response
You can ask the LLM to predict the next response in the chat context using the `respond()` method.
```lms_code_snippet
variants:
"Non-streaming":
language: python
code: |
# The `chat` object is created in the previous step.
result = model.respond(chat)
print(result)
Streaming:
language: python
code: |
# The `chat` object is created in the previous step.
prediction_stream = model.respond_stream(chat)
for fragment in prediction_stream:
print(fragment.content, end="", flush=True)
print() # Advance to a new line at the end of the response
```
## Customize Inferencing Parameters
You can pass in inferencing parameters via the `config` keyword parameter on `.respond()`.
```lms_code_snippet
variants:
Streaming:
language: python
code: |
prediction_stream = model.respond_stream(chat, config={
"temperature": 0.6,
"maxTokens": 50,
})
"Non-streaming":
language: python
code: |
result = model.respond(chat, config={
"temperature": 0.6,
"maxTokens": 50,
})
```
See [Configuring the Model](./parameters) for more information on what can be configured.
## Print prediction stats
You can also print prediction metadata, such as the model used for generation, number of generated
tokens, time to first token, and stop reason.
```lms_code_snippet
variants:
Streaming:
language: python
code: |
# After iterating through the prediction fragments,
# the overall prediction result may be obtained from the stream
result = prediction_stream.result()
print("Model used:", result.model_info.display_name)
print("Predicted tokens:", result.stats.predicted_tokens_count)
print("Time to first token (seconds):", result.stats.time_to_first_token_sec)
print("Stop reason:", result.stats.stop_reason)
"Non-streaming":
language: python
code: |
# `result` is the response from the model.
print("Model used:", result.model_info.display_name)
print("Predicted tokens:", result.stats.predicted_tokens_count)
print("Time to first token (seconds):", result.stats.time_to_first_token_sec)
print("Stop reason:", result.stats.stop_reason)
```
## Example: Multi-turn Chat
```lms_code_snippet
title: "chatbot.py"
variants:
Python:
language: python
code: |
import lmstudio as lms
model = lms.llm()
chat = lms.Chat("You are a task focused AI assistant")
while True:
try:
user_input = input("You (leave blank to exit): ")
except EOFError:
print()
break
if not user_input:
break
chat.add_user_message(user_input)
prediction_stream = model.respond_stream(
chat,
on_message=chat.append,
)
print("Bot: ", end="", flush=True)
for fragment in prediction_stream:
print(fragment.content, end="", flush=True)
print()
```
### Progress Callbacks
Long prompts will often take a long time to first token, i.e. it takes the model a long time to process your prompt.
If you want to get updates on the progress of this process, you can provide a float callback to `respond`
that receives a float from 0.0-1.0 representing prompt processing progress.
```lms_code_snippet
variants:
Python (convenience API):
language: python
code: |
import lmstudio as lms
llm = lms.llm()
response = llm.respond(
"What is LM Studio?",
on_prompt_processing_progress = (lambda progress: print(f"{progress*100}% complete")),
)
Python (scoped resource API):
language: python
code: |
import lmstudio as lms
with lms.Client() as client:
llm = client.llm.model()
response = llm.respond(
"What is LM Studio?",
on_prompt_processing_progress = (lambda progress: print(f"{progress*100}% complete")),
)
```
In addition to `on_prompt_processing_progress`, the other available progress callbacks are:
- `on_first_token`: called after prompt processing is complete and the first token is being emitted.
Does not receive any arguments (use the streaming iteration API or `on_prediction_fragment`
to process tokens as they are emitted).
- `on_prediction_fragment`: called for each prediction fragment received by the client.
Receives the same prediction fragments as iterating over the stream iteration API.
- `on_message`: called with an assistant response message when the prediction is complete.
Intended for appending received messages to a chat history instance.
### Image Input
> API for passing images as input to the model
*Required Python SDK version*: **1.1.0**
Some models, known as VLMs (Vision-Language Models), can accept images as input. You can pass images to the model using the `.respond()` method.
### Prerequisite: Get a VLM (Vision-Language Model)
If you don't yet have a VLM, you can download a model like `qwen2-vl-2b-instruct` using the following command:
```bash
lms get qwen2-vl-2b-instruct
```
## 1. Instantiate the Model
Connect to LM Studio and obtain a handle to the VLM (Vision-Language Model) you want to use.
```lms_code_snippet
variants:
"Python (convenience API)":
language: python
code: |
import lmstudio as lms
model = lms.llm("qwen2-vl-2b-instruct")
"Python (scoped resource API)":
language: python
code: |
import lmstudio as lms
with lms.Client() as client:
model = client.llm.model("qwen2-vl-2b-instruct")
```
## 2. Prepare the Image
Use the `prepare_image()` function or `files` namespace method to
get a handle to the image that can subsequently be passed to the model.
```lms_code_snippet
variants:
"Python (convenience API)":
language: python
code: |
import lmstudio as lms
image_path = "/path/to/image.jpg" # Replace with the path to your image
image_handle = lms.prepare_image(image_path)
"Python (scoped resource API)":
language: python
code: |
import lmstudio as lms
with lms.Client() as client:
image_path = "/path/to/image.jpg" # Replace with the path to your image
image_handle = client.files.prepare_image(image_path)
```
If you only have the raw data of the image, you can supply the raw data directly as a bytes
object without having to write it to disk first. Due to this feature, binary filesystem
paths are *not* supported (as they will be handled as malformed image data rather than as
filesystem paths).
Binary IO objects are also accepted as local file inputs.
The LM Studio server supports JPEG, PNG, and WebP image formats.
## 3. Pass the Image to the Model in `.respond()`
Generate a prediction by passing the image to the model in the `.respond()` method.
```lms_code_snippet
variants:
"Python (convenience API)":
language: python
code: |
import lmstudio as lms
image_path = "/path/to/image.jpg" # Replace with the path to your image
image_handle = lms.prepare_image(image_path)
model = lms.llm("qwen2-vl-2b-instruct")
chat = lms.Chat()
chat.add_user_message("Describe this image please", images=[image_handle])
prediction = model.respond(chat)
"Python (scoped resource API)":
language: python
code: |
import lmstudio as lms
with lms.Client() as client:
image_path = "/path/to/image.jpg" # Replace with the path to your image
image_handle = client.files.prepare_image(image_path)
model = client.llm.model("qwen2-vl-2b-instruct")
chat = lms.Chat()
chat.add_user_message("Describe this image please", images=[image_handle])
prediction = model.respond(chat)
```
### Structured Response
> Enforce a structured response from the model using Pydantic models or JSON Schema
You can enforce a particular response format from an LLM by providing a JSON schema to the `.respond()` method.
This guarantees that the model's output conforms to the schema you provide.
The JSON schema can either be provided directly,
or by providing an object that implements the `lmstudio.ModelSchema` protocol,
such as `pydantic.BaseModel` or `lmstudio.BaseModel`.
The `lmstudio.ModelSchema` protocol is defined as follows:
```python
@runtime_checkable
class ModelSchema(Protocol):
"""Protocol for classes that provide a JSON schema for their model."""
@classmethod
def model_json_schema(cls) -> DictSchema:
"""Return a JSON schema dict describing this model."""
...
```
When a schema is provided, the prediction result's `parsed` field will contain a string-keyed dictionary that conforms
to the given schema (for unstructured results, this field is a string field containing the same value as `content`).
## Enforce Using a Class Based Schema Definition
If you wish the model to generate JSON that satisfies a given schema,
it is recommended to provide a class based schema definition using a library
such as [`pydantic`](https://docs.pydantic.dev/) or [`msgspec`](https://jcristharif.com/msgspec/).
Pydantic models natively implement the `lmstudio.ModelSchema` protocol,
while `lmstudio.BaseModel` is a `msgspec.Struct` subclass that implements `.model_json_schema()` appropriately.
#### Define a Class Based Schema
```lms_code_snippet
variants:
"pydantic.BaseModel":
language: python
code: |
from pydantic import BaseModel
# A class based schema for a book
class BookSchema(BaseModel):
title: str
author: str
year: int
"lmstudio.BaseModel":
language: python
code: |
from lmstudio import BaseModel
# A class based schema for a book
class BookSchema(BaseModel):
title: str
author: str
year: int
```
#### Generate a Structured Response
```lms_code_snippet
variants:
"Non-streaming":
language: python
code: |
result = model.respond("Tell me about The Hobbit", response_format=BookSchema)
book = result.parsed
print(book)
# ^
# Note that `book` is correctly typed as { title: string, author: string, year: number }
Streaming:
language: python
code: |
prediction_stream = model.respond_stream("Tell me about The Hobbit", response_format=BookSchema)
# Optionally stream the response
# for fragment in prediction:
# print(fragment.content, end="", flush=True)
# print()
# Note that even for structured responses, the *fragment* contents are still only text
# Get the final structured result
result = prediction_stream.result()
book = result.parsed
print(book)
# ^
# Note that `book` is correctly typed as { title: string, author: string, year: number }
```
## Enforce Using a JSON Schema
You can also enforce a structured response using a JSON schema.
#### Define a JSON Schema
```python
# A JSON schema for a book
schema = {
"type": "object",
"properties": {
"title": { "type": "string" },
"author": { "type": "string" },
"year": { "type": "integer" },
},
"required": ["title", "author", "year"],
}
```
#### Generate a Structured Response
```lms_code_snippet
variants:
"Non-streaming":
language: python
code: |
result = model.respond("Tell me about The Hobbit", response_format=schema)
book = result.parsed
print(book)
# ^
# Note that `book` is correctly typed as { title: string, author: string, year: number }
Streaming:
language: python
code: |
prediction_stream = model.respond_stream("Tell me about The Hobbit", response_format=schema)
# Stream the response
for fragment in prediction:
print(fragment.content, end="", flush=True)
print()
# Note that even for structured responses, the *fragment* contents are still only text
# Get the final structured result
result = prediction_stream.result()
book = result.parsed
print(book)
# ^
# Note that `book` is correctly typed as { title: string, author: string, year: number }
```
### Speculative Decoding
> API to use a draft model in speculative decoding in `lmstudio-python`
*Required Python SDK version*: **1.2.0**
Speculative decoding is a technique that can substantially increase the generation speed of large language models (LLMs) without reducing response quality. See [Speculative Decoding](./../../app/advanced/speculative-decoding) for more info.
To use speculative decoding in `lmstudio-python`, simply provide a `draftModel` parameter when performing the prediction. You do not need to load the draft model separately.
```lms_code_snippet
variants:
"Non-streaming":
language: python
code: |
import lmstudio as lms
main_model_key = "qwen2.5-7b-instruct"
draft_model_key = "qwen2.5-0.5b-instruct"
model = lms.llm(main_model_key)
result = model.respond(
"What are the prime numbers between 0 and 100?",
config={
"draftModel": draft_model_key,
}
)
print(result)
stats = result.stats
print(f"Accepted {stats.accepted_draft_tokens_count}/{stats.predicted_tokens_count} tokens")
Streaming:
language: python
code: |
import lmstudio as lms
main_model_key = "qwen2.5-7b-instruct"
draft_model_key = "qwen2.5-0.5b-instruct"
model = lms.llm(main_model_key)
prediction_stream = model.respond_stream(
"What are the prime numbers between 0 and 100?",
config={
"draftModel": draft_model_key,
}
)
for fragment in prediction_stream:
print(fragment.content, end="", flush=True)
print() # Advance to a new line at the end of the response
stats = prediction_stream.result().stats
print(f"Accepted {stats.accepted_draft_tokens_count}/{stats.predicted_tokens_count} tokens")
```
### Cancelling Predictions
> Stop an ongoing prediction in `lmstudio-python`
One benefit of using the streaming API is the ability to cancel the
prediction request based on criteria that can't be represented using
the `stopStrings` or `maxPredictedTokens` configuration settings.
The following snippet illustrates cancelling the request in response
to an application specification cancellation condition (such as polling
an event set by another thread).
```lms_code_snippet
variants:
"Python (convenience API)":
language: python
code: |
import lmstudio as lms
model = lms.llm()
prediction_stream = model.respond_stream("What is the meaning of life?")
cancelled = False
for fragment in prediction_stream:
if ...: # Cancellation condition will be app specific
cancelled = True
prediction_stream.cancel()
# Note: it is recommended to let the iteration complete,
# as doing so allows the partial result to be recorded.
# Breaking the loop *is* permitted, but means the partial result
# and final prediction stats won't be available to the client
# The stream allows the prediction result to be retrieved after iteration
if not cancelled:
print(prediction_stream.result())
"Python (scoped resource API)":
language: python
code: |
import lmstudio as lms
with lms.Client() as client:
model = client.llm.model()
prediction_stream = model.respond_stream("What is the meaning of life?")
cancelled = False
for fragment in prediction_stream:
if ...: # Cancellation condition will be app specific
cancelled = True
prediction_stream.cancel()
# Note: it is recommended to let the iteration complete,
# as doing so allows the partial result to be recorded.
# Breaking the loop *is* permitted, but means the partial result
# and final prediction stats won't be available to the client
# The stream allows the prediction result to be retrieved after iteration
if not cancelled:
print(prediction_stream.result())
```
### Text Completions
> Provide a string input for the model to complete
Use `llm.complete(...)` to generate text completions from a loaded language model.
Text completions mean sending a non-formatted string to the model with the expectation that the model will complete the text.
This is different from multi-turn chat conversations. For more information on chat completions, see [Chat Completions](./chat-completion).
## 1. Instantiate a Model
First, you need to load a model to generate completions from.
This can be done using the top-level `llm` convenience API,
or the `model` method in the `llm` namespace when using the scoped resource API.
For example, here is how to use Qwen2.5 7B Instruct.
```lms_code_snippet
variants:
"Python (convenience API)":
language: python
code: |
import lmstudio as lms
model = lms.llm("qwen2.5-7b-instruct")
"Python (scoped resource API)":
language: python
code: |
import lmstudio as lms
with lms.Client() as client:
model = client.llm.model("qwen2.5-7b-instruct")
```
## 2. Generate a Completion
Once you have a loaded model, you can generate completions by passing a string to the `complete` method on the `llm` handle.
```lms_code_snippet
variants:
"Non-streaming":
language: python
code: |
# The `chat` object is created in the previous step.
result = model.complete("My name is", config={"maxTokens": 100})
print(result)
Streaming:
language: python
code: |
# The `chat` object is created in the previous step.
prediction_stream = model.complete_stream("My name is", config={"maxTokens": 100})
for fragment in prediction_stream:
print(fragment.content, end="", flush=True)
print() # Advance to a new line at the end of the response
```
## 3. Print Prediction Stats
You can also print prediction metadata, such as the model used for generation, number of generated tokens, time to first token, and stop reason.
```lms_code_snippet
variants:
"Non-streaming":
language: python
code: |
# `result` is the response from the model.
print("Model used:", result.model_info.display_name)
print("Predicted tokens:", result.stats.predicted_tokens_count)
print("Time to first token (seconds):", result.stats.time_to_first_token_sec)
print("Stop reason:", result.stats.stop_reason)
Streaming:
language: python
code: |
# After iterating through the prediction fragments,
# the overall prediction result may be obtained from the stream
result = prediction_stream.result()
print("Model used:", result.model_info.display_name)
print("Predicted tokens:", result.stats.predicted_tokens_count)
print("Time to first token (seconds):", result.stats.time_to_first_token_sec)
print("Stop reason:", result.stats.stop_reason)
```
## Example: Get an LLM to Simulate a Terminal
Here's an example of how you might use the `complete` method to simulate a terminal.
```lms_code_snippet
title: "terminal-sim.py"
variants:
Python:
language: python
code: |
import lmstudio as lms
model = lms.llm()
console_history = []
while True:
try:
user_command = input("$ ")
except EOFError:
print()
break
if user_command.strip() == "exit":
break
console_history.append(f"$ {user_command}")
history_prompt = "\n".join(console_history)
prediction_stream = model.complete_stream(
history_prompt,
config={ "stopStrings": ["$"] },
)
for fragment in prediction_stream:
print(fragment.content, end="", flush=True)
print()
console_history.append(prediction_stream.result().content)
```
## Customize Inferencing Parameters
You can pass in inferencing parameters via the `config` keyword parameter on `.complete()`.
```lms_code_snippet
variants:
Streaming:
language: python
code: |
prediction_stream = model.complete_stream(initial_text, config={
"temperature": 0.6,
"maxTokens": 50,
})
"Non-streaming":
language: python
code: |
result = model.complete(initial_text, config={
"temperature": 0.6,
"maxTokens": 50,
})
```
See [Configuring the Model](./parameters) for more information on what can be configured.
### Progress Callbacks
Long prompts will often take a long time to first token, i.e. it takes the model a long time to process your prompt.
If you want to get updates on the progress of this process, you can provide a float callback to `complete`
that receives a float from 0.0-1.0 representing prompt processing progress.
```lms_code_snippet
variants:
Python (convenience API):
language: python
code: |
import lmstudio as lms
llm = lms.llm()
completion = llm.complete(
"My name is",
on_prompt_processing_progress = (lambda progress: print(f"{progress*100}% complete")),
)
Python (scoped resource API):
language: python
code: |
import lmstudio as lms
with lms.Client() as client:
llm = client.llm.model()
completion = llm.complete(
"My name is",
on_prompt_processing_progress = (lambda progress: print(f"{progress*100}% processed")),
)
```
In addition to `on_prompt_processing_progress`, the other available progress callbacks are:
* `on_first_token`: called after prompt processing is complete and the first token is being emitted.
Does not receive any arguments (use the streaming iteration API or `on_prediction_fragment`
to process tokens as they are emitted).
* `on_prediction_fragment`: called for each prediction fragment received by the client.
Receives the same prediction fragments as iterating over the stream iteration API.
* `on_message`: called with an assistant response message when the prediction is complete.
Intended for appending received messages to a chat history instance.
### Configuring the Model
> APIs for setting inference-time and load-time parameters for your model
You can customize both inference-time and load-time parameters for your model. Inference parameters can be set on a per-request basis, while load parameters are set when loading the model.
# Inference Parameters
Set inference-time parameters such as `temperature`, `maxTokens`, `topP` and more.
```lms_code_snippet
variants:
".respond()":
language: python
code: |
result = model.respond(chat, config={
"temperature": 0.6,
"maxTokens": 50,
})
".complete()":
language: python
code: |
result = model.complete(chat, config={
"temperature": 0.6,
"maxTokens": 50,
"stopStrings": ["\n\n"],
})
```
See [`LLMPredictionConfigInput`](./../../typescript/api-reference/llm-prediction-config-input) in the
Typescript SDK documentation for all configurable fields.
Note that while `structured` can be set to a JSON schema definition as an inference-time configuration parameter
(Zod schemas are not supported in the Python SDK), the preferred approach is to instead set the
[dedicated `response_format` parameter](<(./structured-responses)>), which allows you to more rigorously
enforce the structure of the output using a JSON or class based schema definition.
# Load Parameters
Set load-time parameters such as the context length, GPU offload ratio, and more.
### Set Load Parameters with `.model()`
The `.model()` retrieves a handle to a model that has already been loaded, or loads a new one on demand (JIT loading).
**Note**: if the model is already loaded, the given configuration will be **ignored**.
```lms_code_snippet
variants:
"Python (convenience API)":
language: python
code: |
import lmstudio as lms
model = lms.llm("qwen2.5-7b-instruct", config={
"contextLength": 8192,
"gpu": {
"ratio": 0.5,
}
})
"Python (scoped resource API)":
language: python
code: |
import lmstudio as lms
with lms.Client() as client:
model = client.llm.model(
"qwen2.5-7b-instruct",
config={
"contextLength": 8192,
"gpu": {
"ratio": 0.5,
}
}
)
```
See [`LLMLoadModelConfig`](./../../typescript/api-reference/llm-load-model-config) in the
Typescript SDK documentation for all configurable fields.
### Set Load Parameters with `.load_new_instance()`
The `.load_new_instance()` method creates a new model instance and loads it with the specified configuration.
```lms_code_snippet
variants:
"Python (convenience API)":
language: python
code: |
import lmstudio as lms
client = lms.get_default_client()
model = client.llm.load_new_instance("qwen2.5-7b-instruct", config={
"contextLength": 8192,
"gpu": {
"ratio": 0.5,
}
})
"Python (scoped resource API)":
language: python
code: |
import lmstudio as lms
with lms.Client() as client:
model = client.llm.load_new_instance(
"qwen2.5-7b-instruct",
config={
"contextLength": 8192,
"gpu": {
"ratio": 0.5,
}
}
)
```
See [`LLMLoadModelConfig`](./../../typescript/api-reference/llm-load-model-config) in the
Typescript SDK documentation for all configurable fields.
### Working with Chats
> APIs for representing a chat conversation with an LLM
SDK methods such as `llm.respond()`, `llm.applyPromptTemplate()`, or `llm.act()`
take in a chat parameter as an input.
There are a few ways to represent a chat when using the SDK.
## Option 1: Input a Single String
If your chat only has one single user message, you can use a single string to represent the chat.
Here is an example with the `.respond` method.
```lms_code_snippet
variants:
"Single string":
language: python
code: |
prediction = llm.respond("What is the meaning of life?")
```
## Option 2: Using the `Chat` Helper Class
For more complex tasks, it is recommended to use the `Chat` helper class.
It provides various commonly used methods to manage the chat.
Here is an example with the `Chat` class, where the initial system prompt
is supplied when initializing the chat instance, and then the initial user
message is added via the corresponding method call.
```lms_code_snippet
variants:
"Simple chat":
language: python
code: |
chat = Chat("You are a resident AI philosopher.")
chat.add_user_message("What is the meaning of life?")
prediction = llm.respond(chat)
```
You can also quickly construct a `Chat` object using the `Chat.from_history` method.
```lms_code_snippet
variants:
"Chat history data":
language: python
code: |
chat = Chat.from_history({"messages": [
{ "role": "system", "content": "You are a resident AI philosopher." },
{ "role": "user", "content": "What is the meaning of life?" },
]})
"Single string":
language: python
code: |
# This constructs a chat with a single user message
chat = Chat.from_history("What is the meaning of life?")
```
## Option 3: Providing Chat History Data Directly
As the APIs that accept chat histories use `Chat.from_history` internally,
they also accept the chat history data format as a regular dictionary:
```lms_code_snippet
variants:
"Chat history data":
language: python
code: |
prediction = llm.respond({"messages": [
{ "role": "system", "content": "You are a resident AI philosopher." },
{ "role": "user", "content": "What is the meaning of life?" },
]})
```
## agent
### The `.act()` call
> How to use the `.act()` call to turn LLMs into autonomous agents that can perform tasks on your local machine.
## Automatic tool calling
We introduce the concept of execution "rounds" to describe the combined process of running a tool, providing its output to the LLM, and then waiting for the LLM to decide what to do next.
**Execution Round**
```
• run a tool ->
↑ • provide the result to the LLM ->
│ • wait for the LLM to generate a response
│
└────────────────────────────────────────┘ └➔ (return)
```
A model might choose to run tools multiple times before returning a final result. For example, if the LLM is writing code, it might choose to compile or run the program, fix errors, and then run it again, rinse and repeat until it gets the desired result.
With this in mind, we say that the `.act()` API is an automatic "multi-round" tool calling API.
### Quick Example
```lms_code_snippet
variants:
"Python (convenience API)":
language: python
code: |
import lmstudio as lms
def multiply(a: float, b: float) -> float:
"""Given two numbers a and b. Returns the product of them."""
return a * b
model = lms.llm("qwen2.5-7b-instruct")
model.act(
"What is the result of 12345 multiplied by 54321?",
[multiply],
on_message=print,
)
```
### What does it mean for an LLM to "use a tool"?
LLMs are largely text-in, text-out programs. So, you may ask "how can an LLM use a tool?". The answer is that some LLMs are trained to ask the human to call the tool for them, and expect the tool output to to be provided back in some format.
Imagine you're giving computer support to someone over the phone. You might say things like "run this command for me ... OK what did it output? ... OK now click there and tell me what it says ...". In this case you're the LLM! And you're "calling tools" vicariously through the person on the other side of the line.
### Important: Model Selection
The model selected for tool use will greatly impact performance.
Some general guidance when selecting a model:
- Not all models are capable of intelligent tool use
- Bigger is better (i.e., a 7B parameter model will generally perform better than a 3B parameter model)
- We've observed [Qwen2.5-7B-Instruct](https://model.lmstudio.ai/download/lmstudio-community/Qwen2.5-7B-Instruct-GGUF) to perform well in a wide variety of cases
- This guidance may change
### Example: Multiple Tools
The following code demonstrates how to provide multiple tools in a single `.act()` call.
```lms_code_snippet
variants:
"Python (convenience API)":
language: python
code: |
import math
import lmstudio as lms
def add(a: int, b: int) -> int:
"""Given two numbers a and b, returns the sum of them."""
return a + b
def is_prime(n: int) -> bool:
"""Given a number n, returns True if n is a prime number."""
if n < 2:
return False
sqrt = int(math.sqrt(n))
for i in range(2, sqrt):
if n % i == 0:
return False
return True
model = lms.llm("qwen2.5-7b-instruct")
model.act(
"Is the result of 12345 + 45668 a prime? Think step by step.",
[add, is_prime],
on_message=print,
)
```
### Example: Chat Loop with Create File Tool
The following code creates a conversation loop with an LLM agent that can create files.
```lms_code_snippet
variants:
"Python (convenience API)":
language: python
code: |
import readline # Enables input line editing
from pathlib import Path
import lmstudio as lms
def create_file(name: str, content: str):
"""Create a file with the given name and content."""
dest_path = Path(name)
if dest_path.exists():
return "Error: File already exists."
try:
dest_path.write_text(content, encoding="utf-8")
except Exception as exc:
return "Error: {exc!r}"
return "File created."
def print_fragment(fragment, round_index=0):
# .act() supplies the round index as the second parameter
# Setting a default value means the callback is also
# compatible with .complete() and .respond().
print(fragment.content, end="", flush=True)
model = lms.llm()
chat = lms.Chat("You are a task focused AI assistant")
while True:
try:
user_input = input("You (leave blank to exit): ")
except EOFError:
print()
break
if not user_input:
break
chat.add_user_message(user_input)
print("Bot: ", end="", flush=True)
model.act(
chat,
[create_file],
on_message=chat.append,
on_prediction_fragment=print_fragment,
)
print()
```
### Progress Callbacks
Complex interactions with a tool using agent may take some time to process.
The regular progress callbacks for any prediction request are available,
but the expected capabilities differ from those for single round predictions.
* `on_prompt_processing_progress`: called during prompt processing for each
prediction round. Receives the progress ratio (as a float) and the round
index as positional arguments.
* `on_first_token`: called after prompt processing is complete for each prediction round.
Receives the round index as its sole argument.
* `on_prediction_fragment`: called for each prediction fragment received by the client.
Receives the prediction fragment and the round index as positional arguments.
* `on_message`: called with an assistant response message when each prediction round is
complete, and with tool result messages as each tool call request is completed.
Intended for appending received messages to a chat history instance, and hence
does *not* receive the round index as an argument.
The following additional callbacks are available to monitor the prediction rounds:
* `on_round_start`: called before submitting the prediction request for each round.
Receives the round index as its sole argument.
* `on_prediction_completed`: called after the prediction for the round has been completed,
but before any requested tool calls have been initiated. Receives the round's prediction
result as its sole argument. A round prediction result is a regular prediction result
with an additional `round_index` attribute.
* `on_round_end`: called after any tool call requests for the round have been resolved.
Finally, applications may request notifications when agents emit invalid tool requests:
* `handle_invalid_tool_request`: called when a tool request was unable to be processed.
Receives the exception that is about to be reported, as well as the original tool
request that resulted in the problem. When no tool request is given, this is
purely a notification of an unrecoverable error before the agent interaction raises
the given exception (allowing the application to raise its own exception instead).
When a tool request is given, it indicates that rather than being raised locally,
the text description of the exception is going to be passed back to the agent
as the result of that failed tool request. In these cases, the callback may either
return `None` to indicate that the error description should be sent to the agent,
raise the given exception (or a different exception) locally, or return a text
string that should be sent to the agent instead of the error description.
For additional details on defining tools, and an example of overriding the invalid
tool request handling to raise all exceptions locally instead of passing them to
back the agent, refer to [Tool Definition](./tools.md).
### Tool Definition
> Define tools to be called by the LLM, and pass them to the model in the `act()` call.
You can define tools as regular Python functions and pass them to the model in the `act()` call.
Alternatively, tools can be defined with `lmstudio.ToolFunctionDef` in order to control the
name and description passed to the language model.
## Anatomy of a Tool
Follow one of the following examples to define functions as tools (the first approach
is typically going to be the most convenient):
```lms_code_snippet
variants:
"Python function":
language: python
code: |
# Type hinted functions with clear names and docstrings
# may be used directly as tool definitions
def add(a: int, b: int) -> int:
"""Given two numbers a and b, returns the sum of them."""
# The SDK ensures arguments are coerced to their specified types
return a + b
# Pass `add` directly to `act()` as a tool definition
"ToolFunctionDef.from_callable":
language: python
code: |
from lmstudio import ToolFunctionDef
def cryptic_name(a: int, b: int) -> int:
return a + b
# Type hinted functions with cryptic names and missing or poor docstrings
# can be turned into clear tool definitions with `from_callable`
tool_def = ToolFunctionDef.from_callable(
cryptic_name,
name="add",
description="Given two numbers a and b, returns the sum of them."
)
# Pass `tool_def` to `act()` as a tool definition
"ToolFunctionDef":
language: python
code: |
from lmstudio import ToolFunctionDef
def cryptic_name(a, b):
return a + b
# Functions without type hints can be used without wrapping them
# at runtime by defining a tool function directly.
tool_def = ToolFunctionDef(
name="add",
description="Given two numbers a and b, returns the sum of them.",
parameters={
"a": int,
"b": int,
},
implementation=cryptic_name,
)
# Pass `tool_def` to `act()` as a tool definition
```
**Important**: The tool name, description, and the parameter definitions are all passed to the model!
This means that your wording will affect the quality of the generation. Make sure to always provide a clear description of the tool so the model knows how to use it.
## Tools with External Effects (like Computer Use or API Calls)
Tools can also have external effects, such as creating files or calling programs and even APIs. By implementing tools with external effects, you
can essentially turn your LLMs into autonomous agents that can perform tasks on your local machine.
## Example: `create_file_tool`
### Tool Definition
```lms_code_snippet
title: "create_file_tool.py"
variants:
Python:
language: python
code: |
from pathlib import Path
def create_file(name: str, content: str):
"""Create a file with the given name and content."""
dest_path = Path(name)
if dest_path.exists():
return "Error: File already exists."
try:
dest_path.write_text(content, encoding="utf-8")
except Exception as exc:
return "Error: {exc!r}"
return "File created."
```
### Example code using the `create_file` tool:
```lms_code_snippet
title: "example.py"
variants:
"Python (convenience API)":
language: python
code: |
import lmstudio as lms
from create_file_tool import create_file
model = lms.llm("qwen2.5-7b-instruct")
model.act(
"Please create a file named output.txt with your understanding of the meaning of life.",
[create_file],
)
```
## Handling tool calling errors
By default, version 1.3.0 and later of the Python SDK will automatically convert
exceptions raised by tool calls to text and report them back to the language model.
In many cases, when notified of an error in this way, a language model is able
to either adjust its request to avoid the failure, or else accept the failure as
a valid response to its request (consider a prompt like `Attempt to divide 1 by 0
using the provided tool. Explain the result.`, where the expected
response is an explanation of the `ZeroDivisionError` exception the Python
interpreter raises when instructed to divide by zero).
This error handling behaviour can be overridden using the `handle_invalid_tool_request`
callback. For example, the following code reverts the error handling back to raising
exceptions locally in the client:
```lms_code_snippet
title: "example.py"
variants:
"Python (convenience API)":
language: python
code: |
import lmstudio as lms
def divide(numerator: float, denominator: float) -> float:
"""Divide the given numerator by the given denominator. Return the result."""
return numerator / denominator
model = lms.llm("qwen2.5-7b-instruct")
chat = Chat()
chat.add_user_message(
"Attempt to divide 1 by 0 using the tool. Explain the result."
)
def _raise_exc_in_client(
exc: LMStudioPredictionError, request: ToolCallRequest | None
) -> None:
raise exc
act_result = llm.act(
chat,
[divide],
handle_invalid_tool_request=_raise_exc_in_client,
)
```
When a tool request is passed in, the callback results are processed as follows:
* `None`: the original exception text is passed to the LLM unmodified
* a string: the returned string is passed to the LLM instead of the original
exception text
* raising an exception (whether the passed in exception or a new exception):
the raised exception is propagated locally in the client, terminating the
prediction process
If no tool request is passed in, the callback invocation is a notification only,
and the exception cannot be converted to text for passing pack to the LLM
(although it can still be replaced with a different exception). These cases
indicate failures in the expected communication with the server API that mean
the prediction process cannot reasonably continue, so if the callback doesn't
raise an exception, the calling code will raise the original exception directly.
## embedding
## Embedding
> Generate text embeddings from input text
Generate embeddings for input text. Embeddings are vector representations of text that capture semantic meaning. Embeddings are a building block for RAG (Retrieval-Augmented Generation) and other similarity-based tasks.
### Prerequisite: Get an Embedding Model
If you don't yet have an embedding model, you can download a model like `nomic-ai/nomic-embed-text-v1.5` using the following command:
```bash
lms get nomic-ai/nomic-embed-text-v1.5
```
## Create Embeddings
To convert a string to a vector representation, pass it to the `embed` method on the corresponding embedding model handle.
```lms_code_snippet
title: "example.py"
variants:
"Python (convenience API)":
language: python
code: |
import lmstudio as lms
model = lms.embedding_model("nomic-embed-text-v1.5")
embedding = model.embed("Hello, world!")
```
## tokenization
## Tokenization
> Tokenize text using a model's tokenizer
Models use a tokenizer to internally convert text into "tokens" they can deal with more easily. LM Studio exposes this tokenizer for utility.
## Tokenize
You can tokenize a string with a loaded LLM or embedding model using the SDK.
In the below examples, the LLM reference can be replaced with an
embedding model reference without requiring any other changes.
```lms_code_snippet
variants:
"Python (convenience API)":
language: python
code: |
import lmstudio as lms
model = lms.llm()
tokens = model.tokenize("Hello, world!")
print(tokens) # Array of token IDs.
```
## Count tokens
If you only care about the number of tokens, simply check the length of the resulting array.
```lms_code_snippet
variants:
"Python (convenience API)":
language: python
code: |
token_count = len(model.tokenize("Hello, world!"))
print("Token count:", token_count)
```
### Example: count context
You can determine if a given conversation fits into a model's context by doing the following:
1. Convert the conversation to a string using the prompt template.
2. Count the number of tokens in the string.
3. Compare the token count to the model's context length.
```lms_code_snippet
variants:
"Python (convenience API)":
language: python
code: |
import lmstudio as lms
def does_chat_fit_in_context(model: lms.LLM, chat: lms.Chat) -> bool:
# Convert the conversation to a string using the prompt template.
formatted = model.apply_prompt_template(chat)
# Count the number of tokens in the string.
token_count = len(model.tokenize(formatted))
# Get the current loaded context length of the model
context_length = model.get_context_length()
return token_count < context_length
model = lms.llm()
chat = lms.Chat.from_history({
"messages": [
{ "role": "user", "content": "What is the meaning of life." },
{ "role": "assistant", "content": "The meaning of life is..." },
# ... More messages
]
})
print("Fits in context:", does_chat_fit_in_context(model, chat))
```
## manage-models
### List Downloaded Models
> APIs to list the available models in a given local environment
You can iterate through locally available models using the downloaded model listing methods.
The listing results offer `.model()` and `.load_new_instance()` methods, which allow the
downloaded model reference to be converted in the full SDK handle for a loaded model.
## Available Models on the LM Studio Server
```lms_code_snippet
variants:
"Python (convenience API)":
language: python
code: |
import lmstudio as lms
downloaded = lms.list_downloaded_models()
llm_only = lms.list_downloaded_models("llm")
embedding_only = lms.list_downloaded_models("embedding")
for model in downloaded:
print(model)
"Python (scoped resource API)":
language: python
code: |
import lmstudio as lms
with lms.Client() as client:
downloaded = client.list_downloaded_models()
llm_only = client.llm.list_downloaded()
embedding_only = client.embedding.list_downloaded()
for model in downloaded:
print(model)
```
This will give you results equivalent to using [`lms ls`](../../cli/ls) in the CLI.
### Example output:
```python
DownloadedLlm(model_key='qwen2.5-7b-instruct-1m', display_name='Qwen2.5 7B Instruct 1M', architecture='qwen2', vision=False)
DownloadedEmbeddingModel(model_key='text-embedding-nomic-embed-text-v1.5', display_name='Nomic Embed Text v1.5', architecture='nomic-bert')
```
### List Loaded Models
> Query which models are currently loaded
You can iterate through models loaded into memory using the functions and methods shown below.
The results are full SDK model handles, allowing access to all model functionality.
## List Models Currently Loaded in Memory
This will give you results equivalent to using [`lms ps`](../../cli/ps) in the CLI.
```lms_code_snippet
variants:
"Python (convenience API)":
language: python
code: |
import lmstudio as lms
all_loaded_models = lms.list_loaded_models()
llm_only = lms.list_loaded_models("llm")
embedding_only = lms.list_loaded_models("embedding")
print(all_loaded_models)
Python (scoped resource API):
language: python
code: |
import lms
with lms.Client() as client:
all_loaded_models = client.list_loaded_models()
llm_only = client.llm.list_loaded()
embedding_only = client.embedding.list_loaded()
print(all_loaded_models)
```
### Manage Models in Memory
> APIs to load, access, and unload models from memory
AI models are huge. It can take a while to load them into memory. LM Studio's SDK allows you to precisely control this process.
**Model namespaces:**
- LLMs are accessed through the `client.llm` namespace
- Embedding models are accessed through the `client.embedding` namespace
- `lmstudio.llm` is equivalent to `client.llm.model` on the default client
- `lmstudio.embedding_model` is equivalent to `client.embedding.model` on the default client
**Most commonly:**
- Use `.model()` to get any currently loaded model
- Use `.model("model-key")` to use a specific model
**Advanced (manual model management):**
- Use `.load_new_instance("model-key")` to load a new instance of a model
- Use `.unload("model-key")` or `model_handle.unload()` to unload a model from memory
## Get the Current Model with `.model()`
If you already have a model loaded in LM Studio (either via the GUI or `lms load`),
you can use it by calling `.model()` without any arguments.
```lms_code_snippet
variants:
"Python (convenience API)":
language: python
code: |
import lmstudio as lms
model = lms.llm()
"Python (scoped resource API)":
language: python
code: |
import lmstudio as lms
with lms.Client() as client:
model = client.llm.model()
```
## Get a Specific Model with `.model("model-key")`
If you want to use a specific model, you can provide the model key as an argument to `.model()`.
#### Get if Loaded, or Load if not
Calling `.model("model-key")` will load the model if it's not already loaded, or return the existing instance if it is.
```lms_code_snippet
variants:
"Python (convenience API)":
language: python
code: |
import lmstudio as lms
model = lms.llm("llama-3.2-1b-instruct")
"Python (scoped resource API)":
language: python
code: |
import lmstudio as lms
with lms.Client() as client:
model = client.llm.model("llama-3.2-1b-instruct")
```
## Load a New Instance of a Model with `.load_new_instance()`
Use `load_new_instance()` to load a new instance of a model, even if one already exists.
This allows you to have multiple instances of the same or different models loaded at the same time.
```lms_code_snippet
variants:
"Python (convenience API)":
language: python
code: |
import lmstudio as lms
client = lms.get_default_client()
llama = client.llm.load_new_instance("llama-3.2-1b-instruct")
another_llama = client.llm.load_new_instance("llama-3.2-1b-instruct", "second-llama")
"Python (scoped resource API)":
language: python
code: |
import lmstudio as lms
with lms.Client() as client:
llama = client.llm.load_new_instance("llama-3.2-1b-instruct")
another_llama = client.llm.load_new_instance("llama-3.2-1b-instruct", "second-llama")
```
### Note about Instance Identifiers
If you provide an instance identifier that already exists, the server will throw an error.
So if you don't really care, it's safer to not provide an identifier, in which case
the server will generate one for you. You can always check in the server tab in LM Studio, too!
## Unload a Model from Memory with `.unload()`
Once you no longer need a model, you can unload it by simply calling `unload()` on its handle.
```lms_code_snippet
variants:
"Python (convenience API)":
language: python
code: |
import lmstudio as lms
model = lms.llm()
model.unload()
"Python (scoped resource API)":
language: python
code: |
import lmstudio as lms
with lms.Client() as client:
model = client.llm.model()
model.unload()
```
## Set Custom Load Config Parameters
You can also specify the same load-time configuration options when loading a model, such as Context Length and GPU offload.
See [load-time configuration](../llm-prediction/parameters) for more.
## Set an Auto Unload Timer (TTL)
You can specify a _time to live_ for a model you load, which is the idle time (in seconds)
after the last request until the model unloads. See [Idle TTL](/docs/app/api/ttl-and-auto-evict) for more on this.
```lms_protip
If you specify a TTL to `model()`, it will only apply if `model()` loads
a new instance, and will _not_ retroactively change the TTL of an existing instance.
```
```lms_code_snippet
variants:
Python:
language: python
code: |
import lmstudio as lms
llama = lms.llm("llama-3.2-1b-instruct", ttl=3600)
Python (with scoped resources):
language: python
code: |
import lmstudio as lms
with lms.Client() as client:
llama = client.llm.model("llama-3.2-1b-instruct", ttl=3600)
```
## model-info
### Get Context Length
> API to get the maximum context length of a model.
LLMs and embedding models, due to their fundamental architecture, have a property called `context length`, and more specifically a **maximum** context length. Loosely speaking, this is how many tokens the models can "keep in memory" when generating text or embeddings. Exceeding this limit will result in the model behaving erratically.
## Use the `get_context_length()` function on the model object
It's useful to be able to check the context length of a model, especially as an extra check before providing potentially long input to the model.
```lms_code_snippet
title: "example.py"
variants:
"Python (convenience API)":
language: python
code: |
context_length = model.get_context_length()
```
The `model` in the above code snippet is an instance of a loaded model you get from the `llm.model` method. See [Manage Models in Memory](../manage-models/loading) for more information.
### Example: Check if the input will fit in the model's context window
You can determine if a given conversation fits into a model's context by doing the following:
1. Convert the conversation to a string using the prompt template.
2. Count the number of tokens in the string.
3. Compare the token count to the model's context length.
```lms_code_snippet
variants:
"Python (convenience API)":
language: python
code: |
import lmstudio as lms
def does_chat_fit_in_context(model: lms.LLM, chat: lms.Chat) -> bool:
# Convert the conversation to a string using the prompt template.
formatted = model.apply_prompt_template(chat)
# Count the number of tokens in the string.
token_count = len(model.tokenize(formatted))
# Get the current loaded context length of the model
context_length = model.get_context_length()
return token_count < context_length
model = lms.llm()
chat = lms.Chat.from_history({
"messages": [
{ "role": "user", "content": "What is the meaning of life." },
{ "role": "assistant", "content": "The meaning of life is..." },
# ... More messages
]
})
print("Fits in context:", does_chat_fit_in_context(model, chat))
```
### Get Load Config
> Get the load configuration of the model
*Required Python SDK version*: **1.2.0**
LM Studio allows you to configure certain parameters when loading a model
[through the server UI](/docs/advanced/per-model) or [through the API](/docs/api/sdk/load-model).
You can retrieve the config with which a given model was loaded using the SDK.
In the below examples, the LLM reference can be replaced with an
embedding model reference without requiring any other changes.
```lms_protip
Context length is a special case that [has its own method](/docs/api/sdk/get-context-length).
```
```lms_code_snippet
variants:
"Python (convenience API)":
language: python
code: |
import lmstudio as lms
model = lms.llm()
print(model.get_load_config())
"Python (scoped resource API)":
language: python
code: |
import lmstudio as lms
with lms.Client() as client:
model = client.llm.model()
print(model.get_load_config())
```
### Get Model Info
> Get information about the model
You can access general information and metadata about a model itself from a loaded
instance of that model.
In the below examples, the LLM reference can be replaced with an
embedding model reference without requiring any other changes.
```lms_code_snippet
variants:
"Python (convenience API)":
language: python
code: |
import lmstudio as lms
model = lms.llm()
print(model.get_info())
"Python (scoped resource API)":
language: python
code: |
import lmstudio as lms
with lms.Client() as client:
model = client.llm.model()
print(model.get_info())
```
## Example output
```python
LlmInstanceInfo.from_dict({
"architecture": "qwen2",
"contextLength": 4096,
"displayName": "Qwen2.5 7B Instruct 1M",
"format": "gguf",
"identifier": "qwen2.5-7b-instruct",
"instanceReference": "lpFZPBQjhSZPrFevGyY6Leq8",
"maxContextLength": 1010000,
"modelKey": "qwen2.5-7b-instruct-1m",
"paramsString": "7B",
"path": "lmstudio-community/Qwen2.5-7B-Instruct-1M-GGUF/Qwen2.5-7B-Instruct-1M-Q4_K_M.gguf",
"sizeBytes": 4683073888,
"trainedForToolUse": true,
"type": "llm",
"vision": false
})
```
# typescript
# `lmstudio-js` (TypeScript SDK)
> Getting started with LM Studio's Typescript / JavaScript SDK
The SDK provides you a set of programmatic tools to interact with LLMs, embeddings models, and agentic flows.
## Installing the SDK
`lmstudio-js` is available as an npm package. You can install it using npm, yarn, or pnpm.
```lms_code_snippet
variants:
npm:
language: bash
code: |
npm install @lmstudio/sdk --save
yarn:
language: bash
code: |
yarn add @lmstudio/sdk
pnpm:
language: bash
code: |
pnpm add @lmstudio/sdk
```
For the source code and open source contribution, visit [lmstudio.js](https://github.com/lmstudio-ai/lmstudio.js) on GitHub.
## Features
- Use LLMs to [respond in chats](./typescript/llm-prediction/chat-completion) or predict [text completions](./typescript/llm-prediction/completion)
- Define functions as tools, and turn LLMs into [autonomous agents](./typescript/agent/act) that run completely locally
- [Load](./typescript/manage-models/loading), [configure](./typescript/llm-prediction/parameters), and [unload](./typescript/manage-models/loading) models from memory
- Supports for both browser and any Node-compatible environments
- Generate embeddings for text, and more!
## Quick Example: Chat with a Llama Model
```lms_code_snippet
title: "index.ts"
variants:
TypeScript:
language: typescript
code: |
import { LMStudioClient } from "@lmstudio/sdk";
const client = new LMStudioClient();
const model = await client.llm.model("llama-3.2-1b-instruct");
const result = await model.respond("What is the meaning of life?");
console.info(result.content);
```
### Getting Local Models
The above code requires the Llama 3.2 1B. If you don't have the model, run the following command in the terminal to download it.
```bash
lms get llama-3.2-1b-instruct
```
Read more about `lms get` in LM Studio's CLI [here](./cli/get).
## Project Setup
> Set up your `lmstudio-js` app or script.
`@lmstudio/sdk` is a library published on npm that allows you to use `lmstudio-js` in your own projects. It is open source and it's developed on GitHub. You can find the source code [here](https://github.com/lmstudio-ai/lmstudio.js).
## Creating a New `node` Project
Use the following command to start an interactive project setup:
```lms_code_snippet
variants:
TypeScript (Recommended):
language: bash
code: |
lms create node-typescript
Javascript:
language: bash
code: |
lms create node-javascript
```
## Add `lmstudio-js` to an Exiting Project
If you have already created a project and would like to use `lmstudio-js` in it, you can install it using npm, yarn, or pnpm.
```lms_code_snippet
variants:
npm:
language: bash
code: |
npm install @lmstudio/sdk --save
yarn:
language: bash
code: |
yarn add @lmstudio/sdk
pnpm:
language: bash
code: |
pnpm add @lmstudio/sdk
```
## llm-prediction
### Chat Completions
> APIs for a multi-turn chat conversations with an LLM
Use `llm.respond(...)` to generate completions for a chat conversation.
## Quick Example: Generate a Chat Response
The following snippet shows how to stream the AI's response to quick chat prompt.
```lms_code_snippet
title: "index.ts"
variants:
TypeScript:
language: typescript
code: |
import { LMStudioClient } from "@lmstudio/sdk";
const client = new LMStudioClient();
const model = await client.llm.model();
for await (const fragment of model.respond("What is the meaning of life?")) {
process.stdout.write(fragment.content);
}
```
## Obtain a Model
First, you need to get a model handle. This can be done using the `model` method in the `llm` namespace. For example, here is how to use Qwen2.5 7B Instruct.
```lms_code_snippet
title: "index.ts"
variants:
TypeScript:
language: typescript
code: |
import { LMStudioClient } from "@lmstudio/sdk";
const client = new LMStudioClient();
const model = await client.llm.model("qwen2.5-7b-instruct");
```
There are other ways to get a model handle. See [Managing Models in Memory](./../manage-models/loading) for more info.
## Manage Chat Context
The input to the model is referred to as the "context". Conceptually, the model receives a multi-turn conversation as input, and it is asked to predict the assistant's response in that conversation.
```lms_code_snippet
variants:
"Using an array of messages":
language: typescript
code: |
import { Chat } from "@lmstudio/sdk";
// Create a chat object from an array of messages.
const chat = Chat.from([
{ role: "system", content: "You are a resident AI philosopher." },
{ role: "user", content: "What is the meaning of life?" },
]);
"Constructing a Chat object":
language: typescript
code: |
import { Chat } from "@lmstudio/sdk";
// Create an empty chat object.
const chat = Chat.empty();
// Build the chat context by appending messages.
chat.append("system", "You are a resident AI philosopher.");
chat.append("user", "What is the meaning of life?");
```
See [Working with Chats](./working-with-chats) for more information on managing chat context.
## Generate a response
You can ask the LLM to predict the next response in the chat context using the `respond()` method.
```lms_code_snippet
variants:
Streaming:
language: typescript
code: |
// The `chat` object is created in the previous step.
const prediction = model.respond(chat);
for await (const { content } of prediction) {
process.stdout.write(content);
}
console.info(); // Write a new line to prevent text from being overwritten by your shell.
"Non-streaming":
language: typescript
code: |
// The `chat` object is created in the previous step.
const result = await model.respond(chat);
console.info(result.content);
```
## Customize Inferencing Parameters
You can pass in inferencing parameters as the second parameter to `.respond()`.
```lms_code_snippet
variants:
Streaming:
language: typescript
code: |
const prediction = model.respond(chat, {
temperature: 0.6,
maxTokens: 50,
});
"Non-streaming":
language: typescript
code: |
const result = await model.respond(chat, {
temperature: 0.6,
maxTokens: 50,
});
```
See [Configuring the Model](./parameters) for more information on what can be configured.
## Print prediction stats
You can also print prediction metadata, such as the model used for generation, number of generated
tokens, time to first token, and stop reason.
```lms_code_snippet
variants:
Streaming:
language: typescript
code: |
// If you have already iterated through the prediction fragments,
// doing this will not result in extra waiting.
const result = await prediction.result();
console.info("Model used:", result.modelInfo.displayName);
console.info("Predicted tokens:", result.stats.predictedTokensCount);
console.info("Time to first token (seconds):", result.stats.timeToFirstTokenSec);
console.info("Stop reason:", result.stats.stopReason);
"Non-streaming":
language: typescript
code: |
// `result` is the response from the model.
console.info("Model used:", result.modelInfo.displayName);
console.info("Predicted tokens:", result.stats.predictedTokensCount);
console.info("Time to first token (seconds):", result.stats.timeToFirstTokenSec);
console.info("Stop reason:", result.stats.stopReason);
```
## Example: Multi-turn Chat
TODO: Probably needs polish here:
```lms_code_snippet
variants:
TypeScript:
language: typescript
code: |
import { Chat, LMStudioClient } from "@lmstudio/sdk";
import { createInterface } from "readline/promises";
const rl = createInterface({ input: process.stdin, output: process.stdout });
const client = new LMStudioClient();
const model = await client.llm.model();
const chat = Chat.empty();
while (true) {
const input = await rl.question("You: ");
// Append the user input to the chat
chat.append("user", input);
const prediction = model.respond(chat, {
// When the model finish the entire message, push it to the chat
onMessage: (message) => chat.append(message),
});
process.stdout.write("Bot: ");
for await (const { content } of prediction) {
process.stdout.write(content);
}
process.stdout.write("\n");
}
```
### Image Input
> API for passing images as input to the model
Some models, known as VLMs (Vision-Language Models), can accept images as input. You can pass images to the model using the `.respond()` method.
### Prerequisite: Get a VLM (Vision-Language Model)
If you don't yet have a VLM, you can download a model like `qwen2-vl-2b-instruct` using the following command:
```bash
lms get qwen2-vl-2b-instruct
```
## 1. Instantiate the Model
Connect to LM Studio and obtain a handle to the VLM (Vision-Language Model) you want to use.
```lms_code_snippet
variants:
Example:
language: typescript
code: |
import { LMStudioClient } from "@lmstudio/sdk";
const client = new LMStudioClient();
const model = await client.llm.model("qwen2-vl-2b-instruct");
```
## 2. Prepare the Image
Use the `client.files.prepareImage()` method to get a handle to the image that can be subsequently passed to the model.
```lms_code_snippet
variants:
Example:
language: typescript
code: |
const imagePath = "/path/to/image.jpg"; // Replace with the path to your image
const image = await client.files.prepareImage(imagePath);
```
If you only have the image in the form of a base64 string, you can use the `client.files.prepareImageBase64()` method instead.
```lms_code_snippet
variants:
Example:
language: typescript
code: |
const imageBase64 = "Your base64 string here";
const image = await client.files.prepareImageBase64(imageBase64);
```
The LM Studio server supports JPEG, PNG, and WebP image formats.
## 3. Pass the Image to the Model in `.respond()`
Generate a prediction by passing the image to the model in the `.respond()` method.
```lms_code_snippet
variants:
Example:
language: typescript
code: |
const prediction = model.respond([
{ role: "user", content: "Describe this image please", images: [image] },
]);
```
### Structured Response
> Enforce a structured response from the model using Pydantic (Python), Zod (TypeScript), or JSON Schema
You can enforce a particular response format from an LLM by providing a schema (JSON or `zod`) to the `.respond()` method. This guarantees that the model's output conforms to the schema you provide.
## Enforce Using a `zod` Schema
If you wish the model to generate JSON that satisfies a given schema, it is recommended to provide
the schema using [`zod`](https://zod.dev/). When a `zod` schema is provided, the prediction result will contain an extra field `parsed`, which contains parsed, validated, and typed result.
#### Define a `zod` Schema
```ts
import { z } from "zod";
// A zod schema for a book
const bookSchema = z.object({
title: z.string(),
author: z.string(),
year: z.number().int(),
});
```
#### Generate a Structured Response
```lms_code_snippet
variants:
"Non-streaming":
language: typescript
code: |
const result = await model.respond("Tell me about The Hobbit.",
{ structured: bookSchema },
maxTokens: 100, // Recommended to avoid getting stuck
);
const book = result.parsed;
console.info(book);
// ^
// Note that `book` is now correctly typed as { title: string, author: string, year: number }
Streaming:
language: typescript
code: |
const prediction = model.respond("Tell me about The Hobbit.",
{ structured: bookSchema },
maxTokens: 100, // Recommended to avoid getting stuck
);
for await (const { content } of prediction) {
process.stdout.write(content);
}
process.stdout.write("\n");
// Get the final structured result
const result = await prediction.result();
const book = result.parsed;
console.info(book);
// ^
// Note that `book` is now correctly typed as { title: string, author: string, year: number }
```
## Enforce Using a JSON Schema
You can also enforce a structured response using a JSON schema.
#### Define a JSON Schema
```ts
// A JSON schema for a book
const schema = {
type: "object",
properties: {
title: { type: "string" },
author: { type: "string" },
year: { type: "integer" },
},
required: ["title", "author", "year"],
};
```
#### Generate a Structured Response
```lms_code_snippet
variants:
"Non-streaming":
language: typescript
code: |
const result = await model.respond("Tell me about The Hobbit.", {
structured: {
type: "json",
jsonSchema: schema,
},
maxTokens: 100, // Recommended to avoid getting stuck
});
const book = JSON.parse(result.content);
console.info(book);
Streaming:
language: typescript
code: |
const prediction = model.respond("Tell me about The Hobbit.", {
structured: {
type: "json",
jsonSchema: schema,
},
maxTokens: 100, // Recommended to avoid getting stuck
});
for await (const { content } of prediction) {
process.stdout.write(content);
}
process.stdout.write("\n");
const result = await prediction.result();
const book = JSON.parse(result.content);
console.info("Parsed", book);
```
```lms_warning
Structured generation works by constraining the model to only generate tokens that conform to the provided schema. This ensures valid output in normal cases, but comes with two important limitations:
1. Models (especially smaller ones) may occasionally get stuck in an unclosed structure (like an open bracket), when they "forget" they are in such structure and cannot stop due to schema requirements. Thus, it is recommended to always include a `maxTokens` parameter to prevent infinite generation.
2. Schema compliance is only guaranteed for complete, successful generations. If generation is interrupted (by cancellation, reaching the `maxTokens` limit, or other reasons), the output will likely violate the schema. With `zod` schema input, this will raise an error; with JSON schema, you'll receive an invalid string that doesn't satisfy schema.
```
### Speculative Decoding
> API to use a draft model in speculative decoding in `lmstudio-js`
Speculative decoding is a technique that can substantially increase the generation speed of large language models (LLMs) without reducing response quality. See [Speculative Decoding](./../../app/advanced/speculative-decoding) for more info.
To use speculative decoding in `lmstudio-js`, simply provide a `draftModel` parameter when performing the prediction. You do not need to load the draft model separately.
```lms_code_snippet
variants:
"Non-streaming":
language: typescript
code: |
import { LMStudioClient } from "@lmstudio/sdk";
const client = new LMStudioClient();
const mainModelKey = "qwen2.5-7b-instruct";
const draftModelKey = "qwen2.5-0.5b-instruct";
const model = await client.llm.model(mainModelKey);
const result = await model.respond("What are the prime numbers between 0 and 100?", {
draftModel: draftModelKey,
});
const { content, stats } = result;
console.info(content);
console.info(`Accepted ${stats.acceptedDraftTokensCount}/${stats.predictedTokensCount} tokens`);
Streaming:
language: typescript
code: |
import { LMStudioClient } from "@lmstudio/sdk";
const client = new LMStudioClient();
const mainModelKey = "qwen2.5-7b-instruct";
const draftModelKey = "qwen2.5-0.5b-instruct";
const model = await client.llm.model(mainModelKey);
const prediction = model.respond("What are the prime numbers between 0 and 100?", {
draftModel: draftModelKey,
});
for await (const { content } of prediction) {
process.stdout.write(content);
}
process.stdout.write("\n");
const { stats } = await prediction.result();
console.info(`Accepted ${stats.acceptedDraftTokensCount}/${stats.predictedTokensCount} tokens`);
```
### Cancelling Predictions
> Stop an ongoing prediction in `lmstudio-js`
Sometimes you may want to halt a prediction before it finishes. For example, the user might change their mind or your UI may navigate away. `lmstudio-js` provides two simple ways to cancel a running prediction.
## 1. Call `.cancel()` on the prediction
Every prediction method returns an `OngoingPrediction` instance. Calling `.cancel()` stops generation and causes the final `stopReason` to be `"userStopped"`. In the example below we schedule the cancel call on a timer:
```lms_code_snippet
variants:
TypeScript:
language: typescript
code: |
import { LMStudioClient } from "@lmstudio/sdk";
const client = new LMStudioClient();
const model = await client.llm.model("qwen2.5-7b-instruct");
const prediction = model.respond("What is the meaning of life?", {
maxTokens: 50,
});
setTimeout(() => prediction.cancel(), 1000); // cancel after 1 second
const result = await prediction.result();
console.info(result.stats.stopReason); // "userStopped"
```
## 2. Use an `AbortController`
If your application already uses an `AbortController` to propagate cancellation, you can pass its `signal` to the prediction method. Aborting the controller stops the prediction with the same `stopReason`:
```lms_code_snippet
variants:
TypeScript:
language: typescript
code: |
import { LMStudioClient } from "@lmstudio/sdk";
const client = new LMStudioClient();
const model = await client.llm.model("qwen2.5-7b-instruct");
const controller = new AbortController();
const prediction = model.respond("What is the meaning of life?", {
maxTokens: 50,
signal: controller.signal,
});
setTimeout(() => controller.abort(), 1000); // cancel after 1 second
const result = await prediction.result();
console.info(result.stats.stopReason); // "userStopped"
```
Both approaches halt generation immediately, and the returned stats indicate that the prediction ended because you stopped it.
### Text Completions
> Provide a string input for the model to complete
Use `llm.complete(...)` to generate text completions from a loaded language model. Text completions mean sending an non-formatted string to the model with the expectation that the model will complete the text.
This is different from multi-turn chat conversations. For more information on chat completions, see [Chat Completions](./chat-completion).
## 1. Instantiate a Model
First, you need to load a model to generate completions from. This can be done using the `model` method on the `llm` handle.
```lms_code_snippet
title: "index.ts"
variants:
TypeScript:
language: typescript
code: |
import { LMStudioClient } from "@lmstudio/sdk";
const client = new LMStudioClient();
const model = await client.llm.model("qwen2.5-7b-instruct");
```
## 2. Generate a Completion
Once you have a loaded model, you can generate completions by passing a string to the `complete` method on the `llm` handle.
```lms_code_snippet
variants:
Streaming:
language: typescript
code: |
const completion = model.complete("My name is", {
maxTokens: 100,
});
for await (const { content } of completion) {
process.stdout.write(content);
}
console.info(); // Write a new line for cosmetic purposes
"Non-streaming":
language: typescript
code: |
const completion = await model.complete("My name is", {
maxTokens: 100,
});
console.info(completion.content);
```
## 3. Print Prediction Stats
You can also print prediction metadata, such as the model used for generation, number of generated tokens, time to first token, and stop reason.
```lms_code_snippet
title: "index.ts"
variants:
TypeScript:
language: typescript
code: |
console.info("Model used:", completion.modelInfo.displayName);
console.info("Predicted tokens:", completion.stats.predictedTokensCount);
console.info("Time to first token (seconds):", completion.stats.timeToFirstTokenSec);
console.info("Stop reason:", completion.stats.stopReason);
```
## Example: Get an LLM to Simulate a Terminal
Here's an example of how you might use the `complete` method to simulate a terminal.
```lms_code_snippet
title: "terminal-sim.ts"
variants:
TypeScript:
language: typescript
code: |
import { LMStudioClient } from "@lmstudio/sdk";
import { createInterface } from "node:readline/promises";
const rl = createInterface({ input: process.stdin, output: process.stdout });
const client = new LMStudioClient();
const model = await client.llm.model();
let history = "";
while (true) {
const command = await rl.question("$ ");
history += "$ " + command + "\n";
const prediction = model.complete(history, { stopStrings: ["$"] });
for await (const { content } of prediction) {
process.stdout.write(content);
}
process.stdout.write("\n");
const { content } = await prediction.result();
history += content;
}
```
### Configuring the Model
> APIs for setting inference-time and load-time parameters for your model
You can customize both inference-time and load-time parameters for your model. Inference parameters can be set on a per-request basis, while load parameters are set when loading the model.
# Inference Parameters
Set inference-time parameters such as `temperature`, `maxTokens`, `topP` and more.
```lms_code_snippet
variants:
".respond()":
language: typescript
code: |
const prediction = model.respond(chat, {
temperature: 0.6,
maxTokens: 50,
});
".complete()":
language: typescript
code: |
const prediction = model.complete(prompt, {
temperature: 0.6,
maxTokens: 50,
stop: ["\n\n"],
});
```
See [`LLMPredictionConfigInput`](./../api-reference/llm-prediction-config-input) for all configurable fields.
Another useful inference-time configuration parameter is [`structured`](<(./structured-responses)>), which allows you to rigorously enforce the structure of the output using a JSON or zod schema.
# Load Parameters
Set load-time parameters such as the context length, GPU offload ratio, and more.
### Set Load Parameters with `.model()`
The `.model()` retrieves a handle to a model that has already been loaded, or loads a new one on demand (JIT loading).
**Note**: if the model is already loaded, the configuration will be **ignored**.
```lms_code_snippet
variants:
TypeScript:
language: typescript
code: |
const model = await client.llm.model("qwen2.5-7b-instruct", {
config: {
contextLength: 8192,
gpu: {
ratio: 0.5,
},
},
});
```
See [`LLMLoadModelConfig`](./../api-reference/llm-load-model-config) for all configurable fields.
### Set Load Parameters with `.load()`
The `.load()` method creates a new model instance and loads it with the specified configuration.
```lms_code_snippet
variants:
TypeScript:
language: typescript
code: |
const model = await client.llm.load("qwen2.5-7b-instruct", {
config: {
contextLength: 8192,
gpu: {
ratio: 0.5,
},
},
});
```
See [`LLMLoadModelConfig`](./../api-reference/llm-load-model-config) for all configurable fields.
### Working with Chats
> APIs for representing a chat conversation with an LLM
SDK methods such as `model.respond()`, `model.applyPromptTemplate()`, or `model.act()`
takes in a chat parameter as an input. There are a few ways to represent a chat in the SDK.
## Option 1: Array of Messages
You can use an array of messages to represent a chat. Here is an example with the `.respond()` method.
```lms_code_snippet
variants:
"Text-only":
language: typescript
code: |
const prediction = model.respond([
{ role: "system", content: "You are a resident AI philosopher." },
{ role: "user", content: "What is the meaning of life?" },
]);
With Images:
language: typescript
code: |
const image = await client.files.prepareImage("/path/to/image.jpg");
const prediction = model.respond([
{ role: "system", content: "You are a state-of-art object recognition system." },
{ role: "user", content: "What is this object?", images: [image] },
]);
```
## Option 2: Input a Single String
If your chat only has one single user message, you can use a single string to represent the chat. Here is an example with the `.respond` method.
```lms_code_snippet
variants:
TypeScript:
language: typescript
code: |
const prediction = model.respond("What is the meaning of life?");
```
## Option 3: Using the `Chat` Helper Class
For more complex tasks, it is recommended to use the `Chat` helper classes. It provides various commonly used methods to manage the chat. Here is an example with the `Chat` class.
```lms_code_snippet
variants:
"Text-only":
language: typescript
code: |
const chat = Chat.empty();
chat.append("system", "You are a resident AI philosopher.");
chat.append("user", "What is the meaning of life?");
const prediction = model.respond(chat);
With Images:
language: typescript
code: |
const image = await client.files.prepareImage("/path/to/image.jpg");
const chat = Chat.empty();
chat.append("system", "You are a state-of-art object recognition system.");
chat.append("user", "What is this object?", { images: [image] });
const prediction = model.respond(chat);
```
You can also quickly construct a `Chat` object using the `Chat.from` method.
```lms_code_snippet
variants:
"Array of messages":
language: typescript
code: |
const chat = Chat.from([
{ role: "system", content: "You are a resident AI philosopher." },
{ role: "user", content: "What is the meaning of life?" },
]);
"Single string":
language: typescript
code: |
// This constructs a chat with a single user message
const chat = Chat.from("What is the meaning of life?");
```
## agent
### The `.act()` call
> How to use the `.act()` call to turn LLMs into autonomous agents that can perform tasks on your local machine.
## Automatic tool calling
We introduce the concept of execution "rounds" to describe the combined process of running a tool, providing its output to the LLM, and then waiting for the LLM to decide what to do next.
**Execution Round**
```
• run a tool ->
↑ • provide the result to the LLM ->
│ • wait for the LLM to generate a response
│
└────────────────────────────────────────┘ └➔ (return)
```
A model might choose to run tools multiple times before returning a final result. For example, if the LLM is writing code, it might choose to compile or run the program, fix errors, and then run it again, rinse and repeat until it gets the desired result.
With this in mind, we say that the `.act()` API is an automatic "multi-round" tool calling API.
### Quick Example
```lms_code_snippet
variants:
TypeScript:
language: typescript
code: |
import { LMStudioClient, tool } from "@lmstudio/sdk";
import { z } from "zod";
const client = new LMStudioClient();
const multiplyTool = tool({
name: "multiply",
description: "Given two numbers a and b. Returns the product of them.",
parameters: { a: z.number(), b: z.number() },
implementation: ({ a, b }) => a * b,
});
const model = await client.llm.model("qwen2.5-7b-instruct");
await model.act("What is the result of 12345 multiplied by 54321?", [multiplyTool], {
onMessage: (message) => console.info(message.toString()),
});
```
### What does it mean for an LLM to "use a tool"?
LLMs are largely text-in, text-out programs. So, you may ask "how can an LLM use a tool?". The answer is that some LLMs are trained to ask the human to call the tool for them, and expect the tool output to to be provided back in some format.
Imagine you're giving computer support to someone over the phone. You might say things like "run this command for me ... OK what did it output? ... OK now click there and tell me what it says ...". In this case you're the LLM! And you're "calling tools" vicariously through the person on the other side of the line.
### Important: Model Selection
The model selected for tool use will greatly impact performance.
Some general guidance when selecting a model:
- Not all models are capable of intelligent tool use
- Bigger is better (i.e., a 7B parameter model will generally perform better than a 3B parameter model)
- We've observed [Qwen2.5-7B-Instruct](https://model.lmstudio.ai/download/lmstudio-community/Qwen2.5-7B-Instruct-GGUF) to perform well in a wide variety of cases
- This guidance may change
### Example: Multiple Tools
The following code demonstrates how to provide multiple tools in a single `.act()` call.
```lms_code_snippet
variants:
TypeScript:
language: typescript
code: |
import { LMStudioClient, tool } from "@lmstudio/sdk";
import { z } from "zod";
const client = new LMStudioClient();
const additionTool = tool({
name: "add",
description: "Given two numbers a and b. Returns the sum of them.",
parameters: { a: z.number(), b: z.number() },
implementation: ({ a, b }) => a + b,
});
const isPrimeTool = tool({
name: "isPrime",
description: "Given a number n. Returns true if n is a prime number.",
parameters: { n: z.number() },
implementation: ({ n }) => {
if (n < 2) return false;
const sqrt = Math.sqrt(n);
for (let i = 2; i <= sqrt; i++) {
if (n % i === 0) return false;
}
return true;
},
});
const model = await client.llm.model("qwen2.5-7b-instruct");
await model.act(
"Is the result of 12345 + 45668 a prime? Think step by step.",
[additionTool, isPrimeTool],
{ onMessage: (message) => console.info(message.toString()) },
);
```
### Example: Chat Loop with Create File Tool
The following code creates a conversation loop with an LLM agent that can create files.
```lms_code_snippet
variants:
TypeScript:
language: typescript
code: |
import { Chat, LMStudioClient, tool } from "@lmstudio/sdk";
import { existsSync } from "fs";
import { writeFile } from "fs/promises";
import { createInterface } from "readline/promises";
import { z } from "zod";
const rl = createInterface({ input: process.stdin, output: process.stdout });
const client = new LMStudioClient();
const model = await client.llm.model();
const chat = Chat.empty();
const createFileTool = tool({
name: "createFile",
description: "Create a file with the given name and content.",
parameters: { name: z.string(), content: z.string() },
implementation: async ({ name, content }) => {
if (existsSync(name)) {
return "Error: File already exists.";
}
await writeFile(name, content, "utf-8");
return "File created.";
},
});
while (true) {
const input = await rl.question("You: ");
// Append the user input to the chat
chat.append("user", input);
process.stdout.write("Bot: ");
await model.act(chat, [createFileTool], {
// When the model finish the entire message, push it to the chat
onMessage: (message) => chat.append(message),
onPredictionFragment: ({ content }) => {
process.stdout.write(content);
},
});
process.stdout.write("\n");
}
```
### Tool Definition
> Define tools with the `tool()` function and pass them to the model in the `act()` call.
You can define tools with the `tool()` function and pass them to the model in the `act()` call.
## Anatomy of a Tool
Follow this standard format to define functions as tools:
```lms_code_snippet
title: "index.ts"
variants:
TypeScript:
language: typescript
code: |
import { tool } from "@lmstudio/sdk";
import { z } from "zod";
const exampleTool = tool({
// The name of the tool
name: "add",
// A description of the tool
description: "Given two numbers a and b. Returns the sum of them.",
// zod schema of the parameters
parameters: { a: z.number(), b: z.number() },
// The implementation of the tool. Just a regular function.
implementation: ({ a, b }) => a + b,
});
```
**Important**: The tool name, description, and the parameter definitions are all passed to the model!
This means that your wording will affect the quality of the generation. Make sure to always provide a clear description of the tool so the model knows how to use it.
## Tools with External Effects (like Computer Use or API Calls)
Tools can also have external effects, such as creating files or calling programs and even APIs. By implementing tools with external effects, you
can essentially turn your LLMs into autonomous agents that can perform tasks on your local machine.
## Example: `createFileTool`
### Tool Definition
```lms_code_snippet
title: "createFileTool.ts"
variants:
TypeScript:
language: typescript
code: |
import { tool } from "@lmstudio/sdk";
import { existsSync } from "fs";
import { writeFile } from "fs/promises";
import { z } from "zod";
const createFileTool = tool({
name: "createFile",
description: "Create a file with the given name and content.",
parameters: { name: z.string(), content: z.string() },
implementation: async ({ name, content }) => {
if (existsSync(name)) {
return "Error: File already exists.";
}
await writeFile(name, content, "utf-8");
return "File created.";
},
});
```
### Example code using the `createFile` tool:
```lms_code_snippet
title: "index.ts"
variants:
TypeScript:
language: typescript
code: |
import { LMStudioClient } from "@lmstudio/sdk";
import { createFileTool } from "./createFileTool";
const client = new LMStudioClient();
const model = await client.llm.model("qwen2.5-7b-instruct");
await model.act(
"Please create a file named output.txt with your understanding of the meaning of life.",
[createFileTool],
);
```
## embedding
## Embedding
> Generate text embeddings from input text
Generate embeddings for input text. Embeddings are vector representations of text that capture semantic meaning. Embeddings are a building block for RAG (Retrieval-Augmented Generation) and other similarity-based tasks.
### Prerequisite: Get an Embedding Model
If you don't yet have an embedding model, you can download a model like `nomic-ai/nomic-embed-text-v1.5` using the following command:
```bash
lms get nomic-ai/nomic-embed-text-v1.5
```
## Create Embeddings
To convert a string to a vector representation, pass it to the `embed` method on the corresponding embedding model handle.
```lms_code_snippet
title: "index.ts"
variants:
TypeScript:
language: typescript
code: |
import { LMStudioClient } from "@lmstudio/sdk";
const client = new LMStudioClient();
const model = await client.embedding.model("nomic-embed-text-v1.5");
const { embedding } = await model.embed("Hello, world!");
```
## tokenization
## Tokenization
> Tokenize text using a model's tokenizer
Models use a tokenizer to internally convert text into "tokens" they can deal with more easily. LM Studio exposes this tokenizer for utility.
## Tokenize
You can tokenize a string with a loaded LLM or embedding model using the SDK. In the below examples, `llm` can be replaced with an embedding model `emb`.
```lms_code_snippet
variants:
TypeScript:
language: typescript
code: |
import { LMStudioClient } from "@lmstudio/sdk";
const client = new LMStudioClient();
const model = await client.llm.model();
const tokens = await model.tokenize("Hello, world!");
console.info(tokens); // Array of token IDs.
```
## Count tokens
If you only care about the number of tokens, you can use the `.countTokens` method instead.
```lms_code_snippet
variants:
TypeScript:
language: typescript
code: |
const tokenCount = await model.countTokens("Hello, world!");
console.info("Token count:", tokenCount);
```
### Example: Count Context
You can determine if a given conversation fits into a model's context by doing the following:
1. Convert the conversation to a string using the prompt template.
2. Count the number of tokens in the string.
3. Compare the token count to the model's context length.
```lms_code_snippet
variants:
TypeScript:
language: typescript
code: |
import { Chat, type LLM, LMStudioClient } from "@lmstudio/sdk";
async function doesChatFitInContext(model: LLM, chat: Chat) {
// Convert the conversation to a string using the prompt template.
const formatted = await model.applyPromptTemplate(chat);
// Count the number of tokens in the string.
const tokenCount = await model.countTokens(formatted);
// Get the current loaded context length of the model
const contextLength = await model.getContextLength();
return tokenCount < contextLength;
}
const client = new LMStudioClient();
const model = await client.llm.model();
const chat = Chat.from([
{ role: "user", content: "What is the meaning of life." },
{ role: "assistant", content: "The meaning of life is..." },
// ... More messages
]);
console.info("Fits in context:", await doesChatFitInContext(model, chat));
```
## manage-models
### List Local Models
> APIs to list the available models in a given local environment
You can iterate through locally available models using the `listLocalModels` method.
## Available Model on the Local Machine
`listLocalModels` lives under the `system` namespace of the `LMStudioClient` object.
```lms_code_snippet
variants:
TypeScript:
language: typescript
code: |
import { LMStudioClient } from "@lmstudio/sdk";
const client = new LMStudioClient();
console.info(await client.system.listDownloadedModels());
```
This will give you results equivalent to using [`lms ls`](../../cli/ls) in the CLI.
### Example output:
```json
[
{
"type": "llm",
"modelKey": "qwen2.5-7b-instruct",
"format": "gguf",
"displayName": "Qwen2.5 7B Instruct",
"path": "lmstudio-community/Qwen2.5-7B-Instruct-GGUF/Qwen2.5-7B-Instruct-Q4_K_M.gguf",
"sizeBytes": 4683073952,
"paramsString": "7B",
"architecture": "qwen2",
"vision": false,
"trainedForToolUse": true,
"maxContextLength": 32768
},
{
"type": "embedding",
"modelKey": "text-embedding-nomic-embed-text-v1.5@q4_k_m",
"format": "gguf",
"displayName": "Nomic Embed Text v1.5",
"path": "nomic-ai/nomic-embed-text-v1.5-GGUF/nomic-embed-text-v1.5.Q4_K_M.gguf",
"sizeBytes": 84106624,
"architecture": "nomic-bert",
"maxContextLength": 2048
}
]
```
### List Loaded Models
> Query which models are currently loaded
You can iterate through models loaded into memory using the `listLoaded` method. This method lives under the `llm` and `embedding` namespaces of the `LMStudioClient` object.
## List Models Currently Loaded in Memory
This will give you results equivalent to using [`lms ps`](../../cli/ps) in the CLI.
```lms_code_snippet
variants:
TypeScript:
language: typescript
code: |
import { LMStudioClient } from "@lmstudio/sdk";
const client = new LMStudioClient();
const llmOnly = await client.llm.listLoaded();
const embeddingOnly = await client.embedding.listLoaded();
```
### Manage Models in Memory
> APIs to load, access, and unload models from memory
AI models are huge. It can take a while to load them into memory. LM Studio's SDK allows you to precisely control this process.
**Most commonly:**
- Use `.model()` to get any currently loaded model
- Use `.model("model-key")` to use a specific model
**Advanced (manual model management):**
- Use `.load("model-key")` to load a new instance of a model
- Use `model.unload()` to unload a model from memory
## Get the Current Model with `.model()`
If you already have a model loaded in LM Studio (either via the GUI or `lms load`), you can use it by calling `.model()` without any arguments.
```lms_code_snippet
variants:
TypeScript:
language: typescript
code: |
import { LMStudioClient } from "@lmstudio/sdk";
const client = new LMStudioClient();
const model = await client.llm.model();
```
## Get a Specific Model with `.model("model-key")`
If you want to use a specific model, you can provide the model key as an argument to `.model()`.
#### Get if Loaded, or Load if not
Calling `.model("model-key")` will load the model if it's not already loaded, or return the existing instance if it is.
```lms_code_snippet
variants:
TypeScript:
language: typescript
code: |
import { LMStudioClient } from "@lmstudio/sdk";
const client = new LMStudioClient();
const model = await client.llm.model("llama-3.2-1b-instruct");
```
## Load a New Instance of a Model with `.load()`
Use `load()` to load a new instance of a model, even if one already exists. This allows you to have multiple instances of the same or different models loaded at the same time.
```lms_code_snippet
variants:
TypeScript:
language: typescript
code: |
import { LMStudioClient } from "@lmstudio/sdk";
const client = new LMStudioClient();
const llama = await client.llm.load("llama-3.2-1b-instruct");
const another_llama = await client.llm.load("llama-3.2-1b-instruct", {
identifier: "second-llama"
});
```
### Note about Instance Identifiers
If you provide an instance identifier that already exists, the server will throw an error.
So if you don't really care, it's safer to not provide an identifier, in which case
the server will generate one for you. You can always check in the server tab in LM Studio, too!
## Unload a Model from Memory with `.unload()`
Once you no longer need a model, you can unload it by simply calling `unload()` on its handle.
```lms_code_snippet
variants:
TypeScript:
language: typescript
code: |
import { LMStudioClient } from "@lmstudio/sdk";
const client = new LMStudioClient();
const model = await client.llm.model();
await model.unload();
```
## Set Custom Load Config Parameters
You can also specify the same load-time configuration options when loading a model, such as Context Length and GPU offload.
See [load-time configuration](../llm-prediction/parameters) for more.
## Set an Auto Unload Timer (TTL)
You can specify a _time to live_ for a model you load, which is the idle time (in seconds)
after the last request until the model unloads. See [Idle TTL](/docs/api/ttl-and-auto-evict) for more on this.
```lms_code_snippet
variants:
"Using .load":
language: typescript
code: |
import { LMStudioClient } from "@lmstudio/sdk";
const client = new LMStudioClient();
const model = await client.llm.load("llama-3.2-1b-instruct", {
ttl: 300, // 300 seconds
});
"Using .model":
language: typescript
code: |
import { LMStudioClient } from "@lmstudio/sdk";
const client = new LMStudioClient();
const model = await client.llm.model("llama-3.2-1b-instruct", {
// Note: specifying ttl in `.model` will only set the TTL for the model if the model is
// loaded from this call. If the model was already loaded, the TTL will not be updated.
ttl: 300, // 300 seconds
});
```
## model-info
### Get Context Length
> API to get the maximum context length of a model.
LLMs and embedding models, due to their fundamental architecture, have a property called `context length`, and more specifically a **maximum** context length. Loosely speaking, this is how many tokens the models can "keep in memory" when generating text or embeddings. Exceeding this limit will result in the model behaving erratically.
## Use the `getContextLength()` Function on the Model Object
It's useful to be able to check the context length of a model, especially as an extra check before providing potentially long input to the model.
```lms_code_snippet
title: "index.ts"
variants:
TypeScript:
language: typescript
code: |
const contextLength = await model.getContextLength();
```
The `model` in the above code snippet is an instance of a loaded model you get from the `llm.model` method. See [Manage Models in Memory](../manage-models/loading) for more information.
### Example: Check if the input will fit in the model's context window
You can determine if a given conversation fits into a model's context by doing the following:
1. Convert the conversation to a string using the prompt template.
2. Count the number of tokens in the string.
3. Compare the token count to the model's context length.
```lms_code_snippet
variants:
TypeScript:
language: typescript
code: |
import { Chat, type LLM, LMStudioClient } from "@lmstudio/sdk";
async function doesChatFitInContext(model: LLM, chat: Chat) {
// Convert the conversation to a string using the prompt template.
const formatted = await model.applyPromptTemplate(chat);
// Count the number of tokens in the string.
const tokenCount = await model.countTokens(formatted);
// Get the current loaded context length of the model
const contextLength = await model.getContextLength();
return tokenCount < contextLength;
}
const client = new LMStudioClient();
const model = await client.llm.model();
const chat = Chat.from([
{ role: "user", content: "What is the meaning of life." },
{ role: "assistant", content: "The meaning of life is..." },
// ... More messages
]);
console.info("Fits in context:", await doesChatFitInContext(model, chat));
```
### Get Model Info
> Get information about the model
You can access information about a loaded model using the `getInfo` method.
```lms_code_snippet
variants:
LLM:
language: typescript
code: |
import { LMStudioClient } from "@lmstudio/sdk";
const client = new LMStudioClient();
const model = await client.llm.model();
const modelInfo = await model.getInfo();
console.info("Model Key", modelInfo.modelKey);
console.info("Current Context Length", model.contextLength);
console.info("Model Trained for Tool Use", modelInfo.trainedForToolUse);
// etc.
Embedding Model:
language: typescript
code: |
import { LMStudioClient } from "@lmstudio/sdk";
const client = new LMStudioClient();
const model = await client.embedding.model();
const modelInfo = await model.getInfo();
console.info("Model Key", modelInfo.modelKey);
console.info("Current Context Length", modelInfo.contextLength);
// etc.
```
## api-reference
### `LLMLoadModelConfig`
> API Reference for `LLMLoadModelConfig`
### Parameters
```lms_params
- name: gpu
description: |
How to distribute the work to your GPUs. See {@link GPUSetting} for more information.
public: true
type: GPUSetting
optional: true
- name: contextLength
description: |
The size of the context length in number of tokens. This will include both the prompts and the
responses. Once the context length is exceeded, the value set in
{@link LLMPredictionConfigBase#contextOverflowPolicy} is used to determine the behavior.
See {@link LLMContextOverflowPolicy} for more information.
type: number
optional: true
- name: ropeFrequencyBase
description: |
Custom base frequency for rotary positional embeddings (RoPE).
This advanced parameter adjusts how positional information is embedded in the model's
representations. Increasing this value may enable better performance at high context lengths by
modifying how the model processes position-dependent information.
type: number
optional: true
- name: ropeFrequencyScale
description: |
Scaling factor for RoPE (Rotary Positional Encoding) frequency.
This factor scales the effective context window by modifying how positional information is
encoded. Higher values allow the model to handle longer contexts by making positional encoding
more granular, which can be particularly useful for extending a model beyond its original
training context length.
type: number
optional: true
- name: evalBatchSize
description: |
Number of input tokens to process together in a single batch during evaluation.
Increasing this value typically improves processing speed and throughput by leveraging
parallelization, but requires more memory. Finding the optimal batch size often involves
balancing between performance gains and available hardware resources.
type: number
optional: true
- name: flashAttention
description: |
Enables Flash Attention for optimized attention computation.
Flash Attention is an efficient implementation that reduces memory usage and speeds up
generation by optimizing how attention mechanisms are computed. This can significantly
improve performance on compatible hardware, especially for longer sequences.
type: boolean
optional: true
- name: keepModelInMemory
description: |
When enabled, prevents the model from being swapped out of system memory.
This option reserves system memory for the model even when portions are offloaded to GPU,
ensuring faster access times when the model needs to be used. Improves performance
particularly for interactive applications, but increases overall RAM requirements.
type: boolean
optional: true
- name: seed
description: |
Random seed value for model initialization to ensure reproducible outputs.
Setting a specific seed ensures that random operations within the model (like sampling)
produce the same results across different runs, which is important for reproducibility
in testing and development scenarios.
type: number
optional: true
- name: useFp16ForKVCache
description: |
When enabled, stores the key-value cache in half-precision (FP16) format.
This option significantly reduces memory usage during inference by using 16-bit floating
point numbers instead of 32-bit for the attention cache. While this may slightly reduce
numerical precision, the impact on output quality is generally minimal for most applications.
type: boolean
optional: true
- name: tryMmap
description: |
Attempts to use memory-mapped (mmap) file access when loading the model.
Memory mapping can improve initial load times by mapping model files directly from disk to
memory, allowing the operating system to handle paging. This is particularly beneficial for
quick startup, but may reduce performance if the model is larger than available system RAM,
causing frequent disk access.
type: boolean
optional: true
- name: numExperts
description: |
Specifies the number of experts to use for models with Mixture of Experts (MoE) architecture.
MoE models contain multiple "expert" networks that specialize in different aspects of the task.
This parameter controls how many of these experts are active during inference, affecting both
performance and quality of outputs. Only applicable for models designed with the MoE architecture.
type: number
optional: true
- name: llamaKCacheQuantizationType
description: |
Quantization type for the Llama model's key cache.
This option determines the precision level used to store the key component of the attention
mechanism's cache. Lower precision values (e.g., 4-bit or 8-bit quantization) significantly
reduce memory usage during inference but may slightly impact output quality. The effect varies
between different models, with some being more robust to quantization than others.
Set to false to disable quantization and use full precision.
type: LLMLlamaCacheQuantizationType | false
optional: true
- name: llamaVCacheQuantizationType
description: |
Quantization type for the Llama model's value cache.
Similar to the key cache quantization, this option controls the precision used for the value
component of the attention mechanism's cache. Reducing precision saves memory but may affect
generation quality. This option requires Flash Attention to be enabled to function properly.
Different models respond differently to value cache quantization, so experimentation may be
needed to find the optimal setting for a specific use case. Set to false to disable quantization.
type: LLMLlamaCacheQuantizationType | false
optional: true
```
### `LLMPredictionConfigInput`
>
TODO: What is it
### Fields
```lms_params
- name: "maxTokens"
type: "number | false"
optional: true
description: "Number of tokens to predict at most. If set to false, the model will predict as many tokens as it wants.\n\nWhen the prediction is stopped because of this limit, the `stopReason` in the prediction stats will be set to `maxPredictedTokensReached`."
- name: "temperature"
type: "number"
optional: true
description: "The temperature parameter for the prediction model. A higher value makes the predictions more random, while a lower value makes the predictions more deterministic. The value should be between 0 and 1."
- name: "stopStrings"
type: "Array"
optional: true
description: "An array of strings. If the model generates one of these strings, the prediction will stop.\n\nWhen the prediction is stopped because of this limit, the `stopReason` in the prediction stats will be set to `stopStringFound`."
- name: "toolCallStopStrings"
type: "Array"
optional: true
description: "An array of strings. If the model generates one of these strings, the prediction will stop with the `stopReason` `toolCalls`."
- name: "contextOverflowPolicy"
type: "LLMContextOverflowPolicy"
optional: true
description: "The behavior for when the generated tokens length exceeds the context window size. The allowed values are:\n\n- `stopAtLimit`: Stop the prediction when the generated tokens length exceeds the context window size. If the generation is stopped because of this limit, the `stopReason` in the prediction stats will be set to `contextLengthReached`\n- `truncateMiddle`: Keep the system prompt and the first user message, truncate middle.\n- `rollingWindow`: Maintain a rolling window and truncate past messages."
- name: "structured"
type: "ZodType | LLMStructuredPredictionSetting"
optional: true
description: "Configures the model to output structured JSON data that follows a specific schema defined using Zod.\n\nWhen you provide a Zod schema, the model will be instructed to generate JSON that conforms to that schema rather than free-form text.\n\nThis is particularly useful for extracting specific data points from model responses or when you need the output in a format that can be directly used by your application."
- name: "topKSampling"
type: "number"
optional: true
description: "Controls token sampling diversity by limiting consideration to the K most likely next tokens.\n\nFor example, if set to 40, only the 40 tokens with the highest probabilities will be considered for the next token selection. A lower value (e.g., 20) will make the output more focused and conservative, while a higher value (e.g., 100) allows for more creative and diverse outputs.\n\nTypical values range from 20 to 100."
- name: "repeatPenalty"
type: "number | false"
optional: true
description: "Applies a penalty to repeated tokens to prevent the model from getting stuck in repetitive patterns.\n\nA value of 1.0 means no penalty. Values greater than 1.0 increase the penalty. For example, 1.2 would reduce the probability of previously used tokens by 20%. This is particularly useful for preventing the model from repeating phrases or getting stuck in loops.\n\nSet to false to disable the penalty completely."
- name: "minPSampling"
type: "number | false"
optional: true
description: "Sets a minimum probability threshold that a token must meet to be considered for generation.\n\nFor example, if set to 0.05, any token with less than 5% probability will be excluded from consideration. This helps filter out unlikely or irrelevant tokens, potentially improving output quality.\n\nValue should be between 0 and 1. Set to false to disable this filter."
- name: "topPSampling"
type: "number | false"
optional: true
description: "Implements nucleus sampling by only considering tokens whose cumulative probabilities reach a specified threshold.\n\nFor example, if set to 0.9, the model will consider only the most likely tokens that together add up to 90% of the probability mass. This helps balance between diversity and quality by dynamically adjusting the number of tokens considered based on their probability distribution.\n\nValue should be between 0 and 1. Set to false to disable nucleus sampling."
- name: "xtcProbability"
type: "number | false"
optional: true
description: "Controls how often the XTC (Exclude Top Choices) sampling technique is applied during generation.\n\nXTC sampling can boost creativity and reduce clichés by occasionally filtering out common tokens. For example, if set to 0.3, there's a 30% chance that XTC sampling will be applied when generating each token.\n\nValue should be between 0 and 1. Set to false to disable XTC completely."
- name: "xtcThreshold"
type: "number | false"
optional: true
description: "Defines the lower probability threshold for the XTC (Exclude Top Choices) sampling technique.\n\nWhen XTC sampling is activated (based on xtcProbability), the algorithm identifies tokens with probabilities between this threshold and 0.5, then removes all such tokens except the least probable one. This helps introduce more diverse and unexpected tokens into the generation.\n\nOnly takes effect when xtcProbability is enabled."
- name: "cpuThreads"
type: "number"
optional: true
description: "Specifies the number of CPU threads to allocate for model inference.\n\nHigher values can improve performance on multi-core systems but may compete with other processes. For example, on an 8-core system, a value of 4-6 might provide good performance while leaving resources for other tasks.\n\nIf not specified, the system will use a default value based on available hardware."
- name: "draftModel"
type: "string"
optional: true
description: "The draft model to use for speculative decoding. Speculative decoding is a technique that can drastically increase the generation speed (up to 3x for larger models) by paring a main model with a smaller draft model.\n\nSee here for more information: https://lmstudio.ai/docs/advanced/speculative-decoding\n\nYou do not need to load the draft model yourself. Simply specifying its model key here is enough."
```
# cli
# `lms` — LM Studio's CLI
> Get starting with the `lms` command line utility.
LM Studio ships with `lms`, a command line tool for scripting and automating your local LLM workflows.
`lms` is **MIT Licensed** and is developed in this repository on GitHub: https://github.com/lmstudio-ai/lms
```lms_info
👉 You need to run LM Studio _at least once_ before you can use `lms`.
```
### Install `lms`
`lms` ships with LM Studio and can be found under `/bin` in the LM Studio's working directory.
Use the following commands to add `lms` to your system path.
#### Bootstrap `lms` on macOS or Linux
Run the following command in your terminal:
```bash
~/.lmstudio/bin/lms bootstrap
```
#### Bootstrap `lms` on Windows
Run the following command in **PowerShell**:
```shell
cmd /c %USERPROFILE%/.lmstudio/bin/lms.exe bootstrap
```
#### Verify the installation
Open a **new terminal window** and run `lms`.
This is the current output you will get:
```bash
$ lms
lms - LM Studio CLI - v0.2.22
GitHub: https://github.com/lmstudio-ai/lmstudio-cli
Usage
lms
where can be one of:
- status - Prints the status of LM Studio
- server - Commands for managing the local server
- ls - List all downloaded models
- ps - List all loaded models
- load - Load a model
- unload - Unload a model
- create - Create a new project with scaffolding
- log - Log operations. Currently only supports streaming logs from LM Studio via `lms log stream`
- version - Prints the version of the CLI
- bootstrap - Bootstrap the CLI
For more help, try running `lms --help`
```
### Use `lms` to automate and debug your workflows
### Start and stop the local server
```bash
lms server start
lms server stop
```
### List the local models on the machine
```bash
lms ls
```
This will reflect the current LM Studio models directory, which you set in **📂 My Models** tab in the app.
### List the currently loaded models
```bash
lms ps
```
### Load a model (with options)
```bash
lms load [--gpu=max|auto|0.0-1.0] [--context-length=1-N]
```
`--gpu=1.0` means 'attempt to offload 100% of the computation to the GPU'.
- Optionally, assign an identifier to your local LLM:
```bash
lms load TheBloke/phi-2-GGUF --identifier="gpt-4-turbo"
```
This is useful if you want to keep the model identifier consistent.
### Unload models
```
lms unload [--all]
```
## `lms load` Reference
> Stream logs from LM Studio. Useful for debugging prompts sent to the model.
The `lms load` command loads a model into memory. You can optionally set parameters such as context length, GPU offload, and TTL.
### Parameters
```lms_params
- name: "[path]"
type: "string"
optional: true
description: "The path of the model to load. If not provided, you will be prompted to select one"
- name: "--ttl"
type: "number"
optional: true
description: "If provided, when the model is not used for this number of seconds, it will be unloaded"
- name: "--gpu"
type: "string"
optional: true
description: "How much to offload to the GPU. Values: 0-1, off, max"
- name: "--context-length"
type: "number"
optional: true
description: "The number of tokens to consider as context when generating text"
- name: "--identifier"
type: "string"
optional: true
description: "The identifier to assign to the loaded model for API reference"
```
## Load a model
Load a model into memory by running the following command:
```shell
lms load
```
You can find the `model_key` by first running [`lms ls`](/docs/cli/ls) to list your locally downloaded models.
### Set a custom identifier
Optionally, you can assign a custom identifier to the loaded model for API reference:
```shell
lms load --identifier "my-custom-identifier"
```
You will then be able to refer to this model by the identifier `my_model` in subsequent commands and API calls (`model` parameter).
### Set context length
You can set the context length when loading a model using the `--context-length` flag:
```shell
lms load --context-length 4096
```
This determines how many tokens the model will consider as context when generating text.
### Set GPU offload
Control GPU memory usage with the `--gpu` flag:
```shell
lms load --gpu 0.5 # Offload 50% of layers to GPU
lms load --gpu max # Offload all layers to GPU
lms load --gpu off # Disable GPU offloading
```
If not specified, LM Studio will automatically determine optimal GPU usage.
### Set TTL
Set an auto-unload timer with the `--ttl` flag (in seconds):
```shell
lms load --ttl 3600 # Unload after 1 hour of inactivity
```
## Operate on a remote LM Studio instance
`lms load` supports the `--host` flag to connect to a remote LM Studio instance.
```shell
lms load --host
```
For this to work, the remote LM Studio instance must be running and accessible from your local machine, e.g. be accessible on the same subnet.
## `lms unload` Reference
> Unload one or all models from memory using the command line.
The `lms unload` command unloads a model from memory. You can optionally specify a model key to unload a specific model, or use the `--all` flag to unload all models.
## Parameters
```lms_params
- name: "[model_key]"
type: "string"
optional: true
description: "The key of the model to unload. If not provided, you will be prompted to select one"
- name: "--all"
type: "flag"
optional: true
description: "Unload all currently loaded models"
- name: "--host"
type: "string"
optional: true
description: "The host address of a remote LM Studio instance to connect to"
```
## Unload a specific model
Unload a single model from memory by running:
```shell
lms unload
```
If no model key is provided, you will be prompted to select from currently loaded models.
## Unload all models
To unload all currently loaded models at once:
```shell
lms unload --all
```
## Operate on a remote LM Studio instance
`lms unload` supports the `--host` flag to connect to a remote LM Studio instance:
```shell
lms unload --host
```
For this to work, the remote LM Studio instance must be running and accessible from your local machine, e.g. be accessible on the same subnet.
## `lms get` Reference
> Search and download models from the command line.
The `lms get` command allows you to search and download models from online repositories. If no model is specified, it shows staff-picked recommendations.
Models you download via `lms get` will be stored in your LM Studio model directory.
### Parameters
```lms_params
- name: "[search term]"
type: "string"
optional: true
description: "The model to download. For specific quantizations, append '@' (e.g., 'llama-3.1-8b@q4_k_m')"
- name: "--mlx"
type: "flag"
optional: true
description: "Include MLX models in search results"
- name: "--gguf"
type: "flag"
optional: true
description: "Include GGUF models in search results"
- name: "--limit"
type: "number"
optional: true
description: "Limit the number of model options shown"
- name: "--always-show-all-results"
type: "flag"
optional: true
description: "Always show search results, even with exact matches"
- name: "--always-show-download-options"
type: "flag"
optional: true
description: "Always show quantization options, even with exact matches"
- name: "--yes"
type: "flag"
optional: true
description: "Skip all confirmations. Uses first match and recommended quantization"
```
## Download a model
Download a model by name:
```shell
lms get llama-3.1-8b
```
### Specify quantization
Download a specific model quantization:
```shell
lms get llama-3.1-8b@q4_k_m
```
### Filter by format
Show only MLX or GGUF models:
```shell
lms get --mlx
lms get --gguf
```
### Control search results
Limit the number of results:
```shell
lms get --limit 5
```
Always show all options:
```shell
lms get --always-show-all-results
lms get --always-show-download-options
```
### Automated downloads
For scripting, skip all prompts:
```shell
lms get llama-3.1-8b --yes
```
This will automatically select the first matching model and recommended quantization for your hardware.
## `lms server start` Reference
> Start the LM Studio local server with customizable port and logging options.
The `lms server start` command launches the LM Studio local server, allowing you to interact with loaded models via HTTP API calls.
### Parameters
```lms_params
- name: "--port"
type: "number"
optional: true
description: "Port to run the server on. If not provided, uses the last used port"
- name: "--cors"
type: "flag"
optional: true
description: "Enable CORS support for web application development. When not set, CORS is disabled"
```
## Start the server
Start the server with default settings:
```shell
lms server start
```
### Specify a custom port
Run the server on a specific port:
```shell
lms server start --port 3000
```
### Enable CORS support
For usage with web applications or some VS Code extensions, you may need to enable CORS support:
```shell
lms server start --cors
```
Note that enabling CORS may expose your server to security risks, so use it only when necessary.
### Check the server status
See [`lms server status`](/docs/cli/server-status) for more information on checking the status of the server.
## `lms server status` Reference
> Check the status of your running LM Studio server instance.
The `lms server status` command displays the current status of the LM Studio local server, including whether it's running and its configuration.
### Parameters
```lms_params
- name: "--json"
type: "flag"
optional: true
description: "Output the status in JSON format"
- name: "--verbose"
type: "flag"
optional: true
description: "Enable detailed logging output"
- name: "--quiet"
type: "flag"
optional: true
description: "Suppress all logging output"
- name: "--log-level"
type: "string"
optional: true
description: "The level of logging to use. Defaults to 'info'"
```
## Check server status
Get the basic status of the server:
```shell
lms server status
```
Example output:
```
The server is running on port 1234.
```
### Example usage
```console
➜ ~ lms server start
Starting server...
Waking up LM Studio service...
Success! Server is now running on port 1234
➜ ~ lms server status
The server is running on port 1234.
```
### JSON output
Get the status in machine-readable JSON format:
```shell
lms server status --json --quiet
```
Example output:
```json
{"running":true,"port":1234}
```
### Control logging output
Adjust logging verbosity:
```shell
lms server status --verbose
lms server status --quiet
lms server status --log-level debug
```
You can only use one logging control flag at a time (`--verbose`, `--quiet`, or `--log-level`).
## `lms server stop` Reference
> Stop the running LM Studio server instance.
The `lms server stop` command gracefully stops the running LM Studio server.
## Stop the server
Stop the running server instance:
```shell
lms server stop
```
Example output:
```
Stopped the server on port 1234.
```
Any active request will be terminated when the server is stopped. You can restart the server using [`lms server start`](/docs/cli/server-start).
## `lms ls` Reference
> List all downloaded models in your LM Studio installation.
The `lms ls` command displays a list of all models downloaded to your machine, including their size, architecture, and parameters.
### Parameters
```lms_params
- name: "--llm"
type: "flag"
optional: true
description: "Show only LLMs. When not set, all models are shown"
- name: "--embedding"
type: "flag"
optional: true
description: "Show only embedding models"
- name: "--json"
type: "flag"
optional: true
description: "Output the list in JSON format"
- name: "--detailed"
type: "flag"
optional: true
description: "Show detailed information about each model"
```
## List all models
Show all downloaded models:
```shell
lms ls
```
Example output:
```
You have 47 models, taking up 160.78 GB of disk space.
LLMs (Large Language Models) PARAMS ARCHITECTURE SIZE
lmstudio-community/meta-llama-3.1-8b-instruct 8B Llama 4.92 GB
hugging-quants/llama-3.2-1b-instruct 1B Llama 1.32 GB
mistral-7b-instruct-v0.3 Mistral 4.08 GB
zeta 7B Qwen2 4.09 GB
... (abbreviated in this example) ...
Embedding Models PARAMS ARCHITECTURE SIZE
text-embedding-nomic-embed-text-v1.5@q4_k_m Nomic BERT 84.11 MB
text-embedding-bge-small-en-v1.5 33M BERT 24.81 MB
```
### Filter by model type
List only LLM models:
```shell
lms ls --llm
```
List only embedding models:
```shell
lms ls --embedding
```
### Additional output formats
Get detailed information about models:
```shell
lms ls --detailed
```
Output in JSON format:
```shell
lms ls --json
```
## Operate on a remote LM Studio instance
`lms ls` supports the `--host` flag to connect to a remote LM Studio instance:
```shell
lms ls --host
```
For this to work, the remote LM Studio instance must be running and accessible from your local machine, e.g. be accessible on the same subnet.
## `lms ps` Reference
> Show information about currently loaded models from the command line.
The `lms ps` command displays information about all models currently loaded in memory.
## List loaded models
Show all currently loaded models:
```shell
lms ps
```
Example output:
```
LOADED MODELS
Identifier: unsloth/deepseek-r1-distill-qwen-1.5b
• Type: LLM
• Path: unsloth/DeepSeek-R1-Distill-Qwen-1.5B-GGUF/DeepSeek-R1-Distill-Qwen-1.5B-Q4_K_M.gguf
• Size: 1.12 GB
• Architecture: Qwen2
```
### JSON output
Get the list in machine-readable format:
```shell
lms ps --json
```
## Operate on a remote LM Studio instance
`lms ps` supports the `--host` flag to connect to a remote LM Studio instance:
```shell
lms ps --host
```
For this to work, the remote LM Studio instance must be running and accessible from your local machine, e.g. be accessible on the same subnet.
## `lms log stream` Reference
> Stream logs from LM Studio. Useful for debugging prompts sent to the model.
`lms log stream` allows you to inspect the exact input string that goes to the model.
This is particularly useful for debugging prompt template issues and other unexpected LLM behaviors.
```lms_protip
If you haven't already, bootstrap `lms` on your machine by following the instructions [here](/docs/cli).
```
### Debug your prompts with `lms log stream`
`lms log stream` allows you to inspect the exact input string that goes to the model.
Open a terminal and run the following command:
```shell
lms log stream
```
This will start streaming logs from LM Studio. Send a message in the Chat UI or send a request to the local server to see the logs.
### Example output
```bash
$ lms log stream
I Streaming logs from LM Studio
timestamp: 5/2/2024, 9:49:47 PM
type: llm.prediction.input
modelIdentifier: TheBloke/TinyLlama-1.1B-1T-OpenOrca-GGUF/tinyllama-1.1b-1t-openorca.Q2_K.gguf
modelPath: TheBloke/TinyLlama-1.1B-1T-OpenOrca-GGUF/tinyllama-1.1b-1t-openorca.Q2_K.gguf
input: "Below is an instruction that describes a task. Write a response that appropriately completes the request.
### Instruction:
Hello, what's your name?
### Response:
"
```
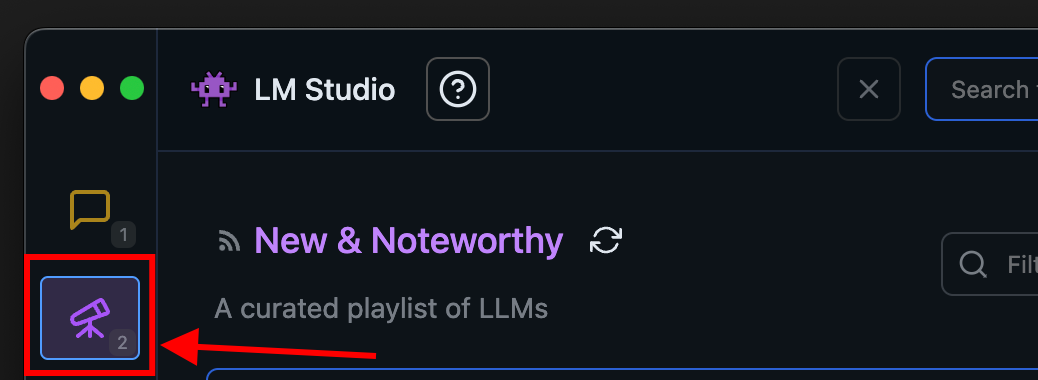 ### 2. Load a model to memory
Head over to the **Chat** tab, and
1. Open the model loader
2. Select one of the models you downloaded (or [sideloaded](/docs/advanced/sideload)).
3. Optionally, choose load configuration parameters.
### 2. Load a model to memory
Head over to the **Chat** tab, and
1. Open the model loader
2. Select one of the models you downloaded (or [sideloaded](/docs/advanced/sideload)).
3. Optionally, choose load configuration parameters.
 ##### What does loading a model mean?
Loading a model typically means allocating memory to be able to accomodate the model's weights and other parameters in your computer's RAM.
### 3. Chat!
Once the model is loaded, you can start a back-and-forth conversation with the model in the Chat tab.
##### What does loading a model mean?
Loading a model typically means allocating memory to be able to accomodate the model's weights and other parameters in your computer's RAM.
### 3. Chat!
Once the model is loaded, you can start a back-and-forth conversation with the model in the Chat tab.
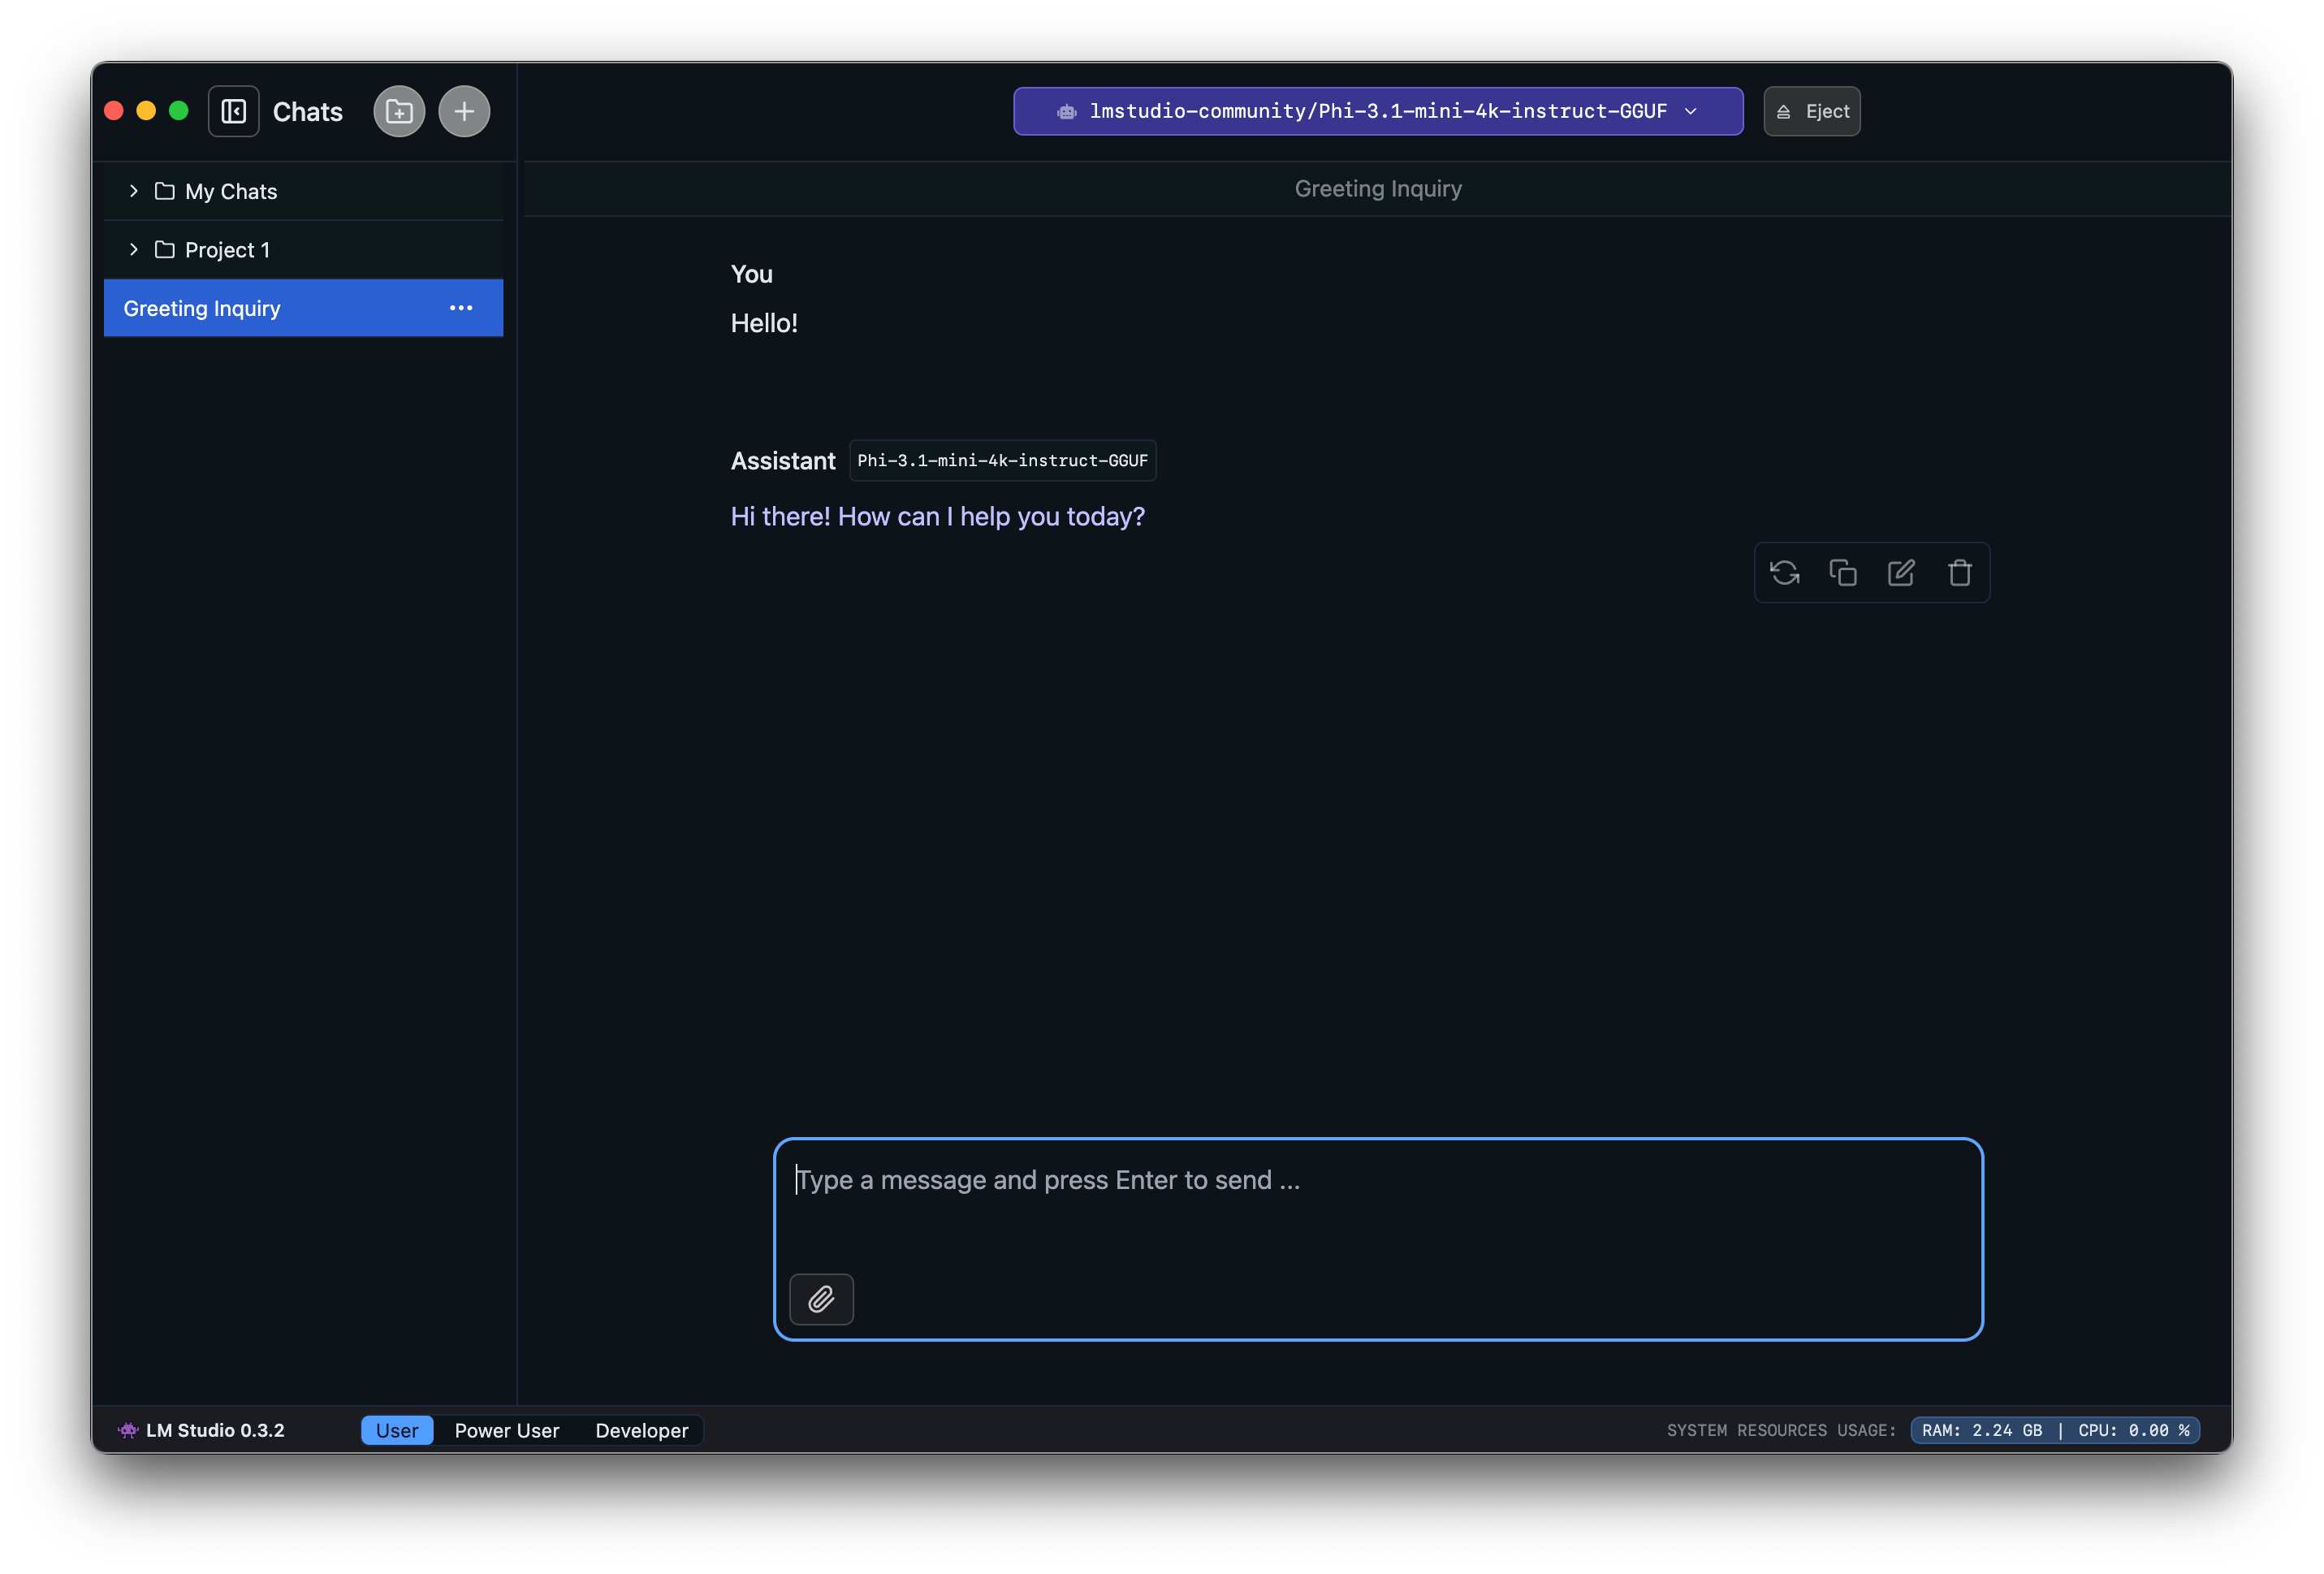
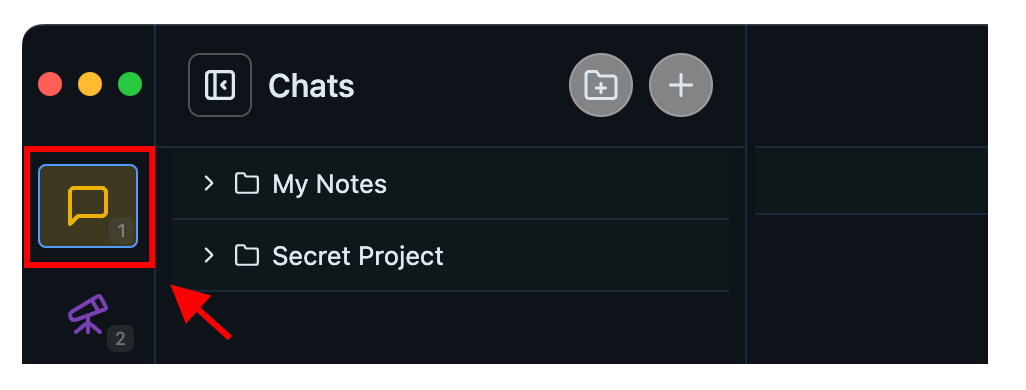
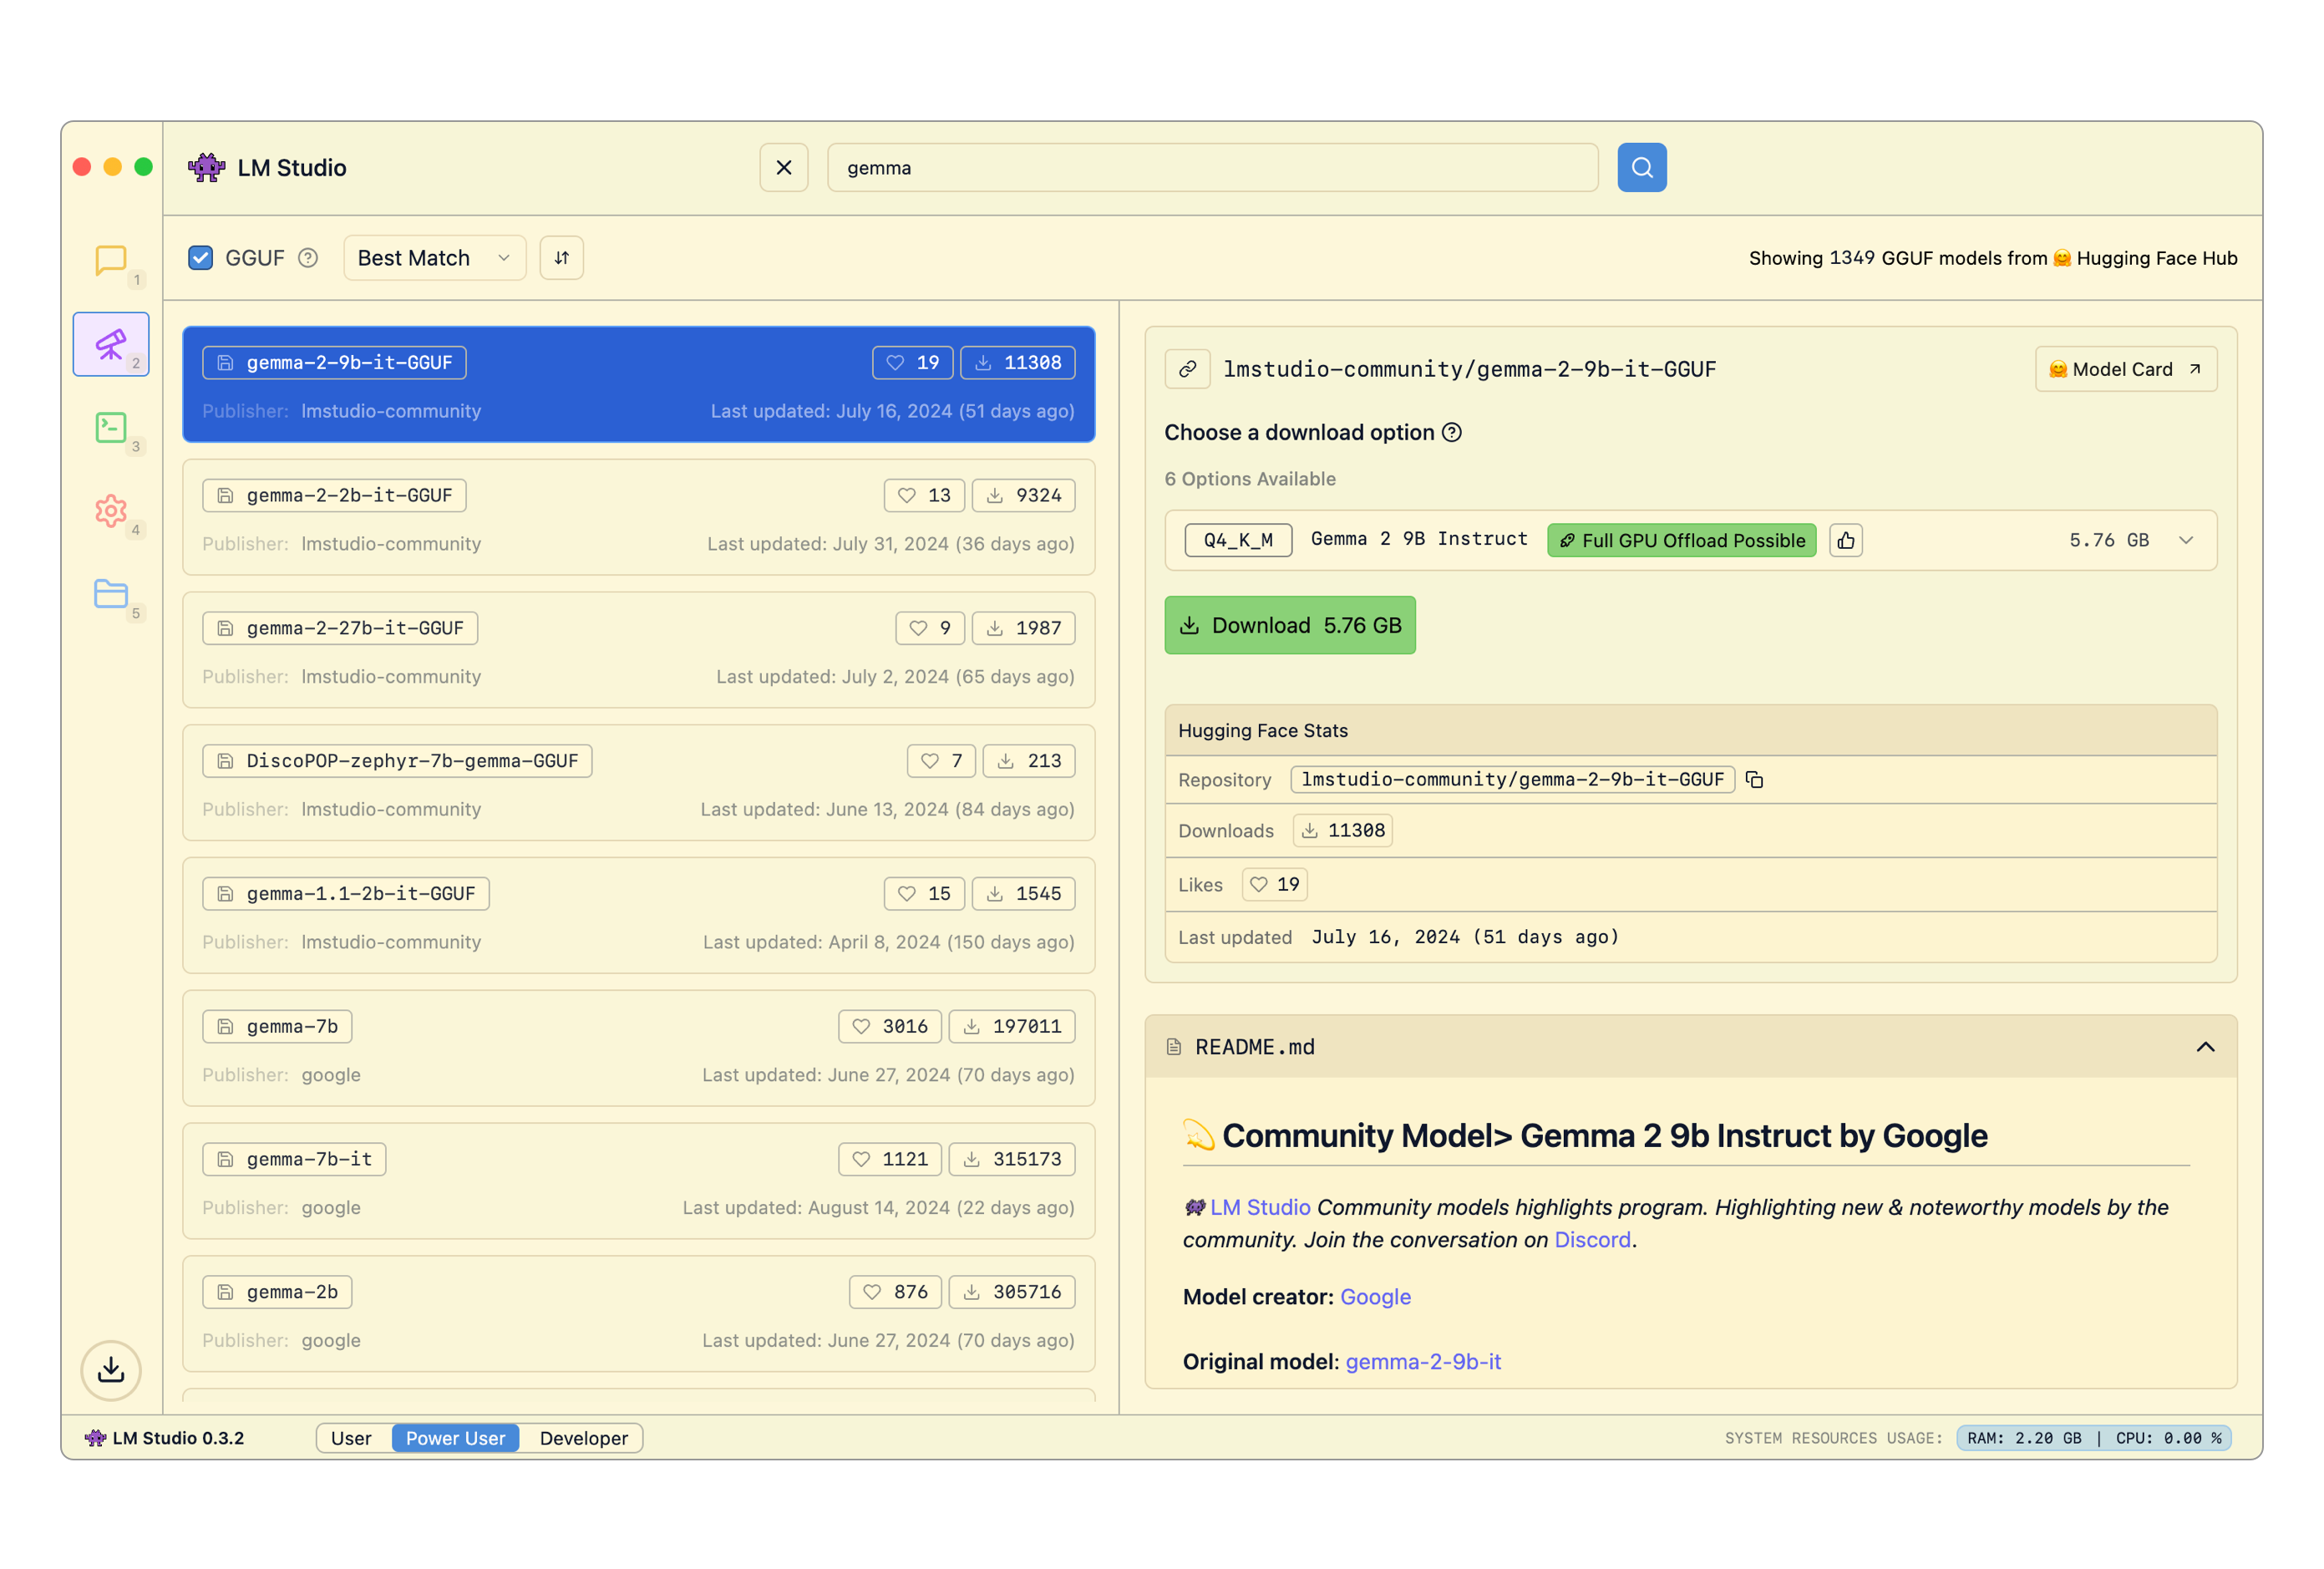
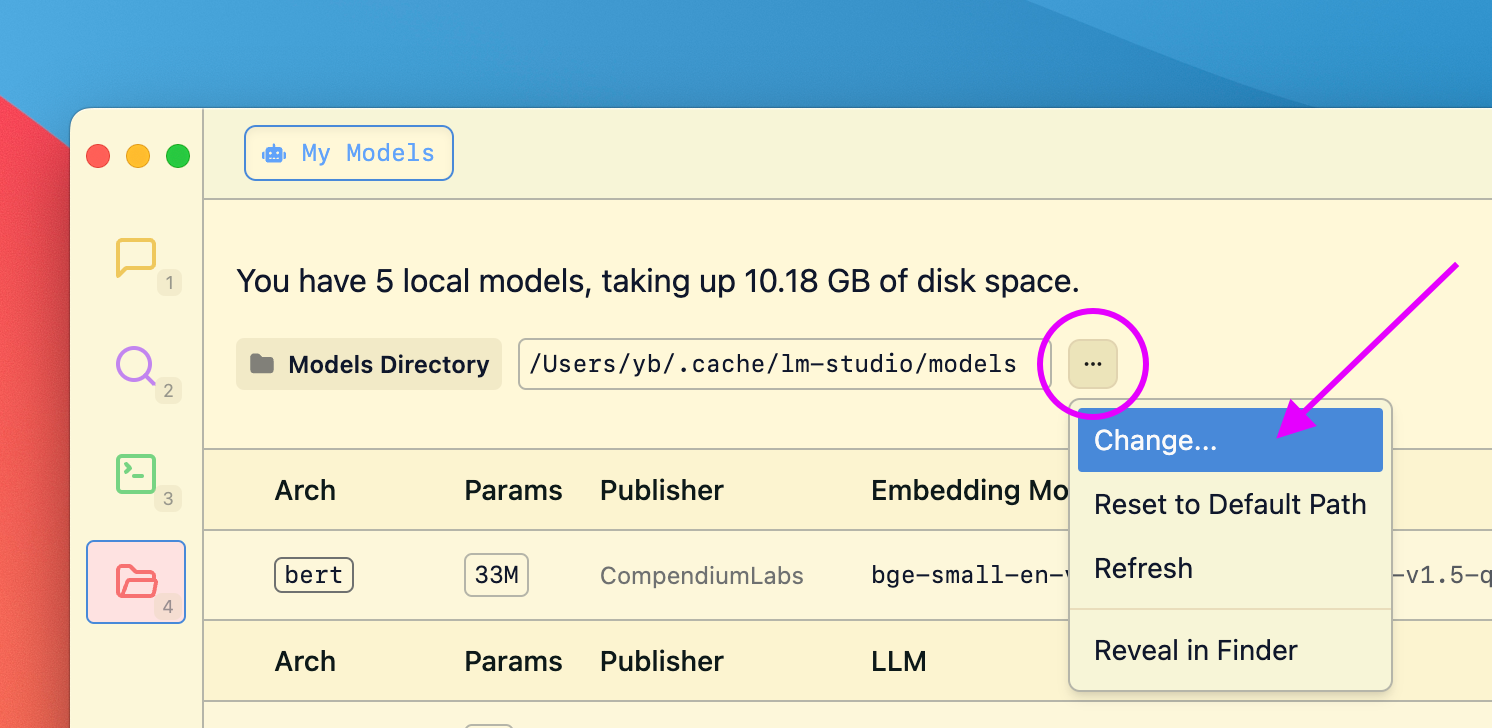
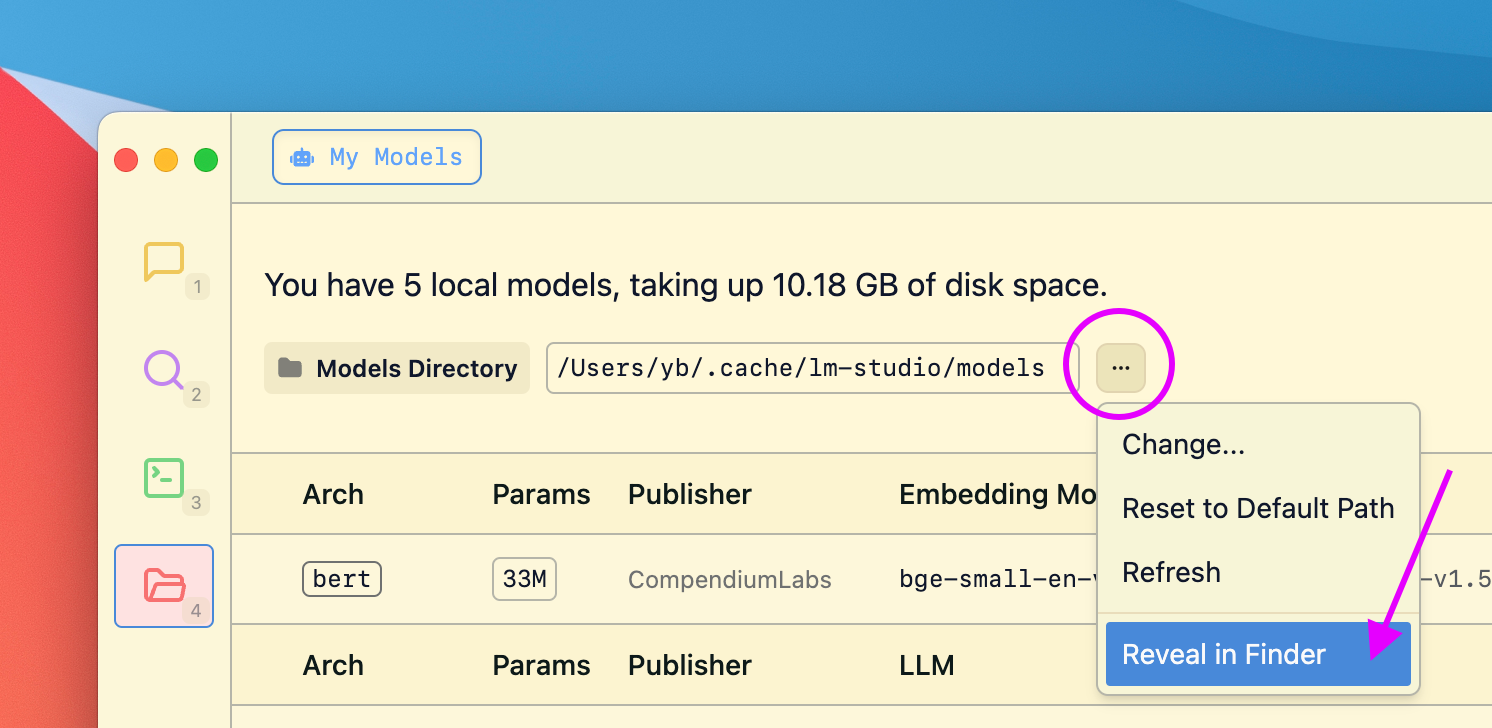 LM Studio aims to preserves the directory structure of models downloaded from Hugging Face. The expected directory structure is as follows:
```xml
~/.lmstudio/models/
└── publisher/
└── model/
└── model-file.gguf
```
For example, if you have a model named `ocelot-v1` published by `infra-ai`, the structure would look like this:
```xml
~/.lmstudio/models/
└── infra-ai/
└── ocelot-v1/
└── ocelot-v1-instruct-q4_0.gguf
```
LM Studio aims to preserves the directory structure of models downloaded from Hugging Face. The expected directory structure is as follows:
```xml
~/.lmstudio/models/
└── publisher/
└── model/
└── model-file.gguf
```
For example, if you have a model named `ocelot-v1` published by `infra-ai`, the structure would look like this:
```xml
~/.lmstudio/models/
└── infra-ai/
└── ocelot-v1/
└── ocelot-v1-instruct-q4_0.gguf
```
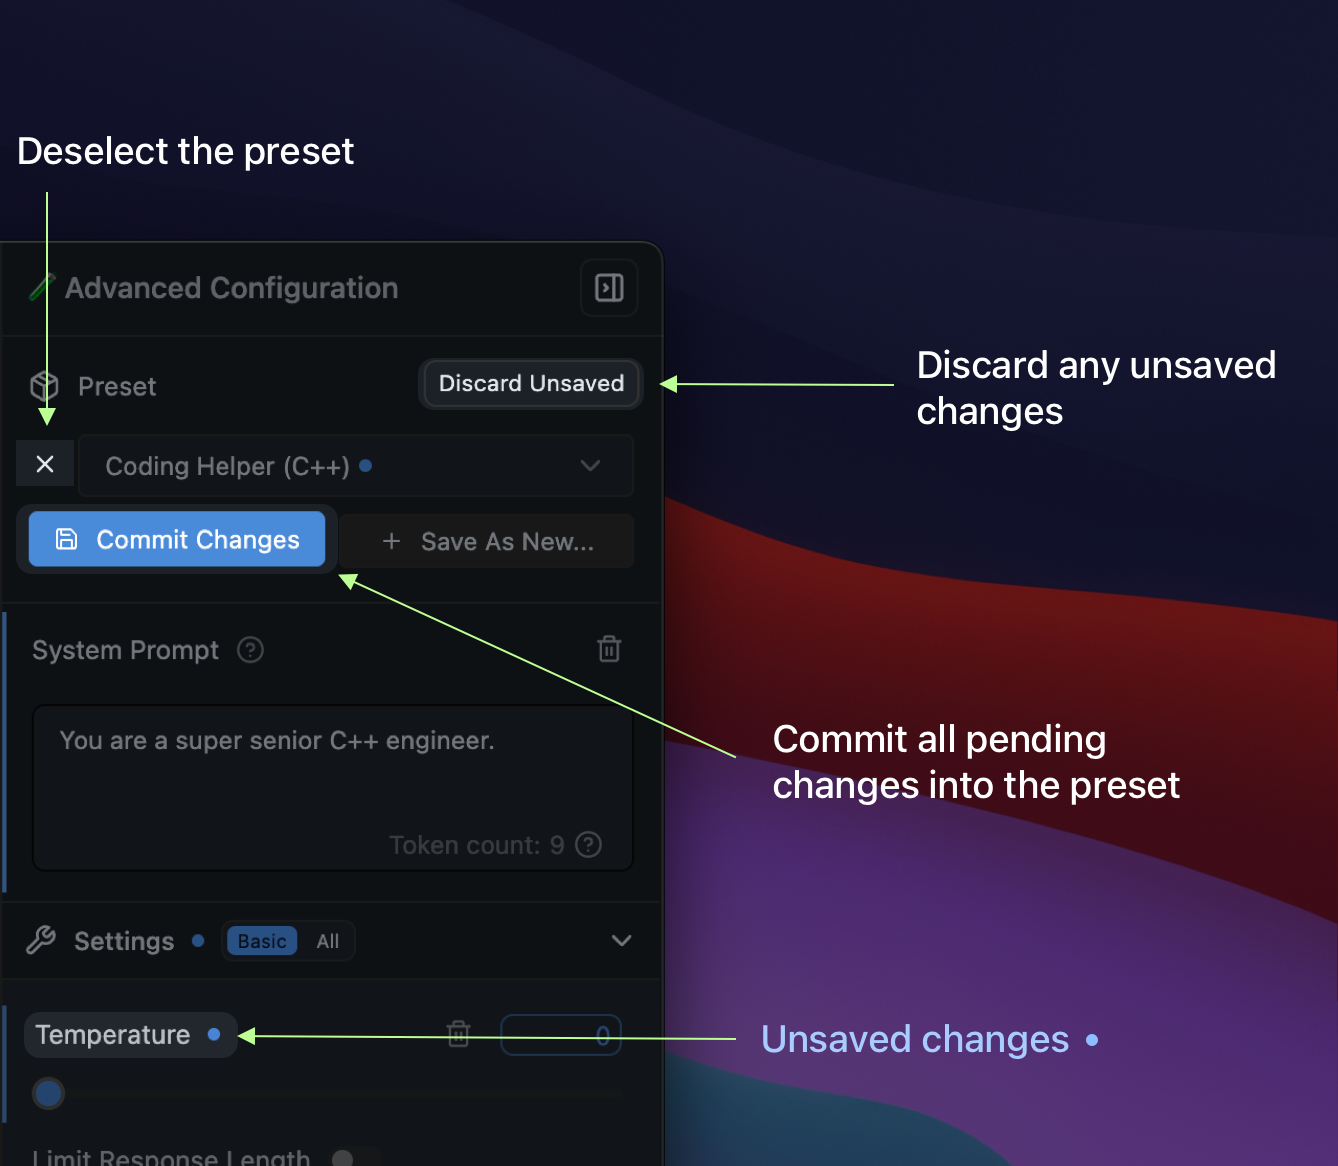 ## Importing, Publishing, and Updating Downloaded Presets
Presets are JSON files. You can share them by sending around the JSON, or you can share them by publishing them to the LM Studio Hub.
You can also import Presets from other users by URL. See the [Import](/docs/app/presets/import) and [Publish](/docs/app/presets/publish) sections for more details.
## Example: Build your own Prompt Library
You can create your own prompt library by using Presets.
In addition to system prompts, every parameter under the Advanced Configuration sidebar can be recorded in a named Preset.
For example, you might want to always use a certain Temperature, Top P, or Max Tokens for a particular use case. You can save these settings as a Preset (with or without a system prompt) and easily switch between them.
#### The Use Case for Presets
- Save your system prompts, inference parameters as a named `Preset`.
- Easily switch between different use cases, such as reasoning, creative writing, multi-turn conversations, or brainstorming.
## Where Presets are stored
Presets are stored in the following directory:
#### macOS or Linux
```xml
~/.lmstudio/config-presets
```
#### Windows
```xml
%USERPROFILE%\.lmstudio\config-presets
```
### Migration from LM Studio 0.2.\* Presets
- Presets you've saved in LM Studio 0.2.\* are automatically readable in 0.3.3 with no migration step needed.
- If you save **new changes** in a **legacy preset**, it'll be **copied** to a new format upon save.
- The old files are NOT deleted.
- Notable difference: Load parameters are not included in the new preset format.
- Favor editing the model's default config in My Models. See [how to do it here](/docs/configuration/per-model).
## Importing, Publishing, and Updating Downloaded Presets
Presets are JSON files. You can share them by sending around the JSON, or you can share them by publishing them to the LM Studio Hub.
You can also import Presets from other users by URL. See the [Import](/docs/app/presets/import) and [Publish](/docs/app/presets/publish) sections for more details.
## Example: Build your own Prompt Library
You can create your own prompt library by using Presets.
In addition to system prompts, every parameter under the Advanced Configuration sidebar can be recorded in a named Preset.
For example, you might want to always use a certain Temperature, Top P, or Max Tokens for a particular use case. You can save these settings as a Preset (with or without a system prompt) and easily switch between them.
#### The Use Case for Presets
- Save your system prompts, inference parameters as a named `Preset`.
- Easily switch between different use cases, such as reasoning, creative writing, multi-turn conversations, or brainstorming.
## Where Presets are stored
Presets are stored in the following directory:
#### macOS or Linux
```xml
~/.lmstudio/config-presets
```
#### Windows
```xml
%USERPROFILE%\.lmstudio\config-presets
```
### Migration from LM Studio 0.2.\* Presets
- Presets you've saved in LM Studio 0.2.\* are automatically readable in 0.3.3 with no migration step needed.
- If you save **new changes** in a **legacy preset**, it'll be **copied** to a new format upon save.
- The old files are NOT deleted.
- Notable difference: Load parameters are not included in the new preset format.
- Favor editing the model's default config in My Models. See [how to do it here](/docs/configuration/per-model).
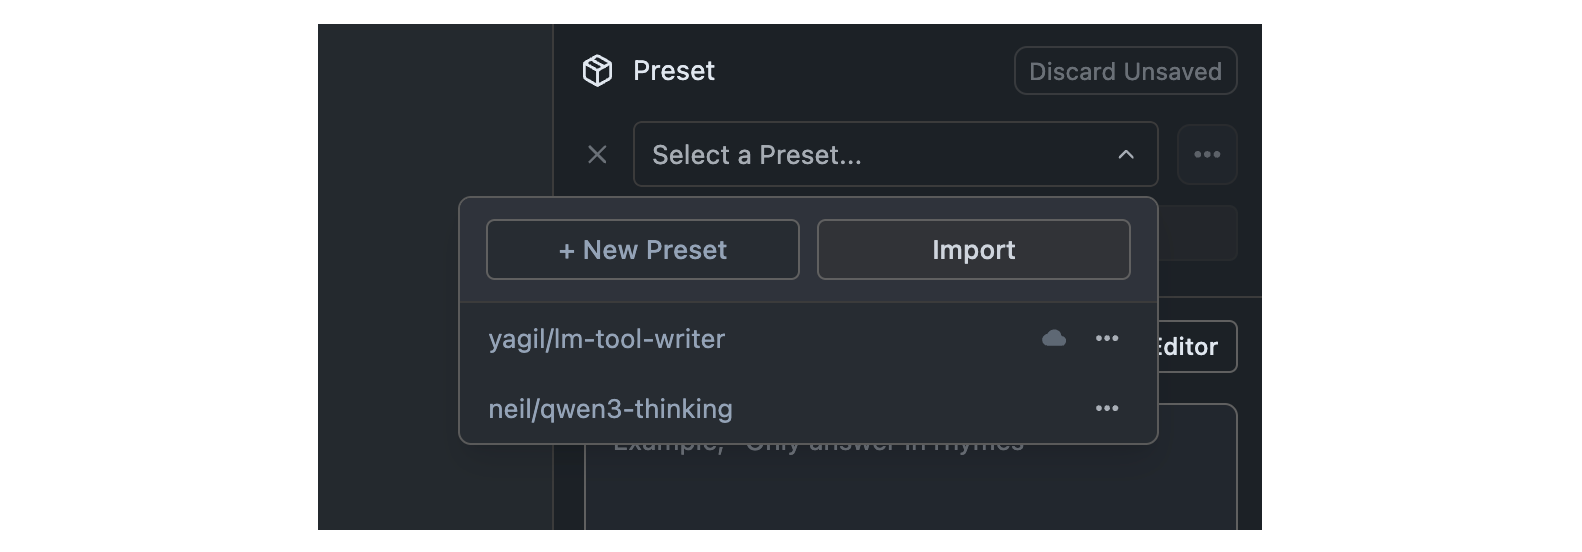 ## Import Presets from File
Once you click the Import button, you can select the source of the preset you want to import. You can either import from a file or from a URL.
## Import Presets from File
Once you click the Import button, you can select the source of the preset you want to import. You can either import from a file or from a URL.
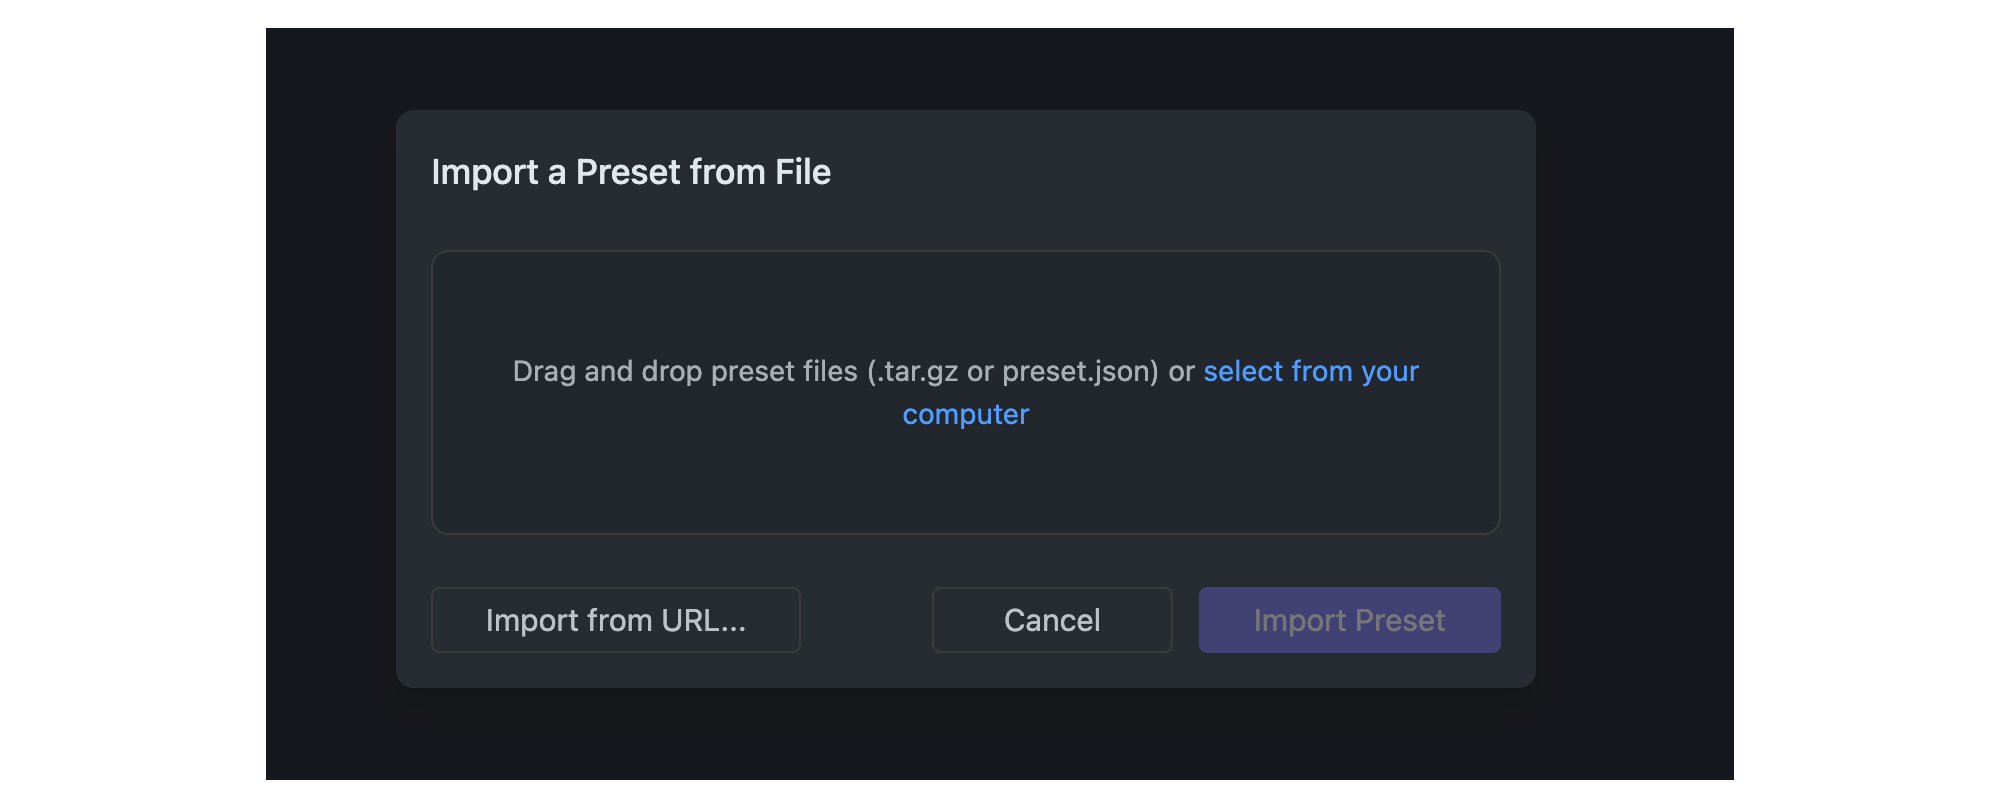 ## Import Presets from URL
Presets that are [published](/docs/app/presets/publish) to the LM Studio Hub can be imported by providing their URL.
Importing public presets does not require logging in within LM Studio.
## Import Presets from URL
Presets that are [published](/docs/app/presets/publish) to the LM Studio Hub can be imported by providing their URL.
Importing public presets does not require logging in within LM Studio.
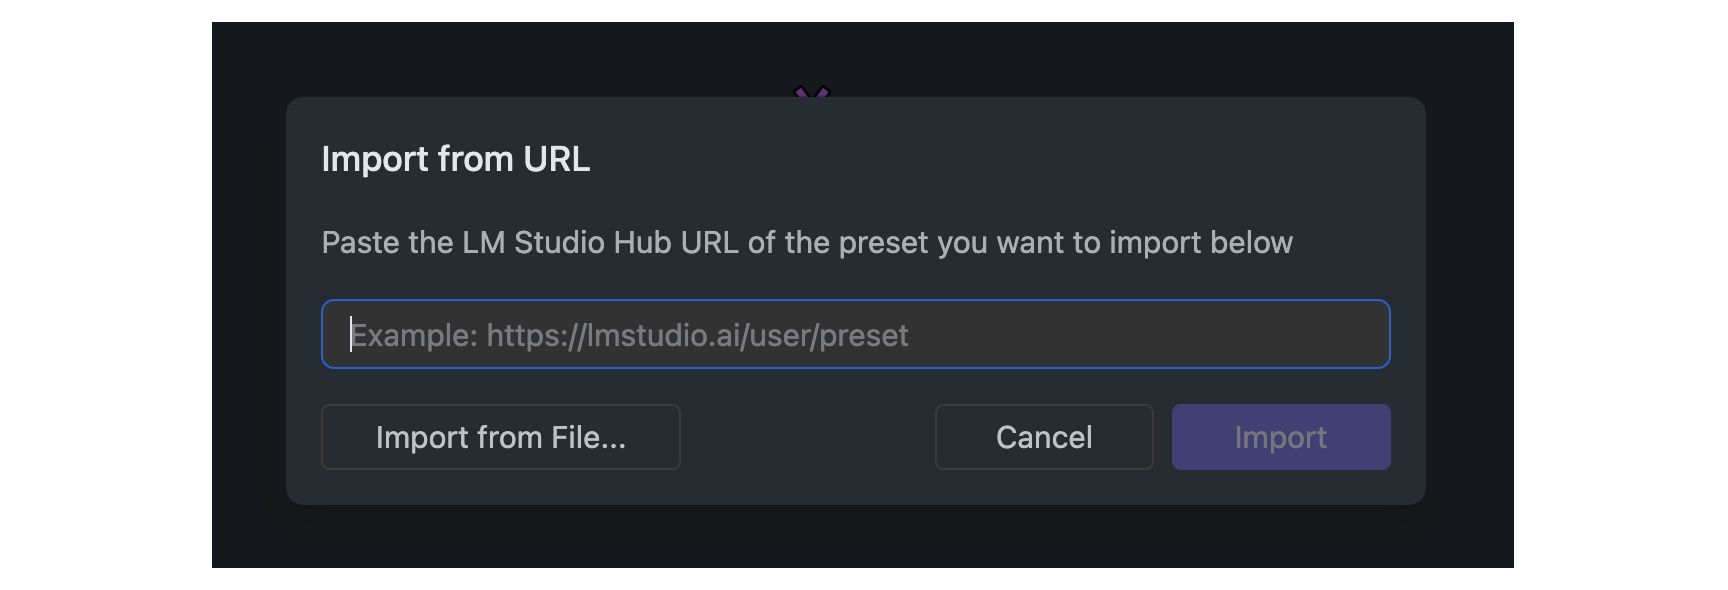 ### Using `lms` CLI
You can also use the CLI to import presets from URL. This is useful for sharing presets with others.
```
lms get {author}/{preset-name}
```
Example:
```bash
lms get neil/qwen3-thinking
```
### Find your config-presets directory
LM Studio manages config presets on disk. Presets are local and private by default. You or others can choose to share them by sharing the file.
Click on the `•••` button in the Preset dropdown and select "Reveal in Finder" (or "Show in Explorer" on Windows).
### Using `lms` CLI
You can also use the CLI to import presets from URL. This is useful for sharing presets with others.
```
lms get {author}/{preset-name}
```
Example:
```bash
lms get neil/qwen3-thinking
```
### Find your config-presets directory
LM Studio manages config presets on disk. Presets are local and private by default. You or others can choose to share them by sharing the file.
Click on the `•••` button in the Preset dropdown and select "Reveal in Finder" (or "Show in Explorer" on Windows).
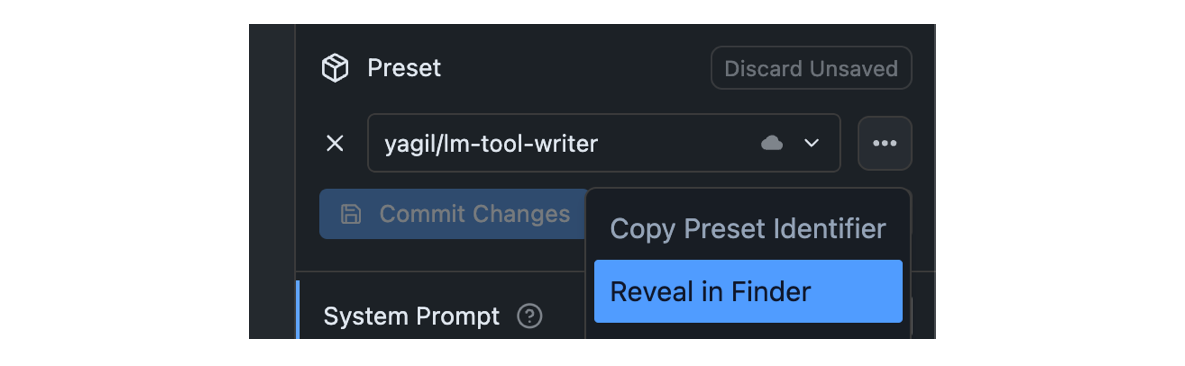 This will download the preset file and automatically surface it in the preset dropdown in the app.
### Where Hub shared presets are stored
Presets you share, and ones you download from the LM Studio Hub are saved in `~/.lmstudio/hub` on macOS and Linux, or `%USERPROFILE%\.lmstudio\hub` on Windows.
### Publish Your Presets
> Publish your Presets to the LM Studio Hub. Share your Presets with the community or with your colleagues.
`Feature In Preview`
Starting LM Studio 0.3.15, you can publish your Presets to the LM Studio community. This allows you to share your Presets with others and import Presets from other users.
This feature is early and we would love to hear your feedback. Please report bugs and feedback to bugs@lmstudio.ai.
---
## Step 1: Click the Publish Button
Identify the Preset you want to publish in the Preset dropdown. Click the `•••` button and select "Publish" from the menu.
This will download the preset file and automatically surface it in the preset dropdown in the app.
### Where Hub shared presets are stored
Presets you share, and ones you download from the LM Studio Hub are saved in `~/.lmstudio/hub` on macOS and Linux, or `%USERPROFILE%\.lmstudio\hub` on Windows.
### Publish Your Presets
> Publish your Presets to the LM Studio Hub. Share your Presets with the community or with your colleagues.
`Feature In Preview`
Starting LM Studio 0.3.15, you can publish your Presets to the LM Studio community. This allows you to share your Presets with others and import Presets from other users.
This feature is early and we would love to hear your feedback. Please report bugs and feedback to bugs@lmstudio.ai.
---
## Step 1: Click the Publish Button
Identify the Preset you want to publish in the Preset dropdown. Click the `•••` button and select "Publish" from the menu.
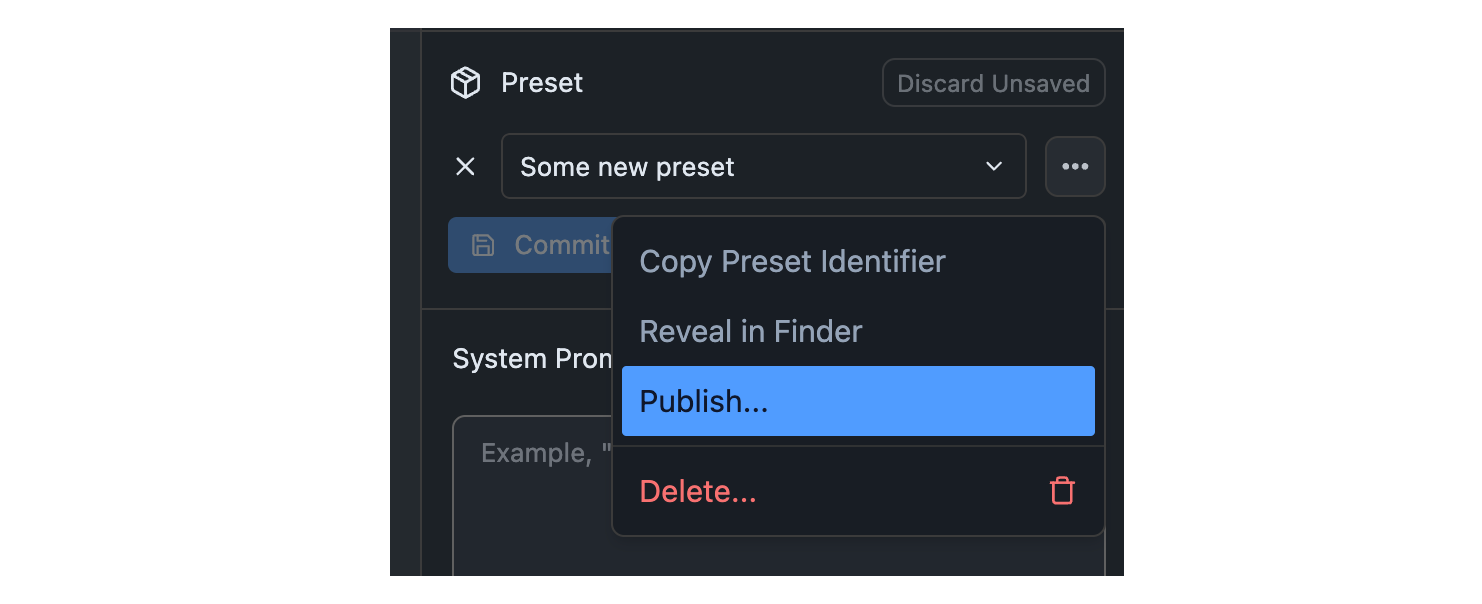 ## Step 2: Set the Preset Details
You will be prompted to set the details of your Preset. This includes the name (slug) and optional description.
Community presets are public and can be used by anyone on the internet!
## Step 2: Set the Preset Details
You will be prompted to set the details of your Preset. This includes the name (slug) and optional description.
Community presets are public and can be used by anyone on the internet!
 #### Privacy and Terms
For good measure, visit the [Privacy Policy](https://lmstudio.ai/hub-privacy) and [Terms of Service](https://lmstudio.ai/hub-terms) to understand what's suitable to share on the Hub, and how data is handled. Community presets are public and visible to everyone. Make sure you agree to what these documents say before publishing your Preset.
### Pull Updates
> How to pull the latest revisions of your Presets, or presets you have imported from others.
`Feature In Preview`
You can pull the latest revisions of your Presets, or presets you have imported from others. This is useful for keeping your Presets up to date with the latest changes.
#### Privacy and Terms
For good measure, visit the [Privacy Policy](https://lmstudio.ai/hub-privacy) and [Terms of Service](https://lmstudio.ai/hub-terms) to understand what's suitable to share on the Hub, and how data is handled. Community presets are public and visible to everyone. Make sure you agree to what these documents say before publishing your Preset.
### Pull Updates
> How to pull the latest revisions of your Presets, or presets you have imported from others.
`Feature In Preview`
You can pull the latest revisions of your Presets, or presets you have imported from others. This is useful for keeping your Presets up to date with the latest changes.
 ## Your Presets vs Others'
Both your published Presets and other downloaded Presets can be pulled and updated the same way.
### Push New Revisions
> Publish new revisions of your Presets to the LM Studio Hub.
`Feature In Preview`
Starting LM Studio 0.3.15, you can publish your Presets to the LM Studio community. This allows you to share your Presets with others and import Presets from other users.
This feature is early and we would love to hear your feedback. Please report bugs and feedback to bugs@lmstudio.ai.
---
## Published Presets
Presets you share on the LM Studio Hub can be updated.
## Your Presets vs Others'
Both your published Presets and other downloaded Presets can be pulled and updated the same way.
### Push New Revisions
> Publish new revisions of your Presets to the LM Studio Hub.
`Feature In Preview`
Starting LM Studio 0.3.15, you can publish your Presets to the LM Studio community. This allows you to share your Presets with others and import Presets from other users.
This feature is early and we would love to hear your feedback. Please report bugs and feedback to bugs@lmstudio.ai.
---
## Published Presets
Presets you share on the LM Studio Hub can be updated.
 ## Step 1: Make Changes and Commit
Make any changes to your Preset, both in parameters that are already included in the Preset, or by adding new parameters.
## Step 2: Click the Push Button
Once changes are committed, you will see a `Push` button. Click it to push your changes to the Hub.
Pushing changes will result in a new revision of your Preset on the Hub.
## Step 1: Make Changes and Commit
Make any changes to your Preset, both in parameters that are already included in the Preset, or by adding new parameters.
## Step 2: Click the Push Button
Once changes are committed, you will see a `Push` button. Click it to push your changes to the Hub.
Pushing changes will result in a new revision of your Preset on the Hub.
 ## api
## LM Studio as a Local LLM API Server
> Run an LLM API server on localhost with LM Studio
You can serve local LLMs from LM Studio's Developer tab, either on localhost or on the network.
LM Studio's APIs can be used through an [OpenAI compatibility mode](/docs/app/api/endpoints/openai), enhanced [REST API](/docs/api/rest-api/endpoints/endpoints), or through a client library like [lmstudio-js](/docs/api/sdk).
#### API options
- [TypeScript SDK](/docs/typescript) - `lmstudio-js`
- [Python SDK](/docs/python) - `lmstudio-python`
- [LM Studio REST API](/docs/app/api/endpoints/rest) (new, in beta)
- [OpenAI Compatibility endpoints](/docs/app/api/endpoints/openai)
## api
## LM Studio as a Local LLM API Server
> Run an LLM API server on localhost with LM Studio
You can serve local LLMs from LM Studio's Developer tab, either on localhost or on the network.
LM Studio's APIs can be used through an [OpenAI compatibility mode](/docs/app/api/endpoints/openai), enhanced [REST API](/docs/api/rest-api/endpoints/endpoints), or through a client library like [lmstudio-js](/docs/api/sdk).
#### API options
- [TypeScript SDK](/docs/typescript) - `lmstudio-js`
- [Python SDK](/docs/python) - `lmstudio-python`
- [LM Studio REST API](/docs/app/api/endpoints/rest) (new, in beta)
- [OpenAI Compatibility endpoints](/docs/app/api/endpoints/openai)
 ### Run LM Studio as a service (headless)
> GUI-less operation of LM Studio: run in the background, start on machine login, and load models on demand
`Advanced`
Starting in v[0.3.5](/blog/lmstudio-v0.3.5), LM Studio can be run as a service without the GUI. This is useful for running LM Studio on a server or in the background on your local machine.
### Run LM Studio as a service (headless)
> GUI-less operation of LM Studio: run in the background, start on machine login, and load models on demand
`Advanced`
Starting in v[0.3.5](/blog/lmstudio-v0.3.5), LM Studio can be run as a service without the GUI. This is useful for running LM Studio on a server or in the background on your local machine.
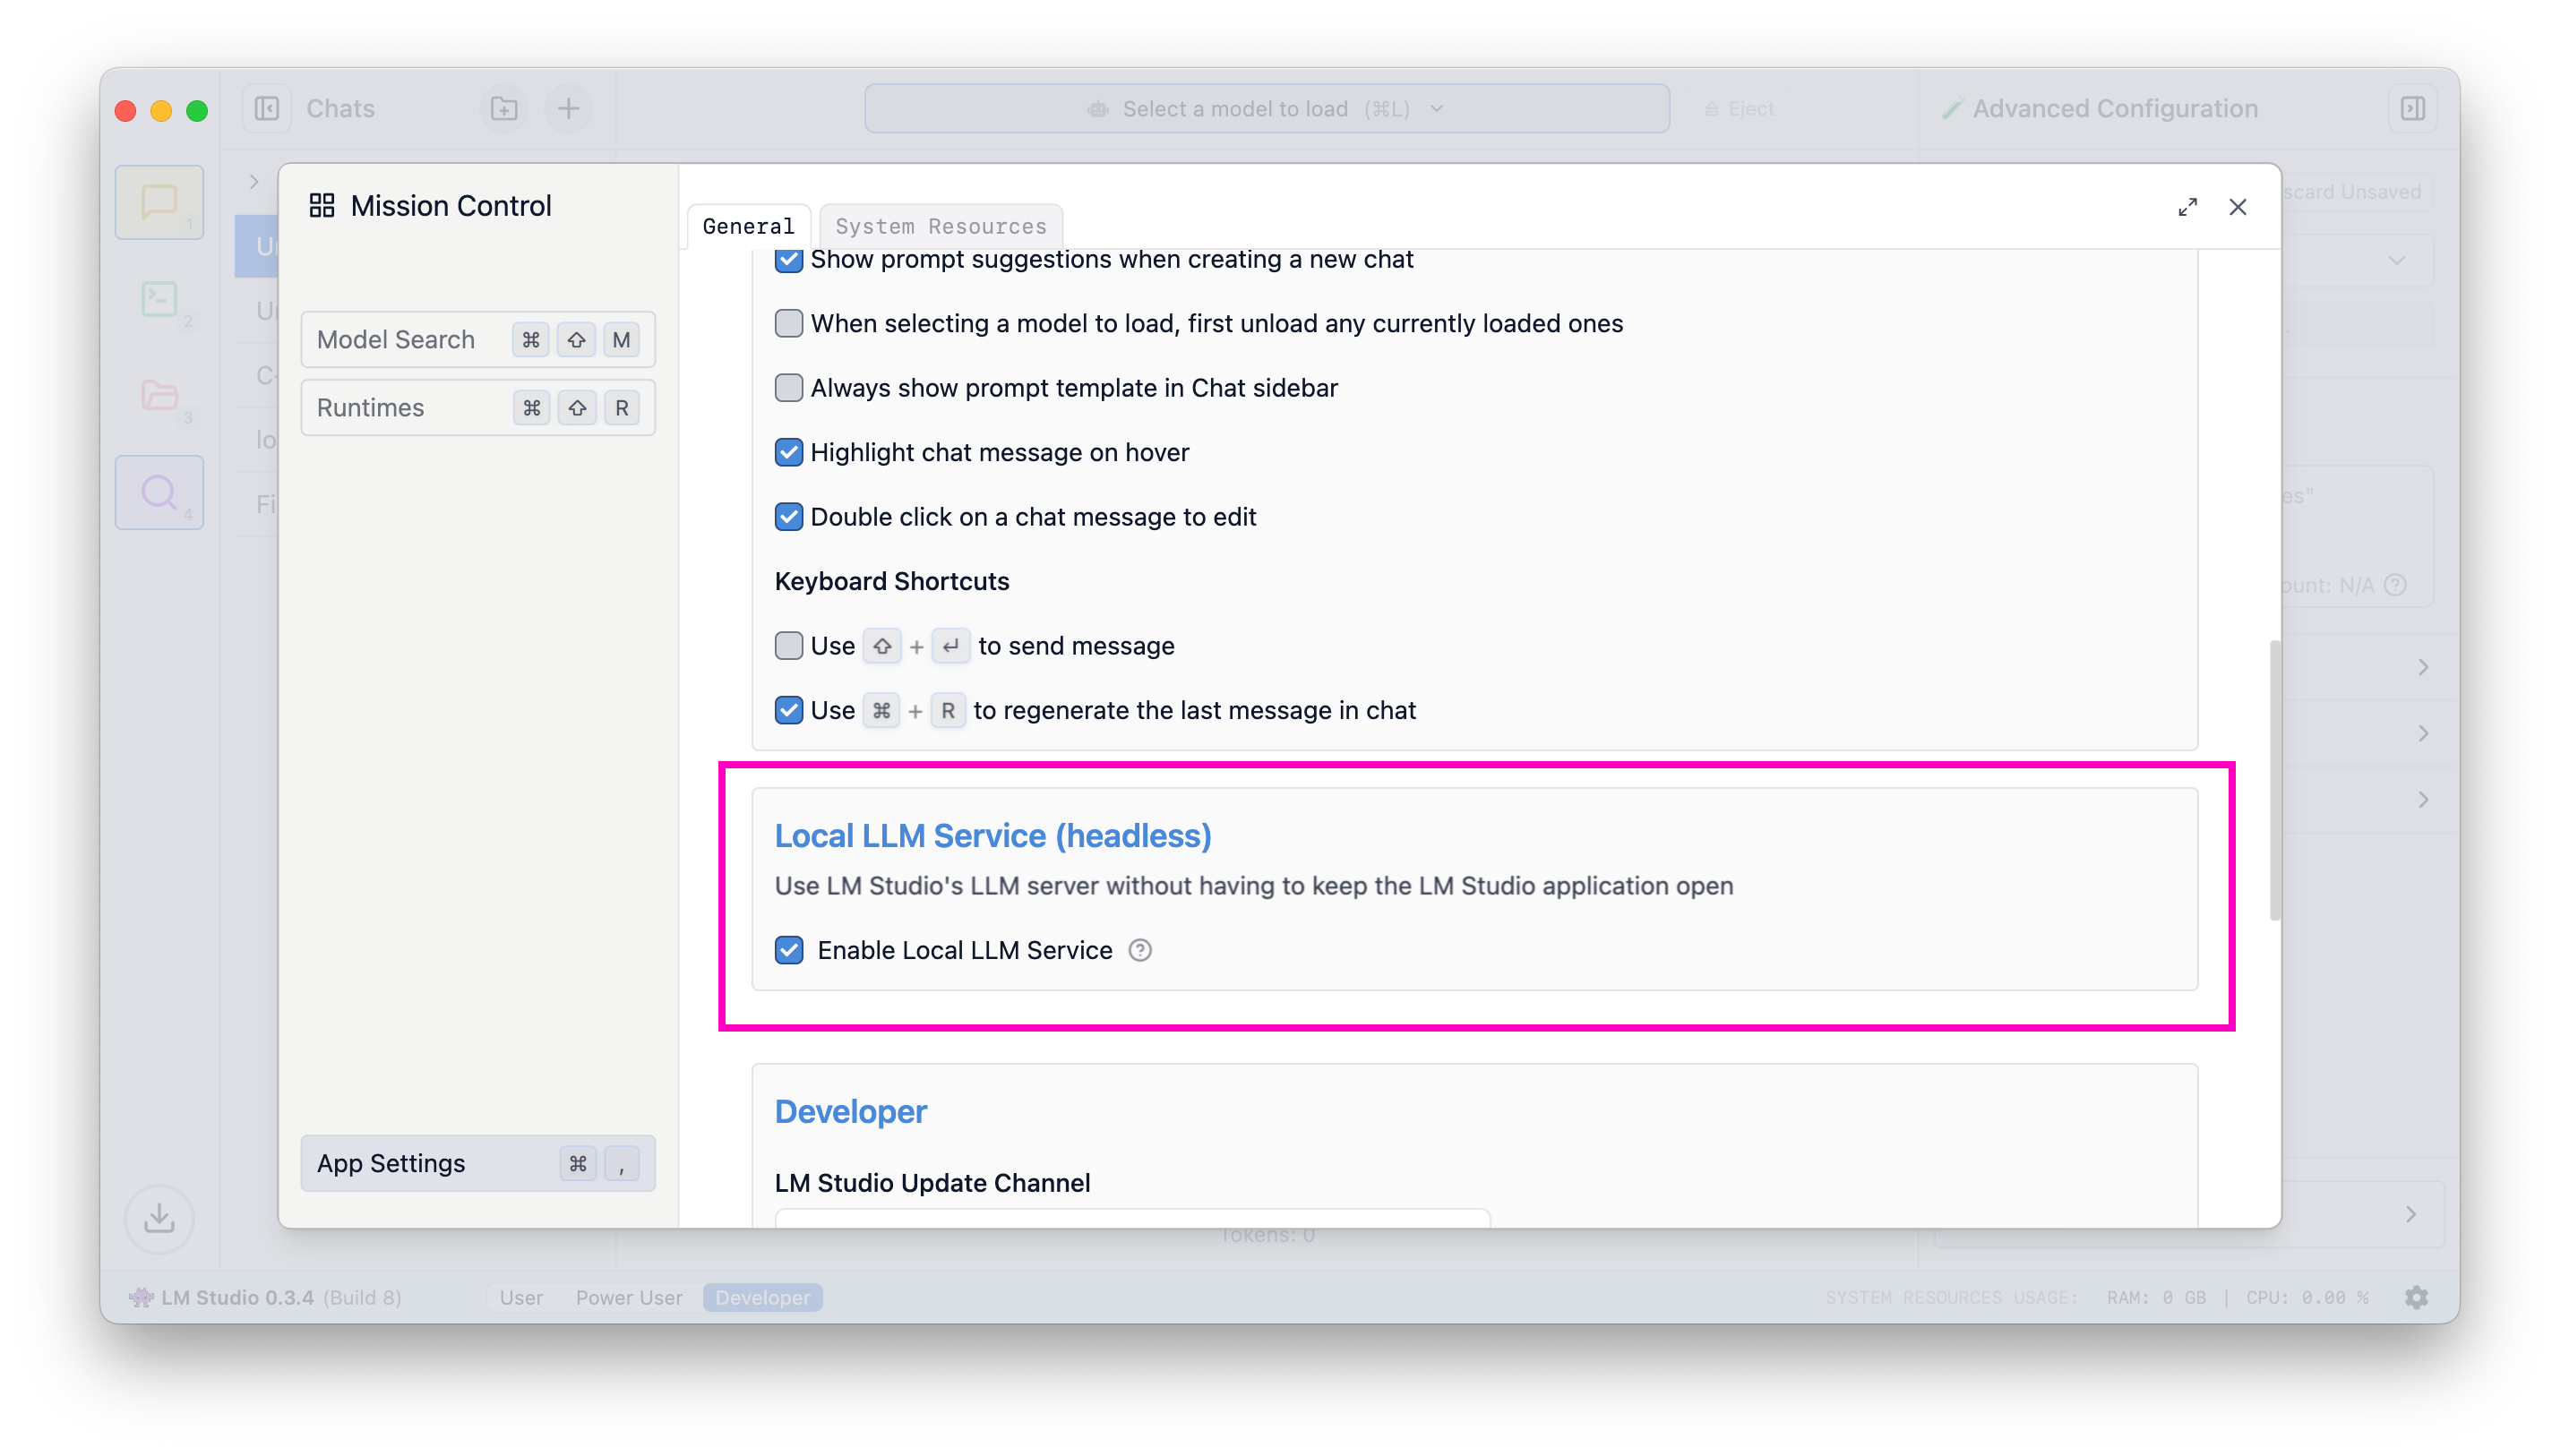 When this setting is enabled, exiting the app will minimize it to the system tray, and the LLM server will continue to run in the background.
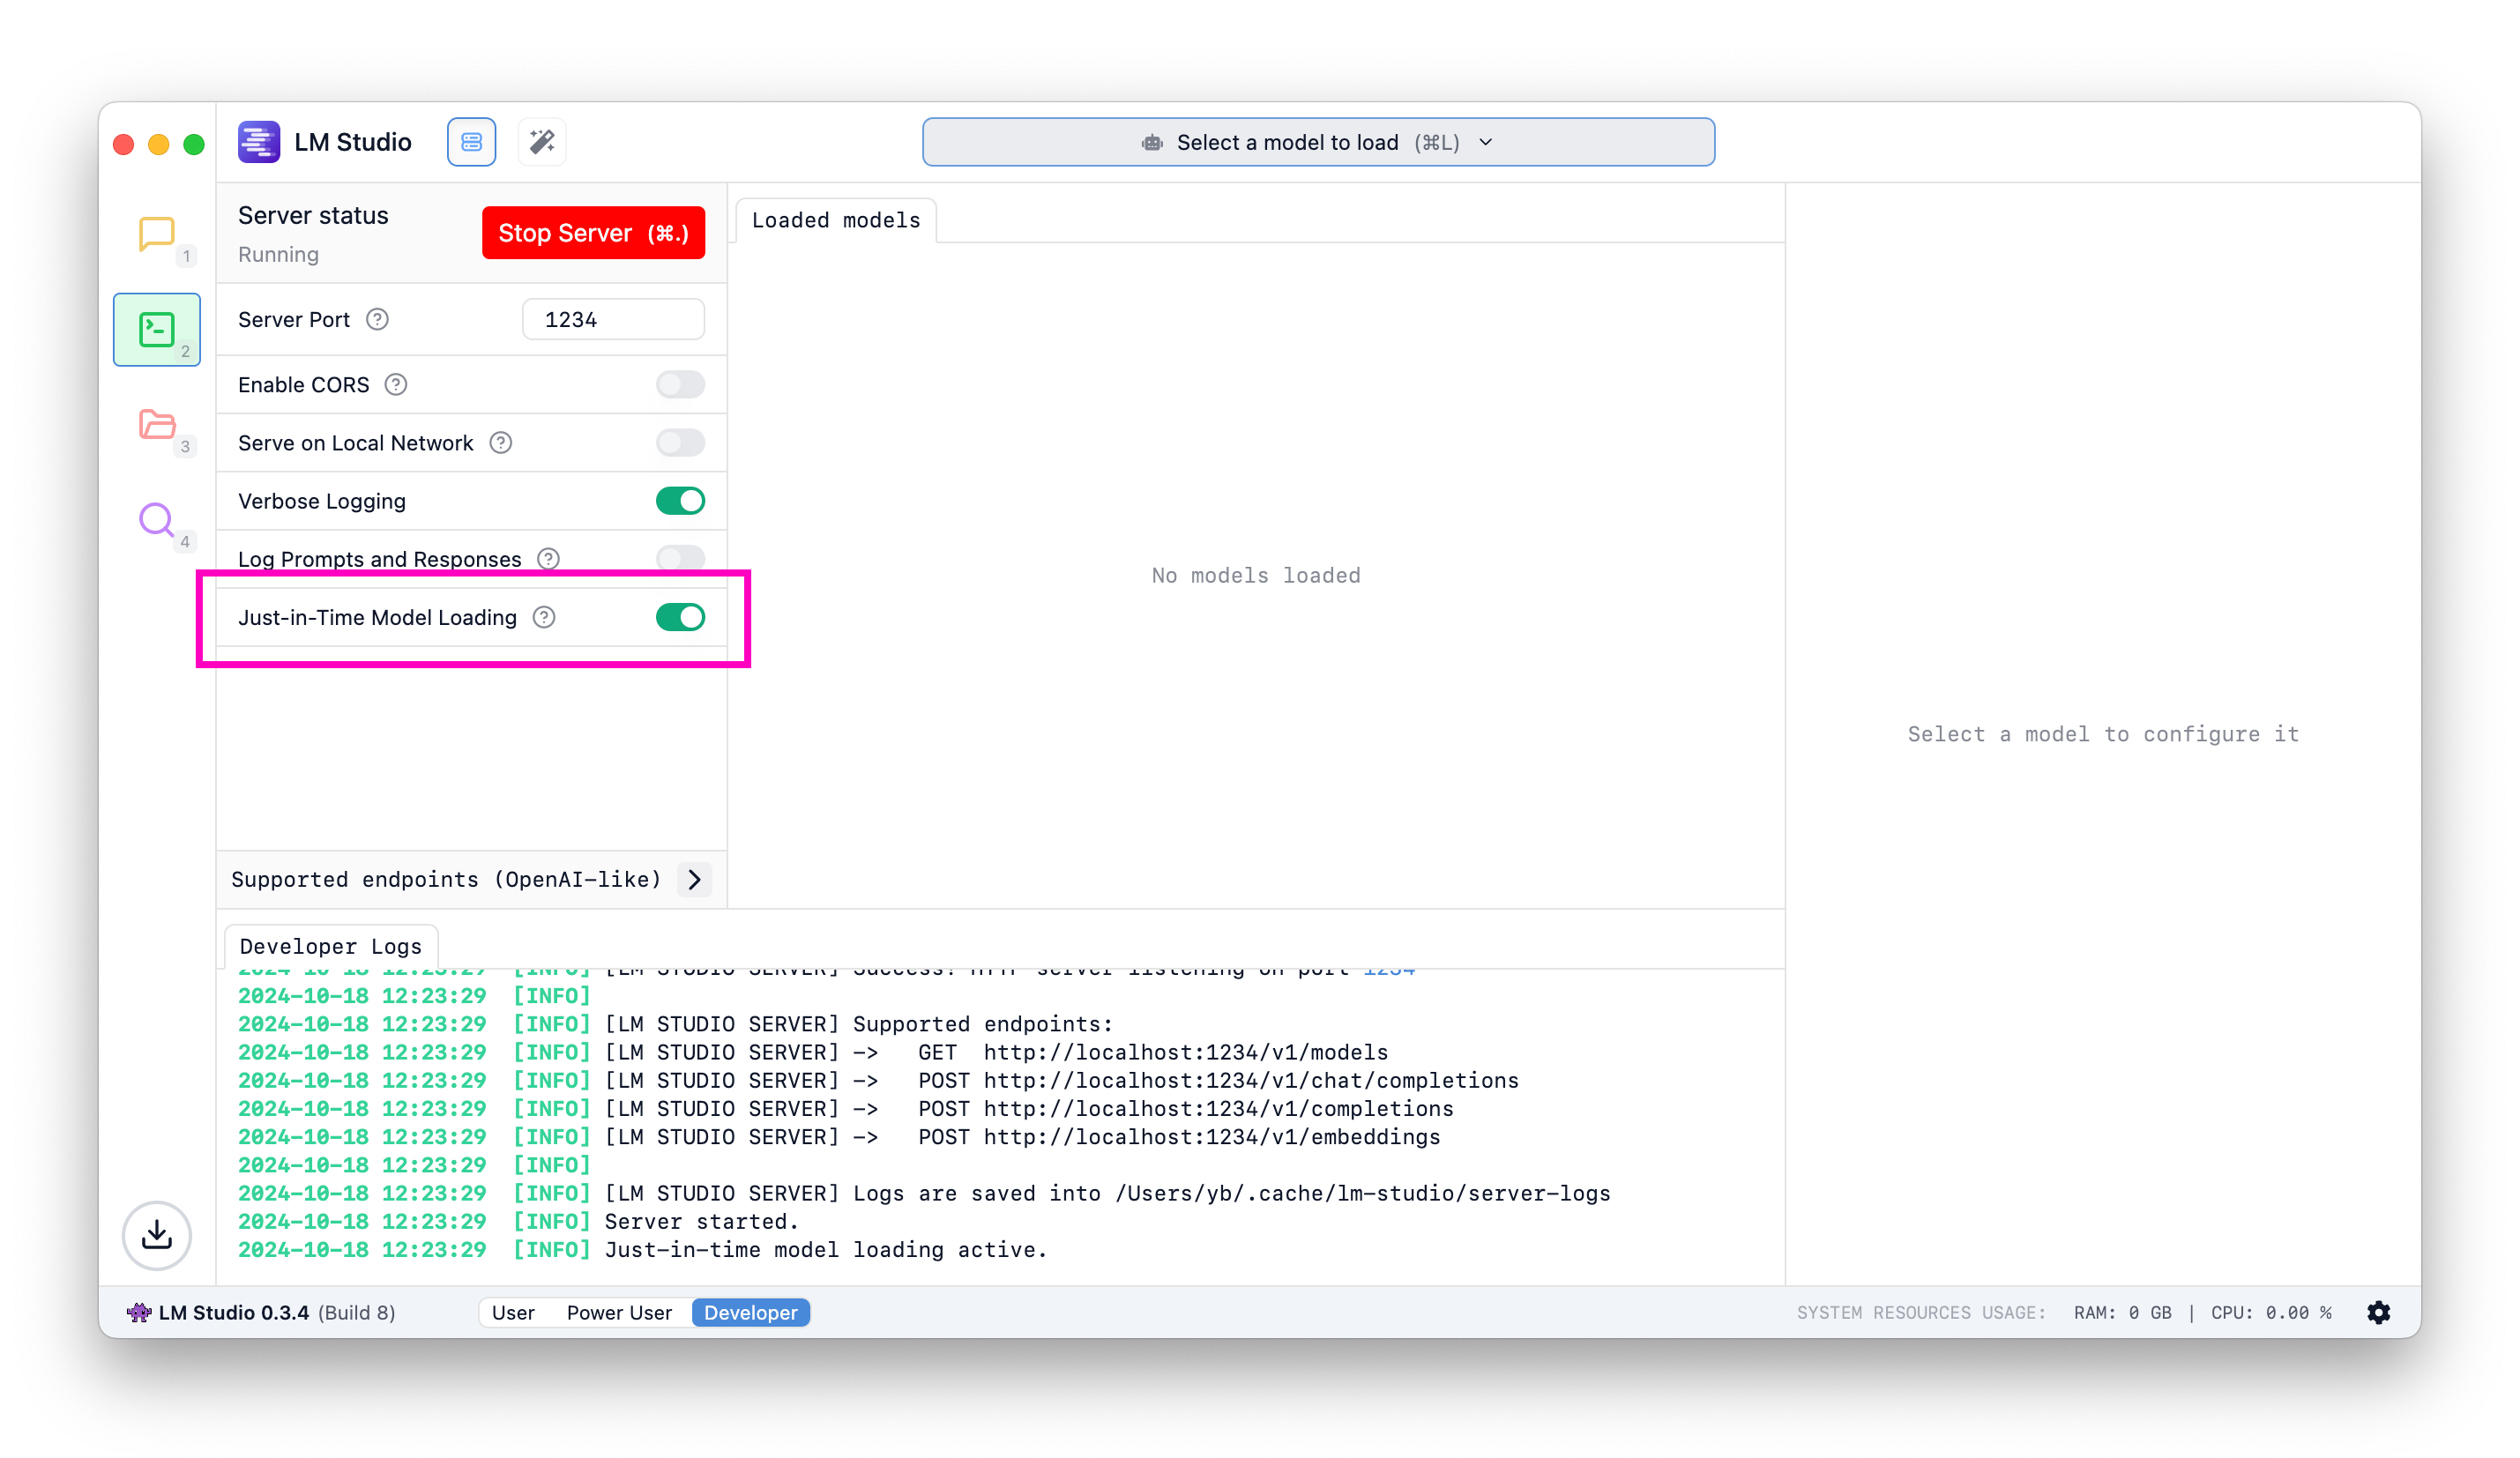
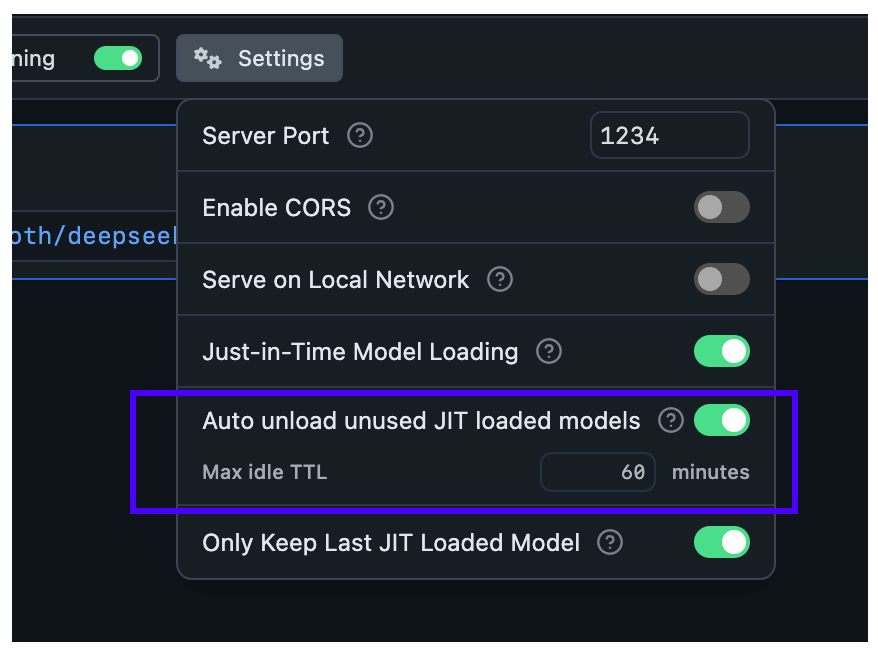 ### Set per-model TTL-model in API requests
When JIT loading is enabled, the **first request** to a model will load it into memory. You can specify a TTL for that model in the request payload.
This works for requests targeting both the [OpenAI compatibility API](openai-api) and the [LM Studio's REST API](rest-api):
### Set per-model TTL-model in API requests
When JIT loading is enabled, the **first request** to a model will load it into memory. You can specify a TTL for that model in the request payload.
This works for requests targeting both the [OpenAI compatibility API](openai-api) and the [LM Studio's REST API](rest-api):
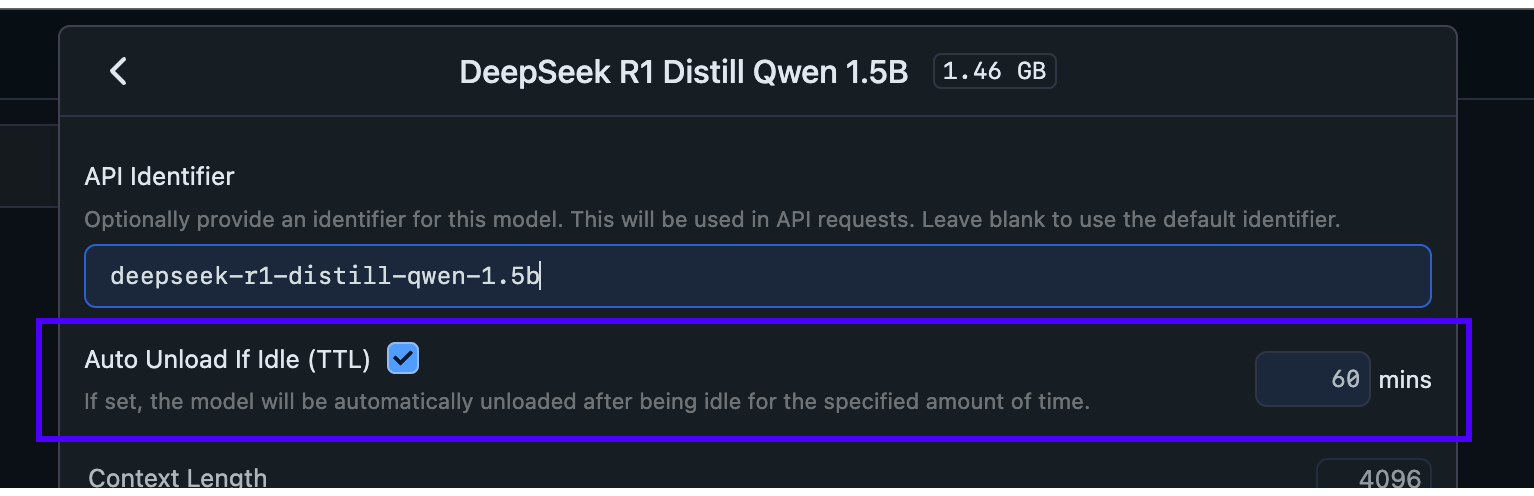 ## Configure Auto-Evict for JIT loaded models
With this setting, you can ensure new models loaded via JIT automatically unload previously loaded models first.
This is useful when you want to switch between models from another app without worrying about memory building up with unused models.
## Configure Auto-Evict for JIT loaded models
With this setting, you can ensure new models loaded via JIT automatically unload previously loaded models first.
This is useful when you want to switch between models from another app without worrying about memory building up with unused models.
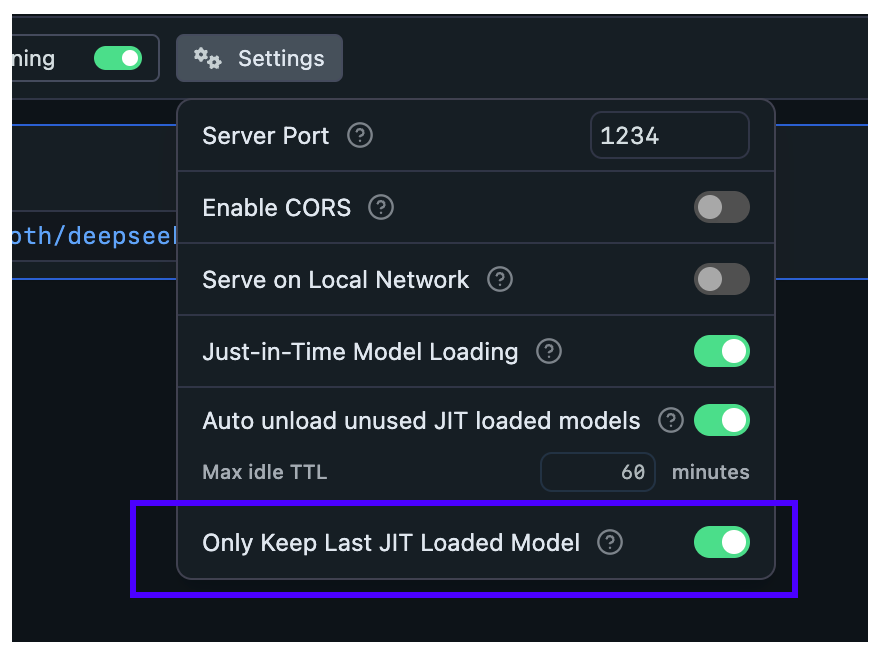 **When Auto-Evict is ON** (default):
- At most `1` model is kept loaded in memory at a time (when loaded via JIT)
- Non-JIT loaded models are not affected
**When Auto-Evict is OFF**:
- Switching models from an external app will keep previous models loaded in memory
- Models will remain loaded until either:
- Their TTL expires
- You manually unload them
This feature works in tandem with TTL to provide better memory management for your workflow.
### Nomenclature
`TTL`: Time-To-Live, is a term borrowed from networking protocols and cache systems. It defines how long a resource can remain allocated before it's considered stale and evicted.
### Structured Output
> Enforce LLM response formats using JSON schemas.
You can enforce a particular response format from an LLM by providing a JSON schema to the `/v1/chat/completions` endpoint, via LM Studio's REST API (or via any OpenAI client).
**When Auto-Evict is ON** (default):
- At most `1` model is kept loaded in memory at a time (when loaded via JIT)
- Non-JIT loaded models are not affected
**When Auto-Evict is OFF**:
- Switching models from an external app will keep previous models loaded in memory
- Models will remain loaded until either:
- Their TTL expires
- You manually unload them
This feature works in tandem with TTL to provide better memory management for your workflow.
### Nomenclature
`TTL`: Time-To-Live, is a term borrowed from networking protocols and cache systems. It defines how long a resource can remain allocated before it's considered stale and evicted.
### Structured Output
> Enforce LLM response formats using JSON schemas.
You can enforce a particular response format from an LLM by providing a JSON schema to the `/v1/chat/completions` endpoint, via LM Studio's REST API (or via any OpenAI client).
 ### Which mode should I choose?
#### `User`
Show only the chat interface, and auto-configure everything. This is the best choice for beginners or anyone who's happy with the default settings.
#### `Power User`
Use LM Studio in this mode if you want access to configurable [load](/docs/configuration/load) and [inference](/docs/configuration/inference) parameters as well as advanced chat features such as [insert, edit, & continue](/docs/advanced/context) (for either role, user or assistant).
#### `Developer`
Full access to all aspects in LM Studio. This includes keyboard shortcuts and development features. Check out the Developer section under Settings for more.
### Color Themes
> Customize LM Studio's color theme
LM Studio comes with a few built-in themes for app-wide color palettes.
### Which mode should I choose?
#### `User`
Show only the chat interface, and auto-configure everything. This is the best choice for beginners or anyone who's happy with the default settings.
#### `Power User`
Use LM Studio in this mode if you want access to configurable [load](/docs/configuration/load) and [inference](/docs/configuration/inference) parameters as well as advanced chat features such as [insert, edit, & continue](/docs/advanced/context) (for either role, user or assistant).
#### `Developer`
Full access to all aspects in LM Studio. This includes keyboard shortcuts and development features. Check out the Developer section under Settings for more.
### Color Themes
> Customize LM Studio's color theme
LM Studio comes with a few built-in themes for app-wide color palettes.
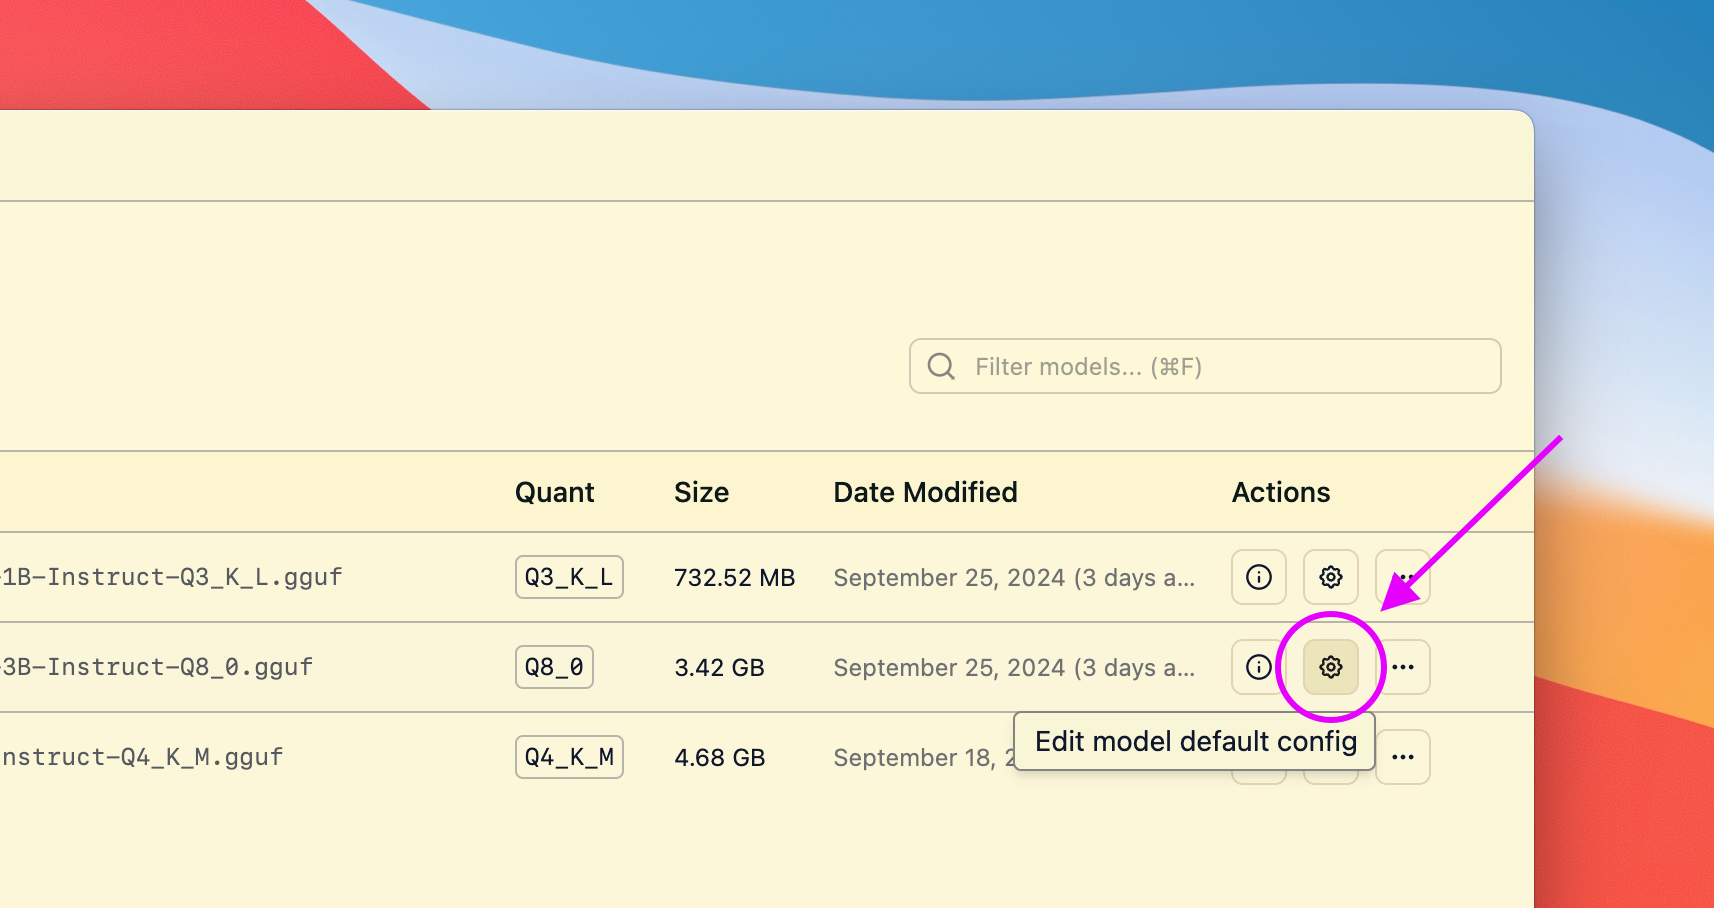 This will open a dialog where you can set the default parameters for the model.
Next time you load the model, these settings will be used.
```lms_protip
#### Reasons to set default load parameters (not required, totally optional)
- Set a particular GPU offload settings for a given model
- Set a particular context size for a given model
- Whether or not to utilize Flash Attention for a given model
```
## Advanced Topics
### Changing load settings before loading a model
When you load a model, you can optionally change the default load settings.
This will open a dialog where you can set the default parameters for the model.
Next time you load the model, these settings will be used.
```lms_protip
#### Reasons to set default load parameters (not required, totally optional)
- Set a particular GPU offload settings for a given model
- Set a particular context size for a given model
- Whether or not to utilize Flash Attention for a given model
```
## Advanced Topics
### Changing load settings before loading a model
When you load a model, you can optionally change the default load settings.
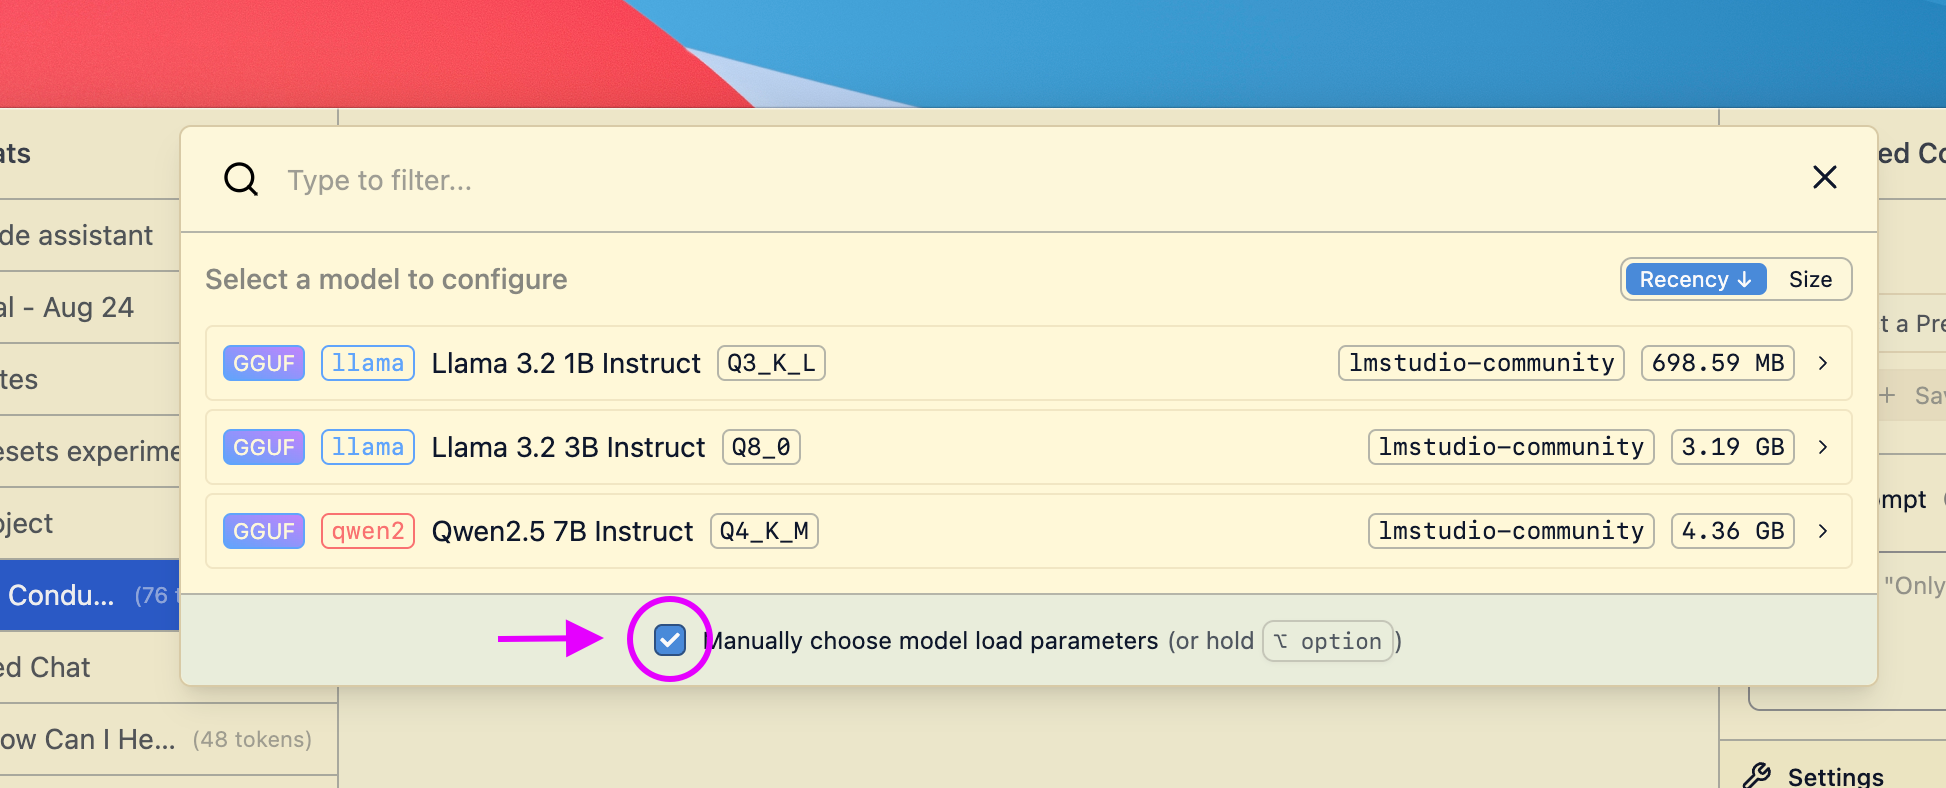 ### Saving your changes as the default settings for a model
If you make changes to load settings when you load a model, you can save them as the default settings for that model.
### Saving your changes as the default settings for a model
If you make changes to load settings when you load a model, you can save them as the default settings for that model.
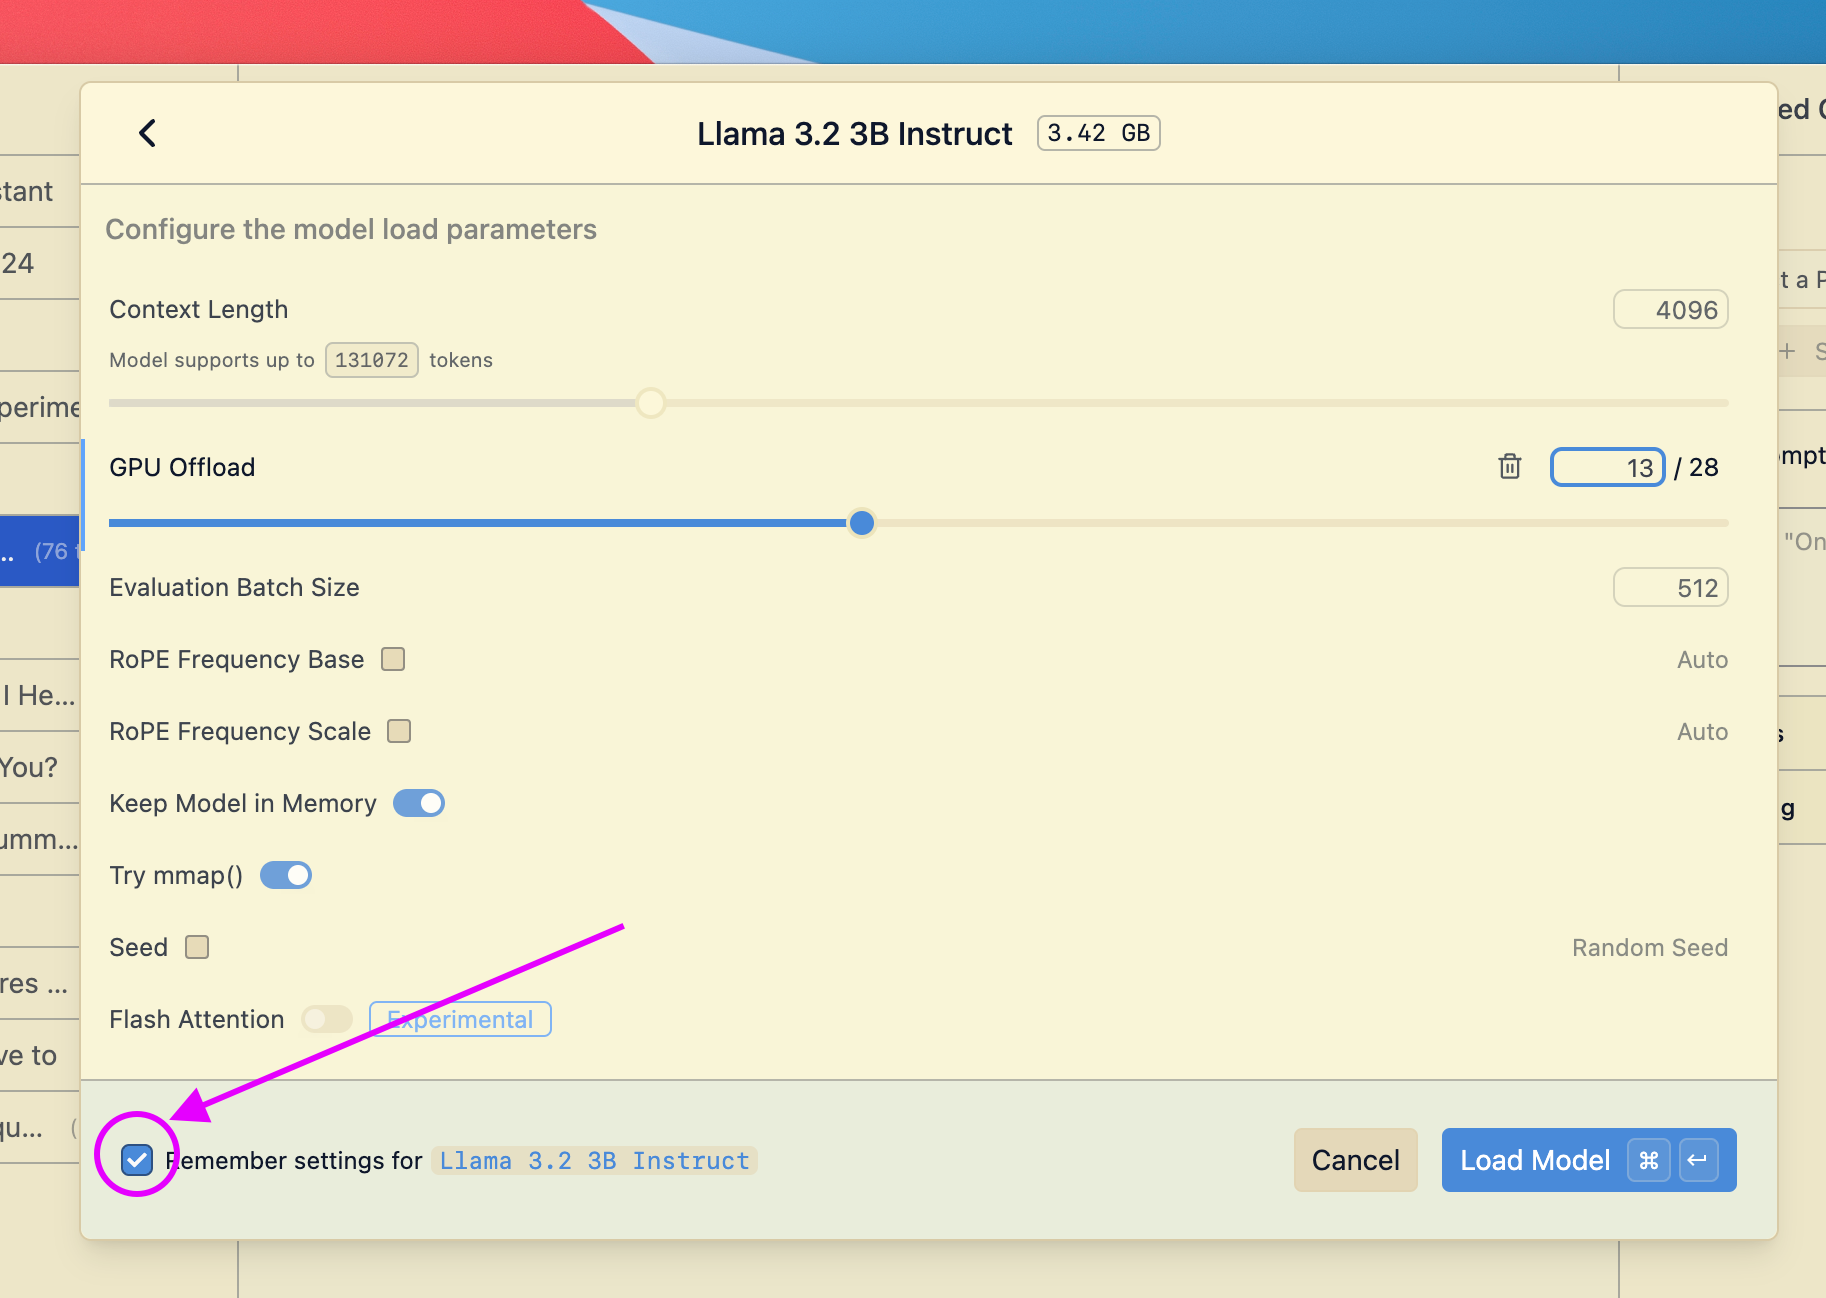
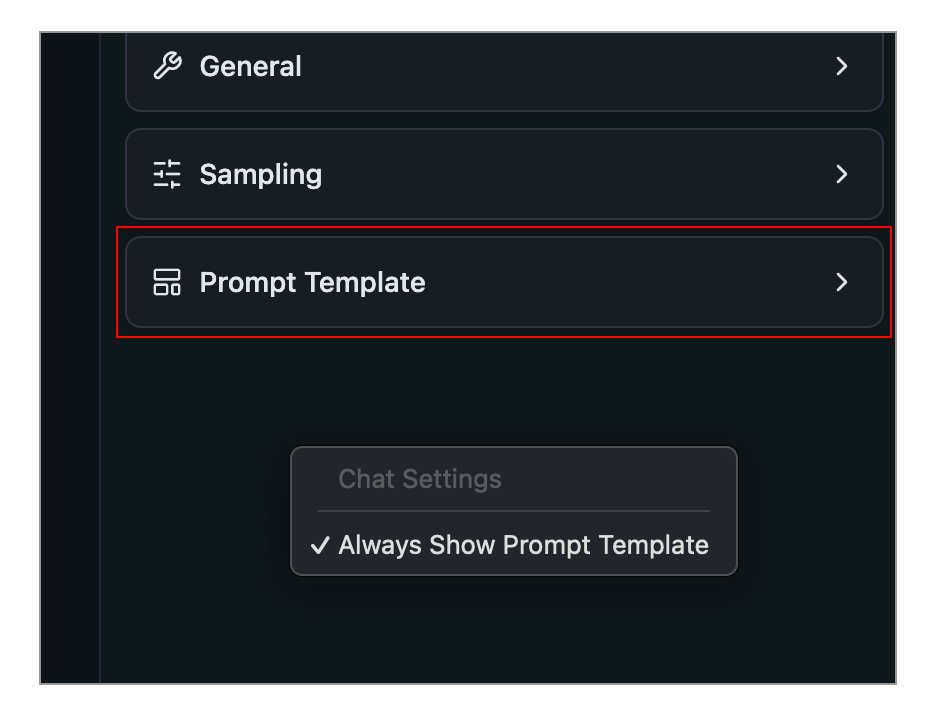 You can make this config box always show up by right clicking the sidebar and selecting **Always Show Prompt Template**.
### Prompt template options
#### Jinja Template
You can express the prompt template in Jinja.
###### 💡 [Jinja](https://en.wikipedia.org/wiki/Jinja_(template_engine)) is a templating engine used to encode the prompt template in several popular LLM model file formats.
#### Manual
You can also express the prompt template manually by specifying message role prefixes and suffixes.
You can make this config box always show up by right clicking the sidebar and selecting **Always Show Prompt Template**.
### Prompt template options
#### Jinja Template
You can express the prompt template in Jinja.
###### 💡 [Jinja](https://en.wikipedia.org/wiki/Jinja_(template_engine)) is a templating engine used to encode the prompt template in several popular LLM model file formats.
#### Manual
You can also express the prompt template manually by specifying message role prefixes and suffixes.
 ### Finding compatible draft models
You might see the following when you open the dropdown:
### Finding compatible draft models
You might see the following when you open the dropdown:
 Try to download a lower parameter variant of the model you have loaded, if it exists. If no smaller versions of your model exist, find a pairing that does.
For example:
Try to download a lower parameter variant of the model you have loaded, if it exists. If no smaller versions of your model exist, find a pairing that does.
For example: